
Payments Dashboard
Access and manage all membership transactions, search by user details, sort by date or status, and track payments across registration forms and gateways.
Last updated on Jul 15, 2026
Prerequisites
User Registration & Membership plugin installed and activated.
At least one payment gateway configured (PayPal, Stripe, Mollie, or Authorize.net) or at least one free registration form set up.
Accessing the Payments Dashboard
To open the Payments section, go to:
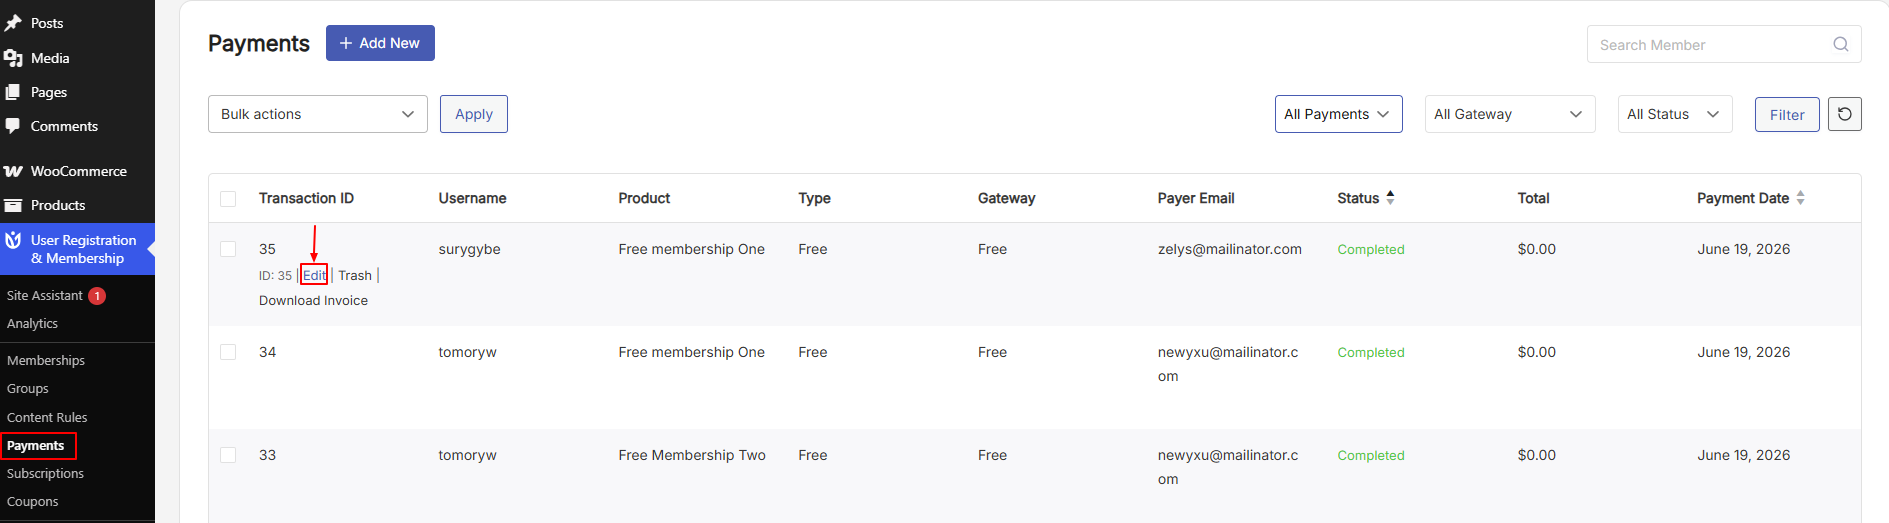
User Registration & Membership → PaymentsPayments Table
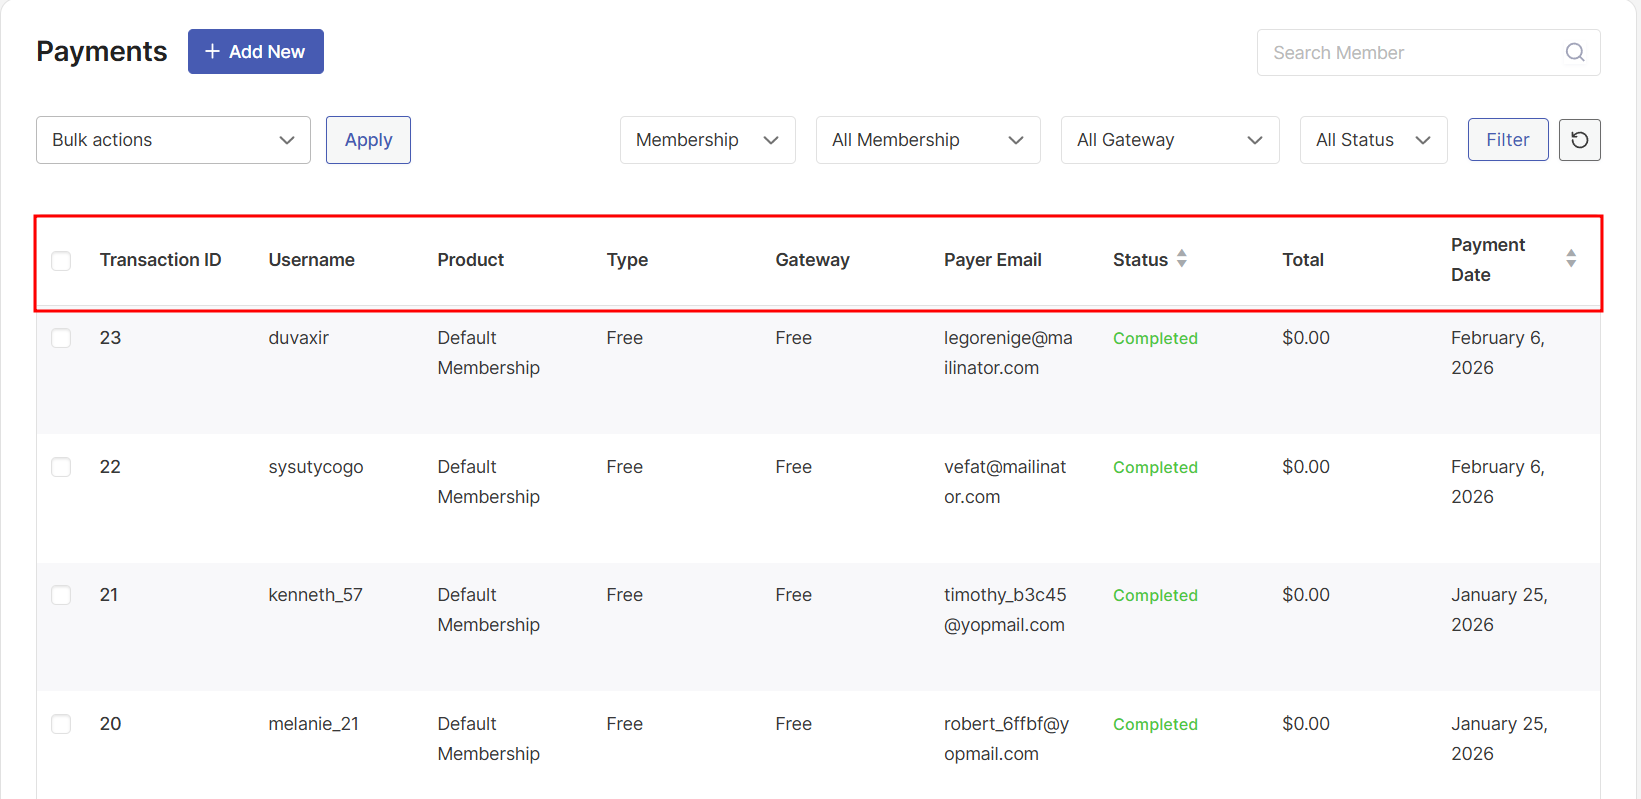
When you open the Payments page, you will see a table listing all recorded transactions on your site.
Each row in the table displays the following information:
Column | Description |
|---|---|
Transaction ID | A unique identifier for each payment record. |
Username | The WordPress username of the member who made the payment. |
Product | The membership plan or registration form associated with the payment. |
Type | Indicates whether the transaction is Free or Paid. |
Gateway | The payment gateway used to process the transaction. |
Payer Email | The email address of the member who completed the payment. |
Status | The current state of the transaction: Completed, Pending, Failed, or Refunded. |
Total Amount | The full amount charged for the transaction. |
Payment Date | The date the transaction was recorded. |
Search Payments
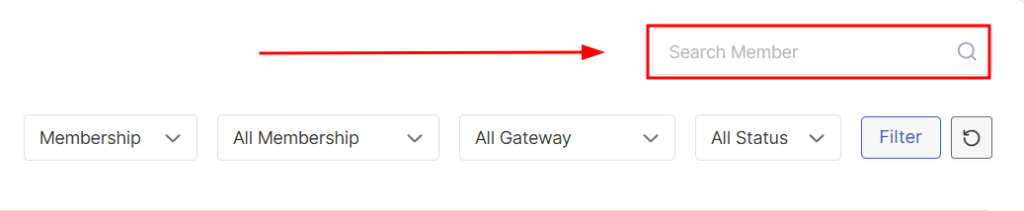
At the top of the Payments table, you will find a search bar that lets you quickly locate transactions associated with a specific member.
You can search using:
Username
Email address
This is useful when you need to find a specific transaction without applying multiple filters.
Sorting Payments
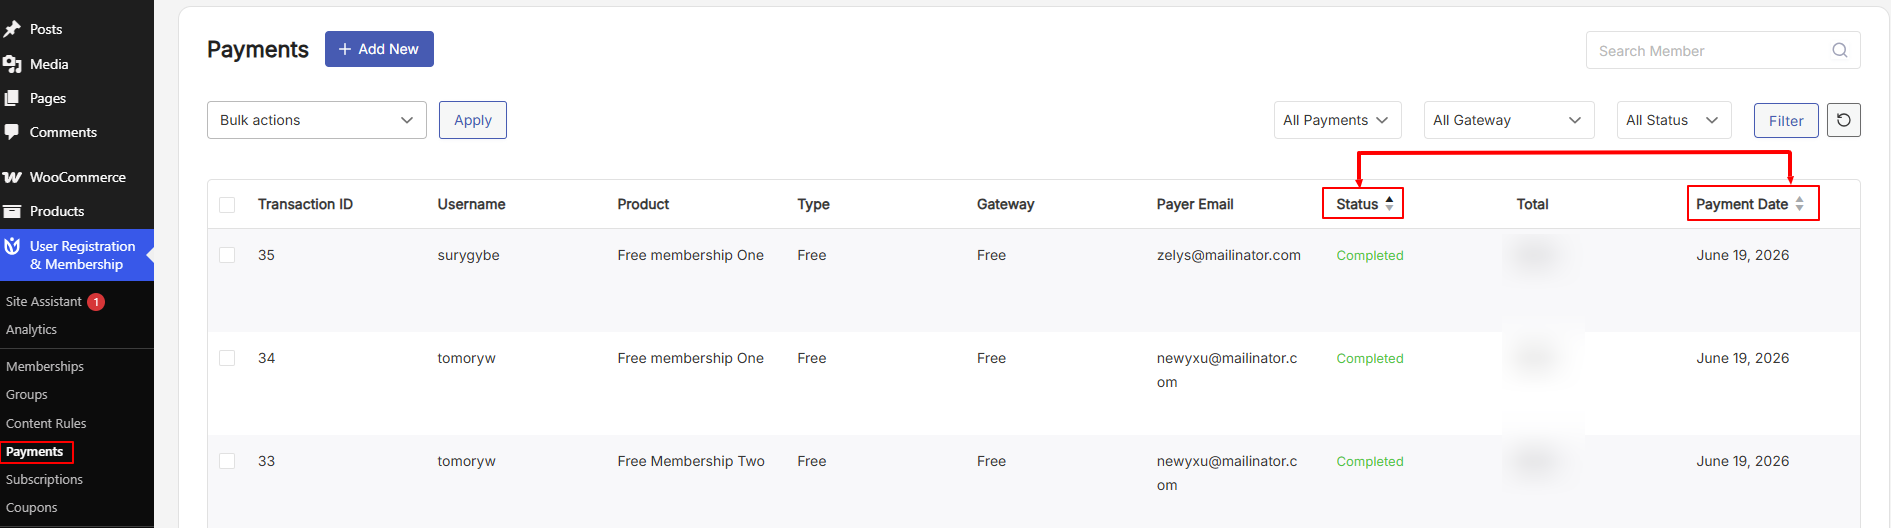
You can sort the payments table by clicking on any sortable column header. Sortable columns include:
Payment Date
Payment Status
Clicking the up-down arrow icon on a column header toggles between ascending and descending order, helping you quickly analyze payments by date or status.
Payment Filters
The Payments page includes filters to help you narrow down transactions based on your needs.
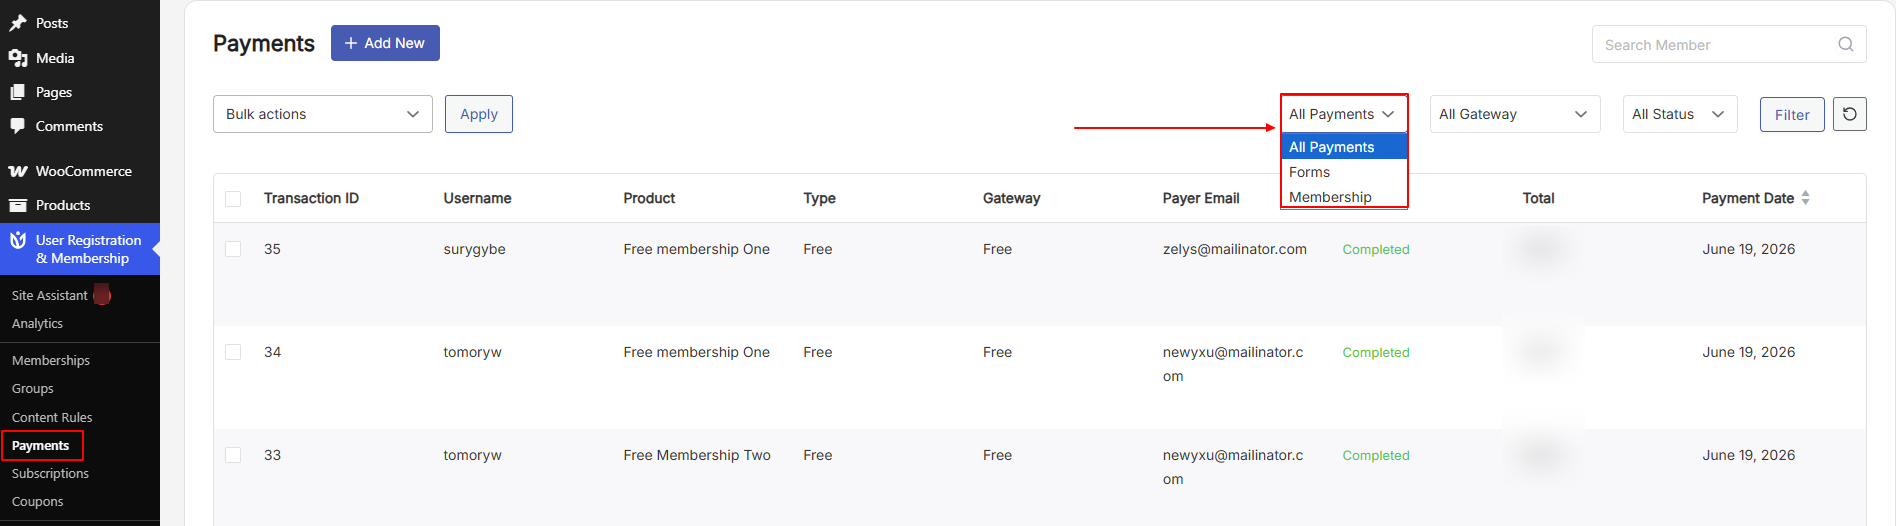
Module Filter
You can filter payments by the module they belong to:
Membership — Shows payments associated with membership plans.
Forms — Shows payments collected through registration forms.
Membership Filters
When Membership is selected as the module, the following filters become available:
Filter | Options |
|---|---|
Membership Plan | All memberships, or filter by a specific membership plan. |
Gateway | All gateways, PayPal, Stripe, Stripe (Credit Card), Mollie, Authorize.net. |
Payment Status | All statuses, Pending, Completed, Failed, or Refunded. |
After selecting your filters, click Filter to apply them. Click Reset to clear all selections and return to the full list.
Forms Filters
When Forms is selected as the module, you can filter payments by:
Filter | Options |
|---|---|
Form | All forms, or a specific registration form. |
Gateway | All gateways or a specific payment gateway. |
Payment Status | All statuses, Pending, Completed, Failed, or Refunded. |
This makes it easy to review payments collected through a specific registration form.
Managing Payments
The Payments section lets you review, update, and manage individual transactions. Each payment can be edited, updated, or removed as needed.
To open a payment record, click the Edit option below the Transaction ID in the Payments table.
Edit Payment Screen
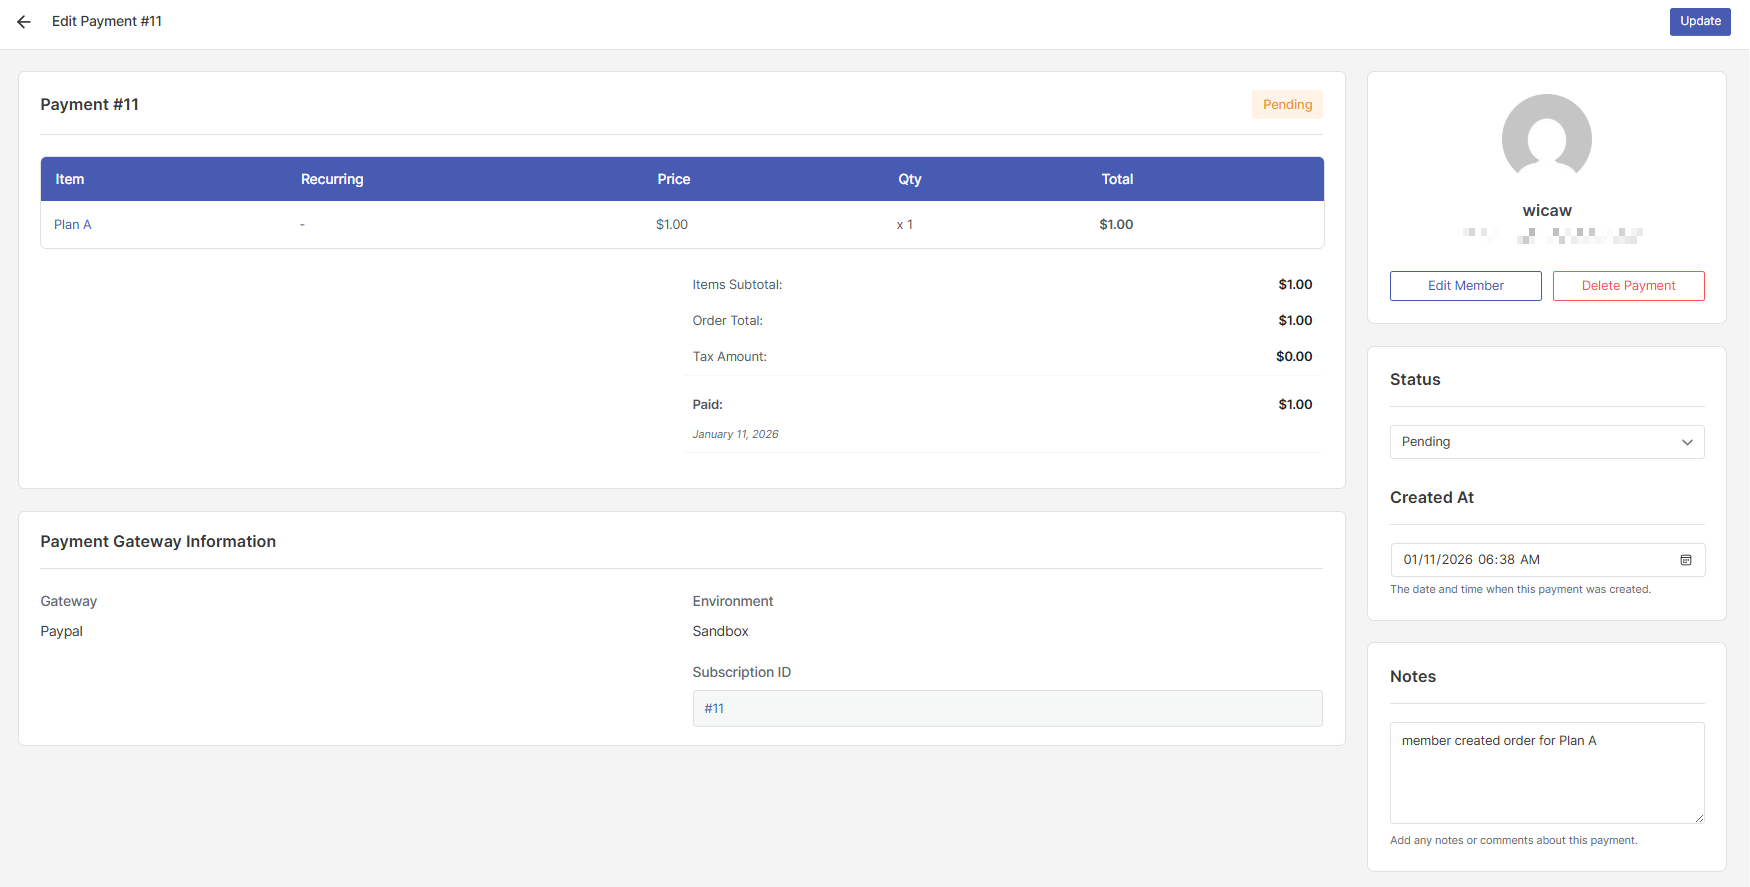
The Edit Payment screen gives you a detailed breakdown of the transaction and lets you update the status, adjust the creation date, and add internal notes.
Payment Details
This section is read-only and lets you verify the details recorded for the transaction, including the purchased membership plan and tax breakdown.
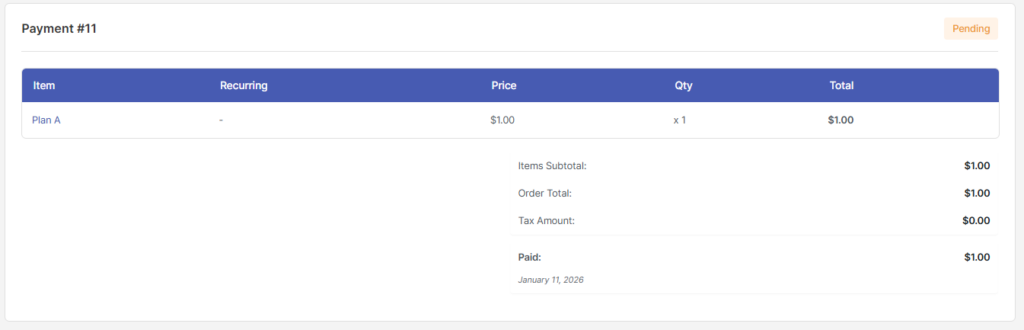
It displays the following:
Item name
Price
Quantity
Subtotal
Order total
Tax amount
Payment date
Payment Gateway Information
This section shows technical details about how the transaction was processed.

Here you can view:
Payment gateway used — The gateway that processed the transaction (e.g., Stripe, PayPal).
Environment — Whether the payment was made in Live or Test mode.
Subscription ID — Displayed if the transaction is linked to a recurring subscription.
Member Actions
This sidebar panel shows the username and email address of the member associated with the payment, helping you quickly identify the payer.
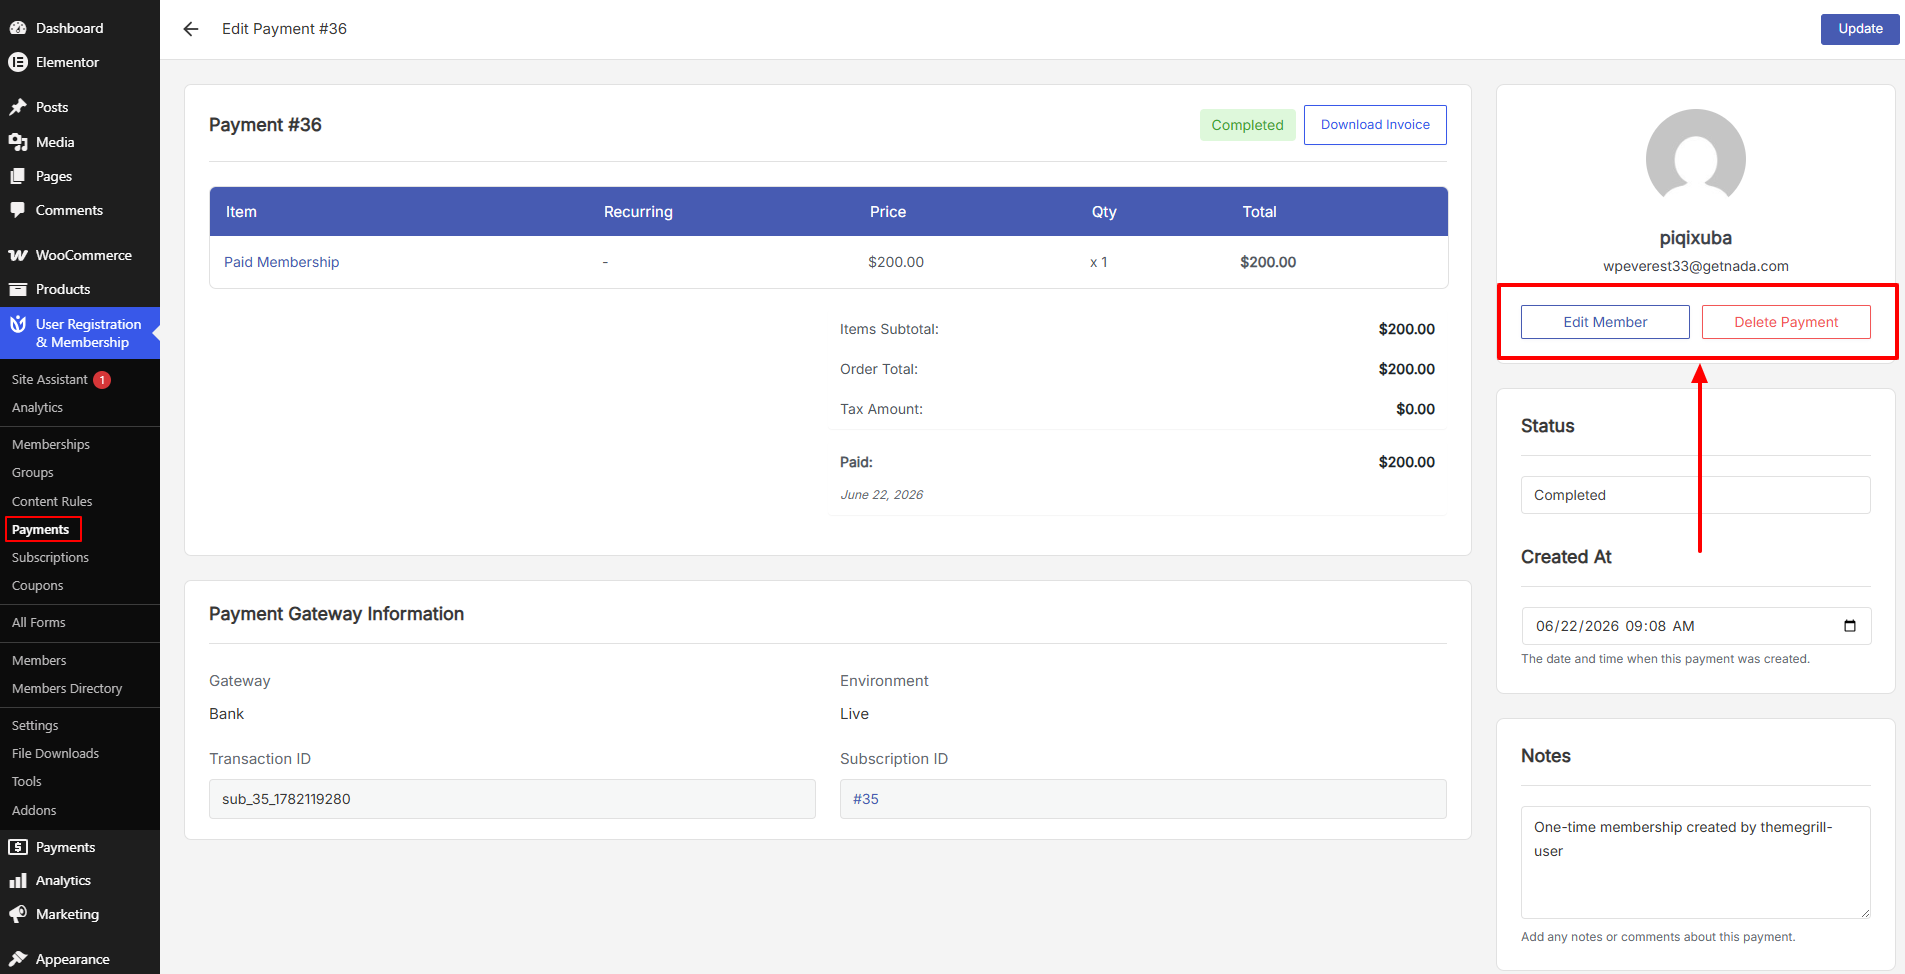
From this panel, you can:
Edit Member — Opens the member's profile so you can view or update their account details.
Delete Payment — Permanently removes the payment record from your site.
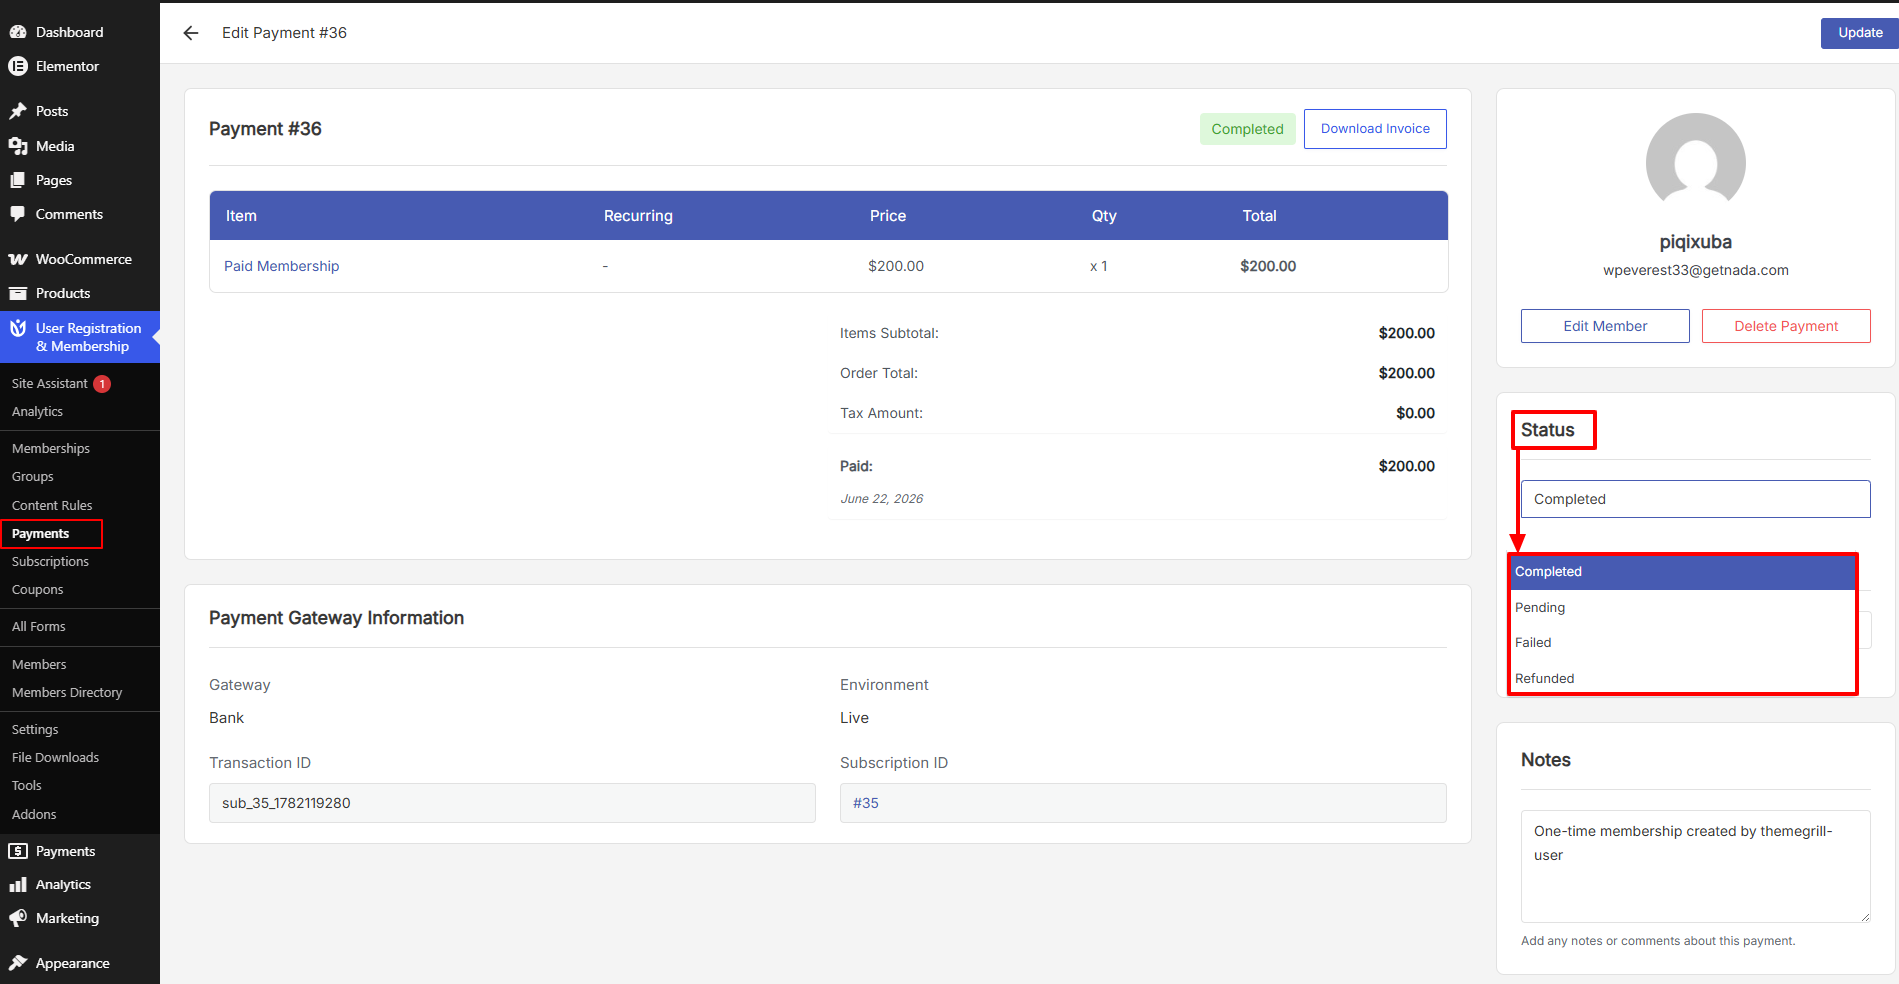
Status
The Status field shows the current state of the transaction and lets you update it if needed.
Available statuses are:
Status | Description |
|---|---|
Pending | Payment has been initiated but not yet completed. |
Completed | Payment was successfully processed. |
Failed | The payment attempt was unsuccessful. |
Refunded | Payment was returned to the member. |
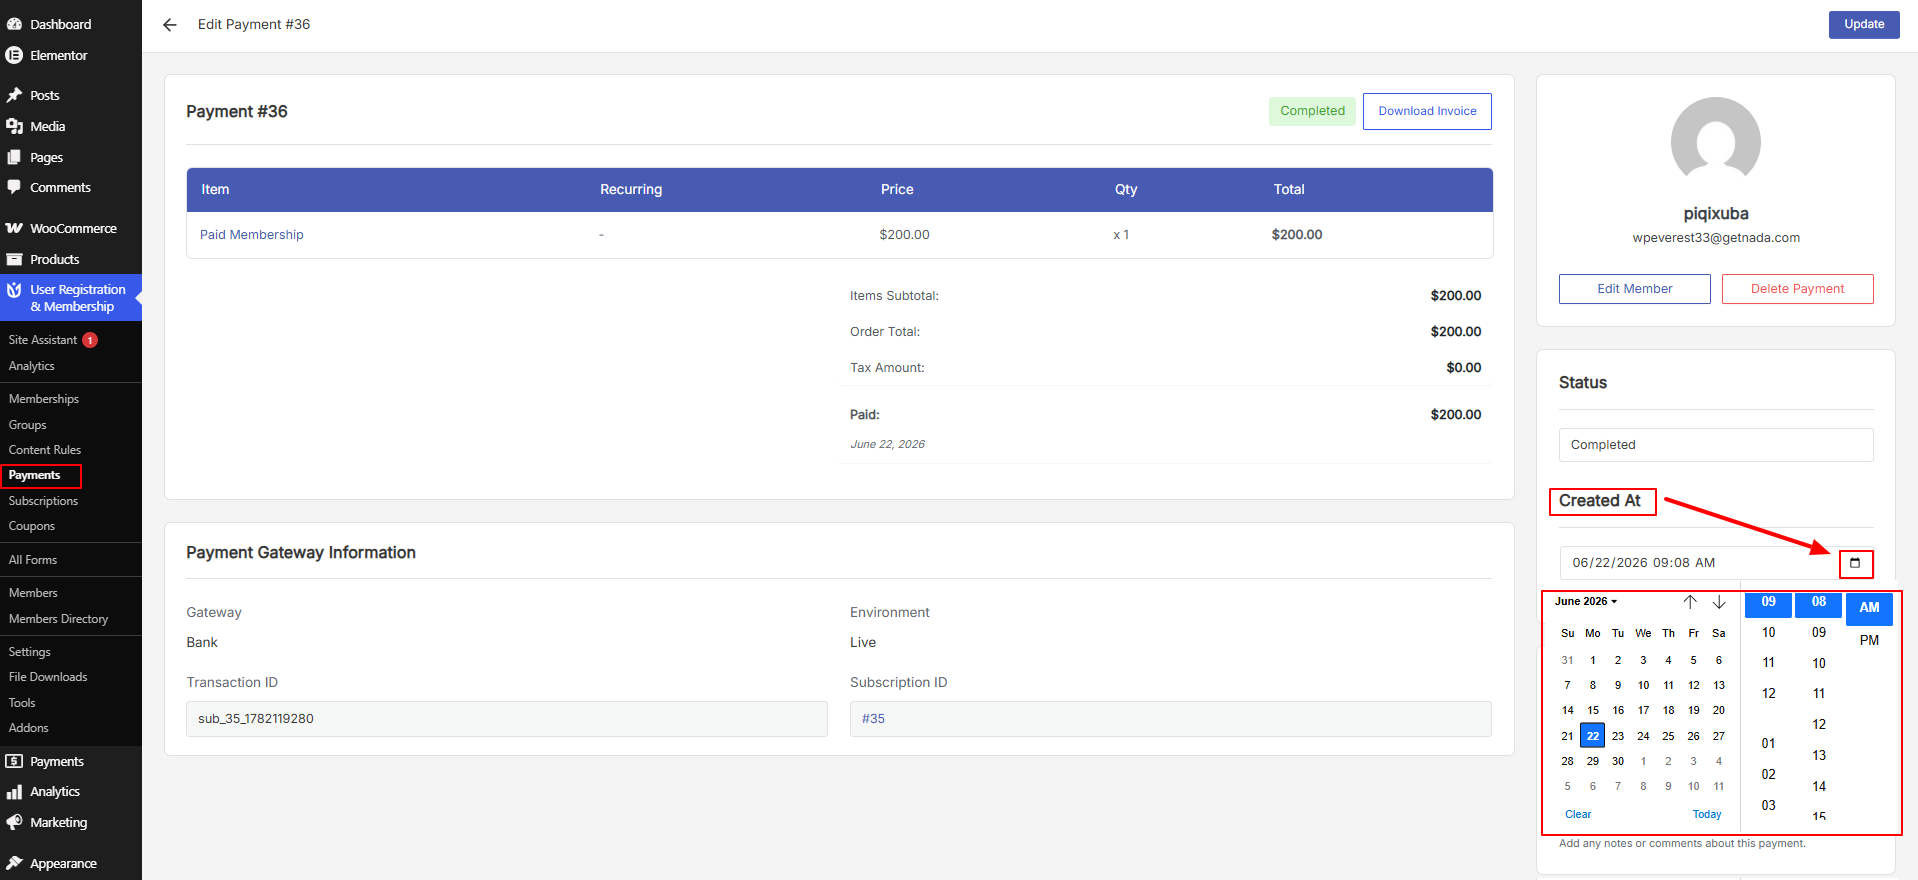
Created At
Shows the date and time when the payment record was created.
Clicking the calendar icon opens a date and time selector, allowing you to manually adjust the creation timestamp. This is useful when recording payments that occurred in the past or correcting an incorrect timestamp.
Notes
The Notes section lets administrators add internal comments to a payment record. Notes are visible to admins only and are not shown to members.
You can use notes for:
Recording manual adjustments
Adding context for refunds or failed payments
Leaving internal references for future review
How to Edit the Status of a Payment
To change the status of an existing payment:
Go to User Registration & Membership → Payments.
Locate the transaction and click Edit under its Transaction ID.
Find the Status panel on the right side of the screen.
Select the appropriate status from the dropdown.
Click Update to save the change.
Keeping statuses up to date ensures your transaction records remain accurate for reporting and audits.
How to Modify the Creation Date of a Payment
To update the Created At timestamp for a payment:
Open the payment record from the Payments table.
Click the calendar icon next to the Created At field.
Select the correct date and time.
Click Update to save the changes.
This is useful when:
Logging payments that were processed outside the system.
Correcting an incorrect timestamp.
Recording offline or delayed transactions.
How to Delete a Payment
To permanently remove a payment record:
Open the payment from the Payments table.
Click Delete Payment in the Member Actions panel.
Confirm the deletion when prompted.
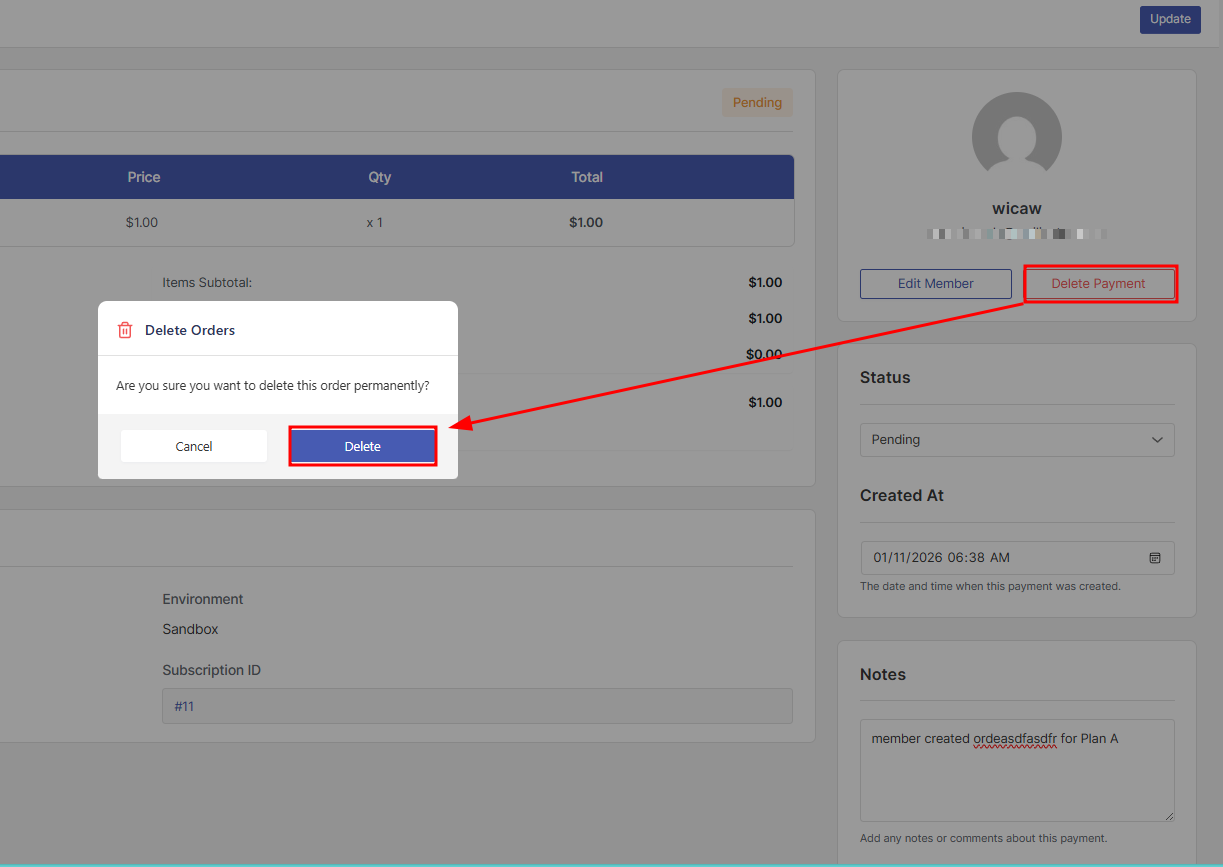
Important: Deleted payments are permanently removed and cannot be restored. Make sure you want to delete the record before confirming.
How to Record a Payment Manually
You can manually record a transaction to account for missed, offline, or external payments that were not captured automatically.
To add a manual payment:
Go to User Registration & Membership → Payments.
Click Add New at the top of the page.

This opens the Add New Payment screen.
Select the member for whom you are recording the payment.
Review the associated membership plan.
Enter the amount, payment method, payment date, and transaction status.
Optionally, add internal notes in the Notes field for reference.
Click Add Payment to save the record.
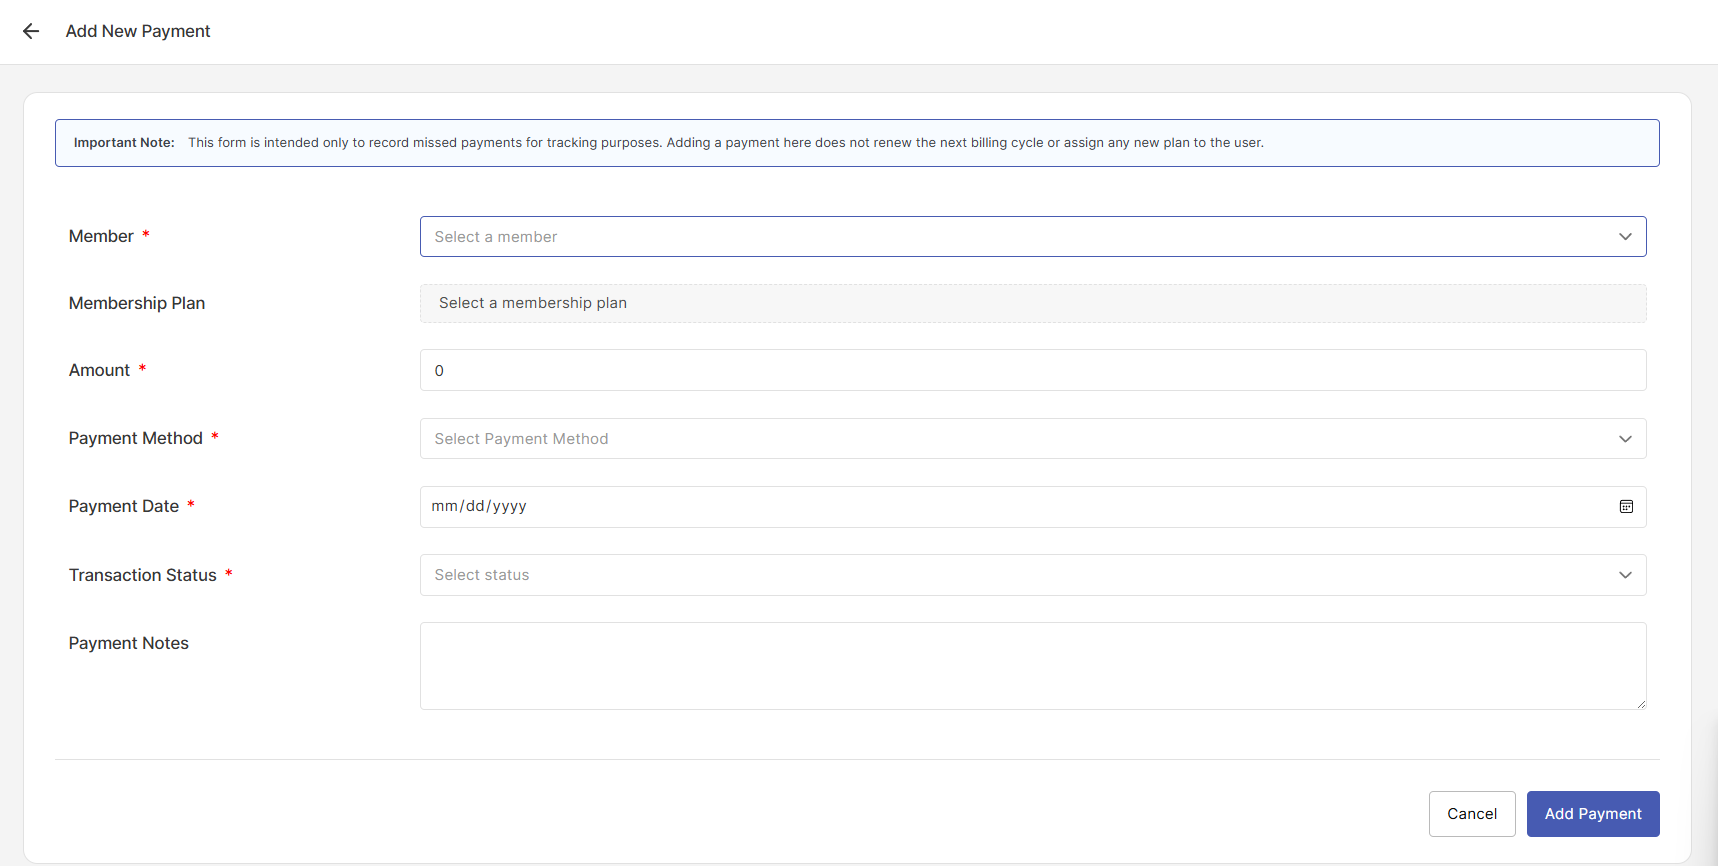
Manually added payments are recorded for tracking purposes only. They do not renew subscriptions, extend billing cycles, or assign new membership plans to the member.
How to Add a Note to a Payment
You can add or update a note for any payment record at any time.
Open the payment record from the Payments table.
Enter your comments in the Notes field.
Click Update to save.
Notes are for internal use only and do not affect the payment status or the member's membership.
The Payments Dashboard gives you full control over all transactions on your site. You can search, sort, filter, edit statuses, adjust timestamps, record manual entries, and maintain internal notes — all from a single screen. For managing active subscriptions tied to these payments, refer to the Membership Subscriptions documentation.