
Customize My Account
ProTransform your default member dashboard into a branded experience by adding custom tabs, content, and styling through the Customize My Account add-on.
Last updated on Aug 14, 2026
Would you like to create a professional member dashboard that matches your brand? User Registration & Membership allows you to customize the My Account page with custom tabs, content, and styling options. This tutorial will show you how to install and configure the Customize My Account add-on to build a personalized member experience.
Before getting started, make sure you've installed and activated the User Registration & Membership pro plugin. Then, make sure you've purchased a Plus plan or higher, as the Customize My Account add-on requires a premium license.
Installing the Customize My Account Add-on
To install the add-on, go to User Registration & Membership > Addons in your WordPress dashboard.
Here, you'll see a list of all available add-ons for your license level.
Scroll down to find the Customize My Account add-on. Toggle the switch next to it to activate.
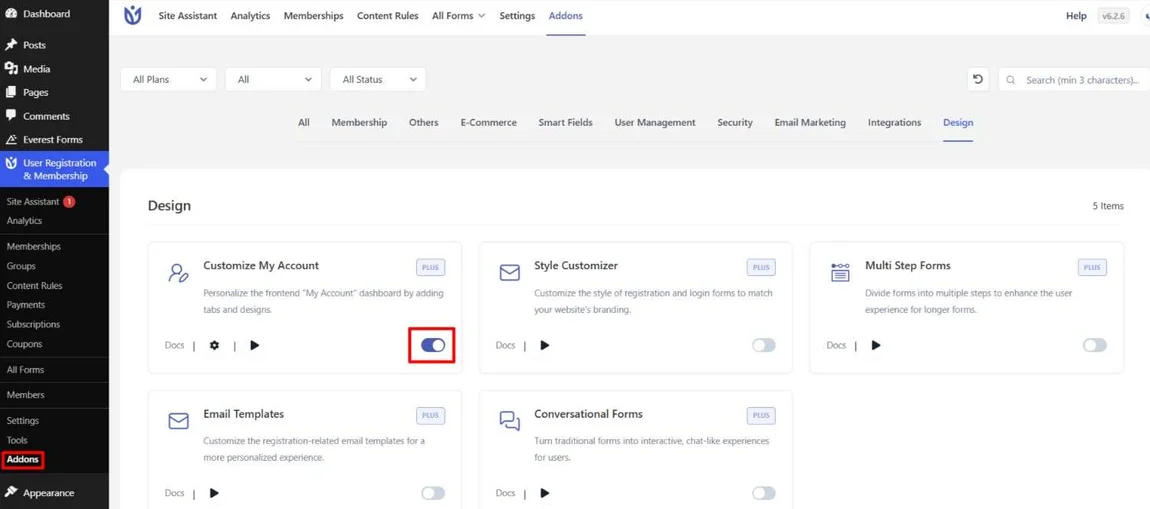
Once activated, the toggle will turn blue and the add-on is ready to use.
If you don't see the Customize My Account add-on, verify that you have an active Plus, Professional, or ThemeGrill Agency plan license.
Accessing the Customization Settings
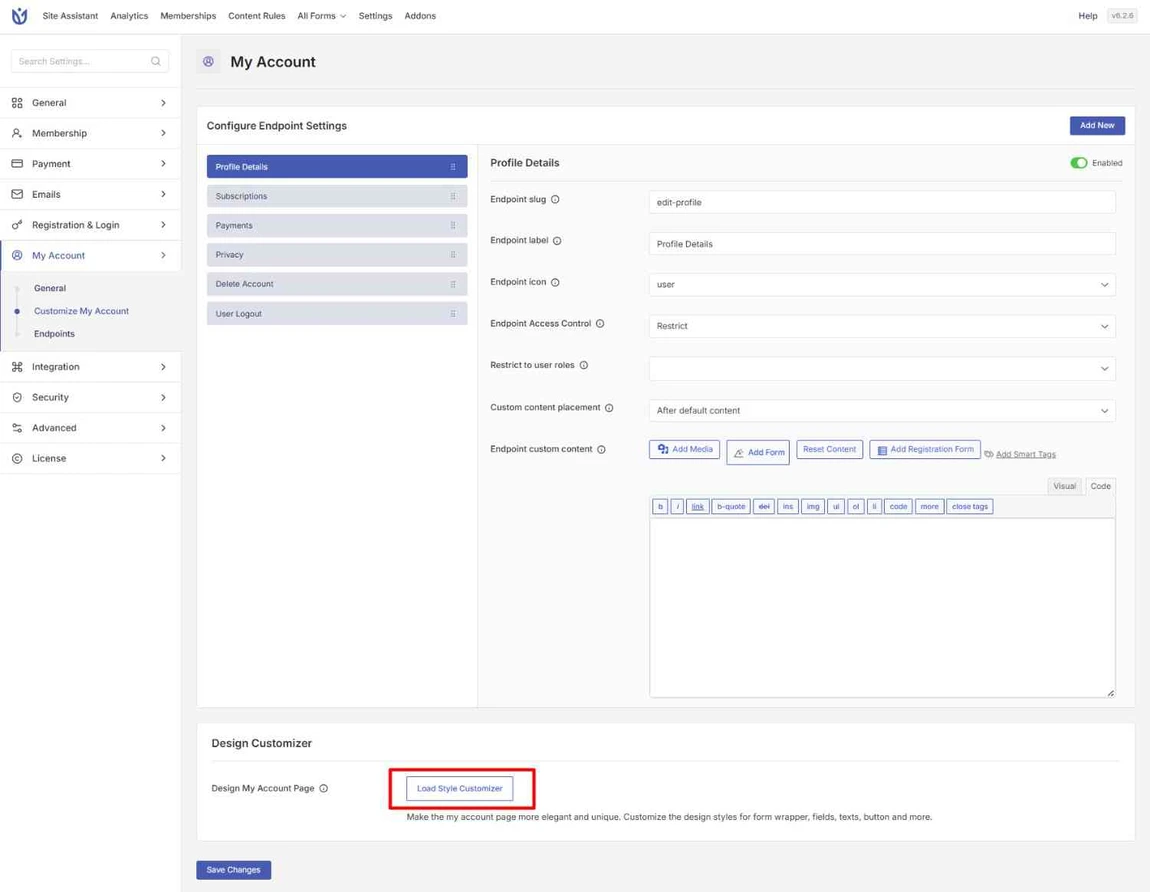
After activating the add-on, go to User Registration & Membership > Settings > My Account.
Click the Customize My Account tab to access the customization interface.
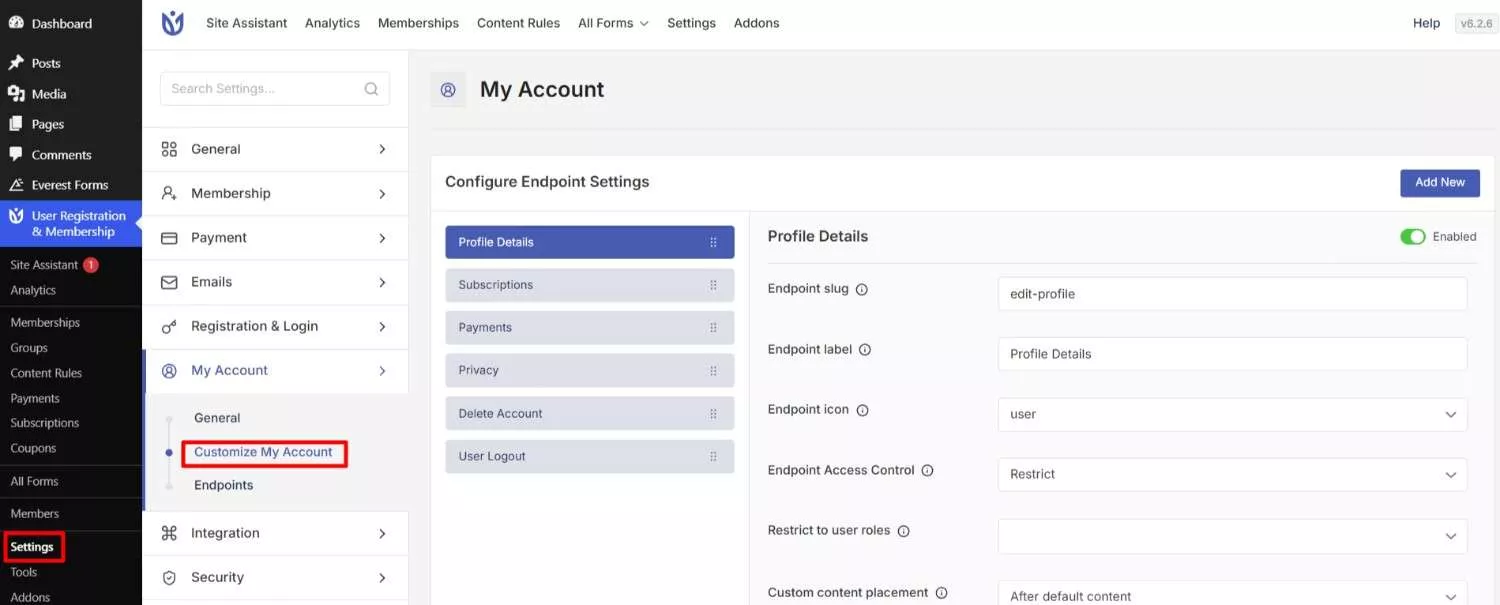
Here, you'll see two main sections:
Configure Endpoint Settings - Configure individual tabs and their settings
Design Customizer - Opens the live visual customization panel
Understanding Default Endpoints
The My Account page comes with default endpoints that cannot be deleted:
Profile Details – Allows members to view their profile details.
Edit Profile – Allows members to update their profile information.
Edit Password – Allows members to change their password.
Subscriptions – Displays the member’s subscription details.
Payments – Displays the member’s payment information.
Privacy – Provides privacy-related options.
Delete Account – Allows members to delete their account.
User Logout – Allows members to log out.
These default endpoints cannot be completely removed, but you can enable or disable them based on your requirements.
Adding Custom Tabs
To add a new tab to the My Account page, click the Add New button at the top of the endpoint list.
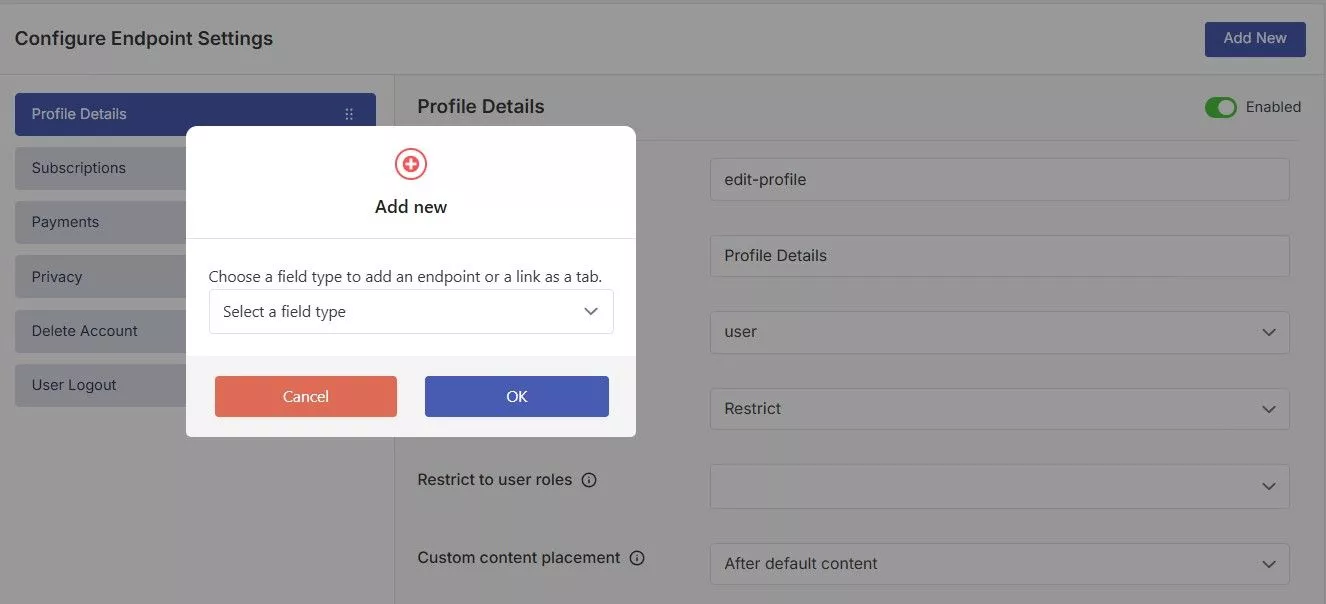
You have two options when creating a new tab:
Option 1: Endpoint Tab with Custom Content
Select Endpoint to create a tab with custom content displayed directly in the My Account area.
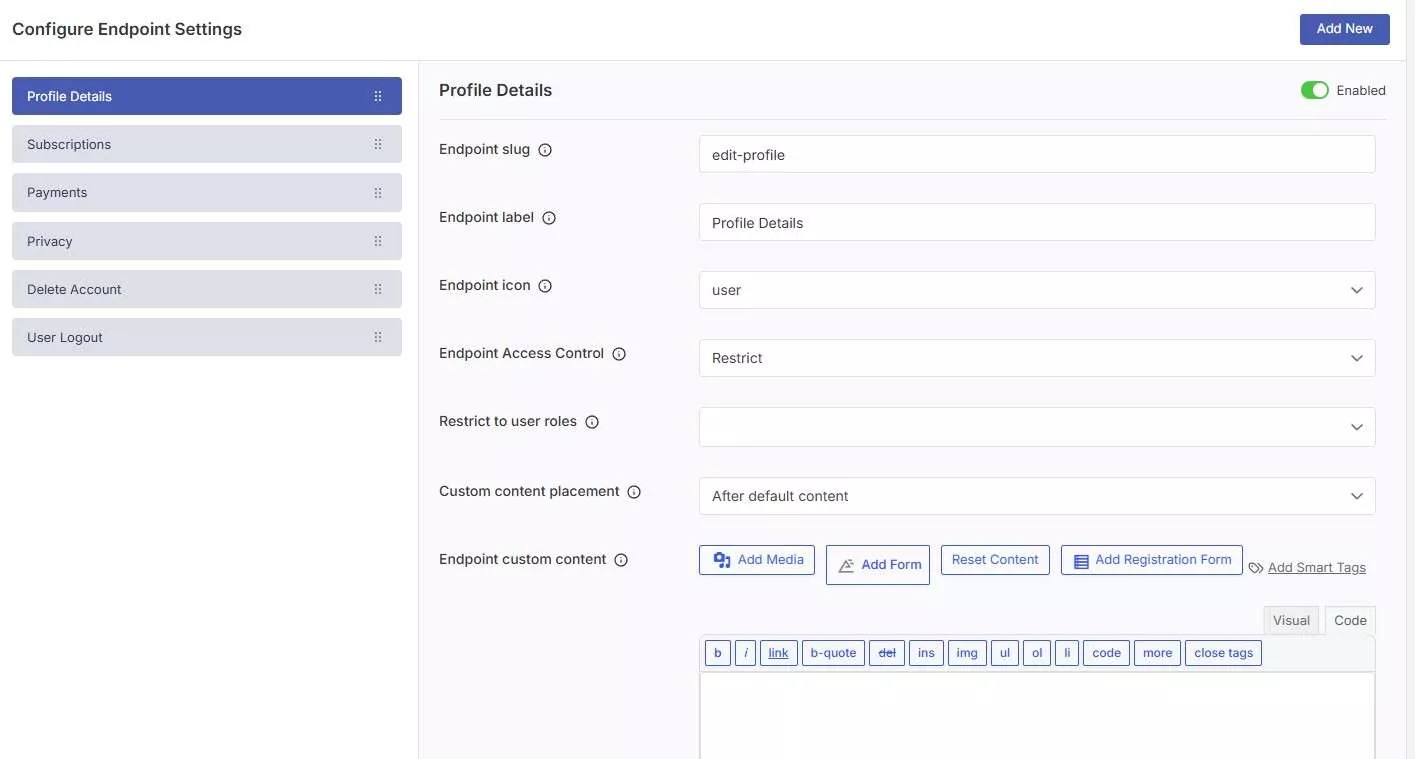
Configure the following settings:
Endpoint Slug – Enter a unique, URL-friendly name (e.g., resources). This creates the URL yoursite.com/my-account/resources.
Endpoint Label – Enter the text that will appear in the navigation menu (e.g., Member Resources).
Endpoint Icon – Click the icon selector to choose an icon from the available library.
Endpoint Access Control – Define which users or members can access the custom endpoint.
Restrict to User Roles – Select the user roles that should have access to the custom endpoint.
Custom Content Placement – Choose Before, After, or Override to control where the custom content appears.
Custom Content – Use the editor to add your content, including text formatting, images, and smart tags.
Option 2: Link Tab to Another Page
Select Link to create a tab that redirects to another page when clicked.
Configure the following settings:
Link Type – Choose between External URL or Internal Page.
Link URL – Enter the full URL for an external link or select a WordPress page for an internal link.
Link Label – Enter the text that will appear in the My Account navigation menu.
Link Icon – Select an icon to display next to the link in the My Account navigation menu.
Endpoint Access Control – Define which users or members can access the link.
Restrict to User Roles – Select the user roles that should have access to the link.
Open in New Tab – Enable this option to open the link in a new browser tab.
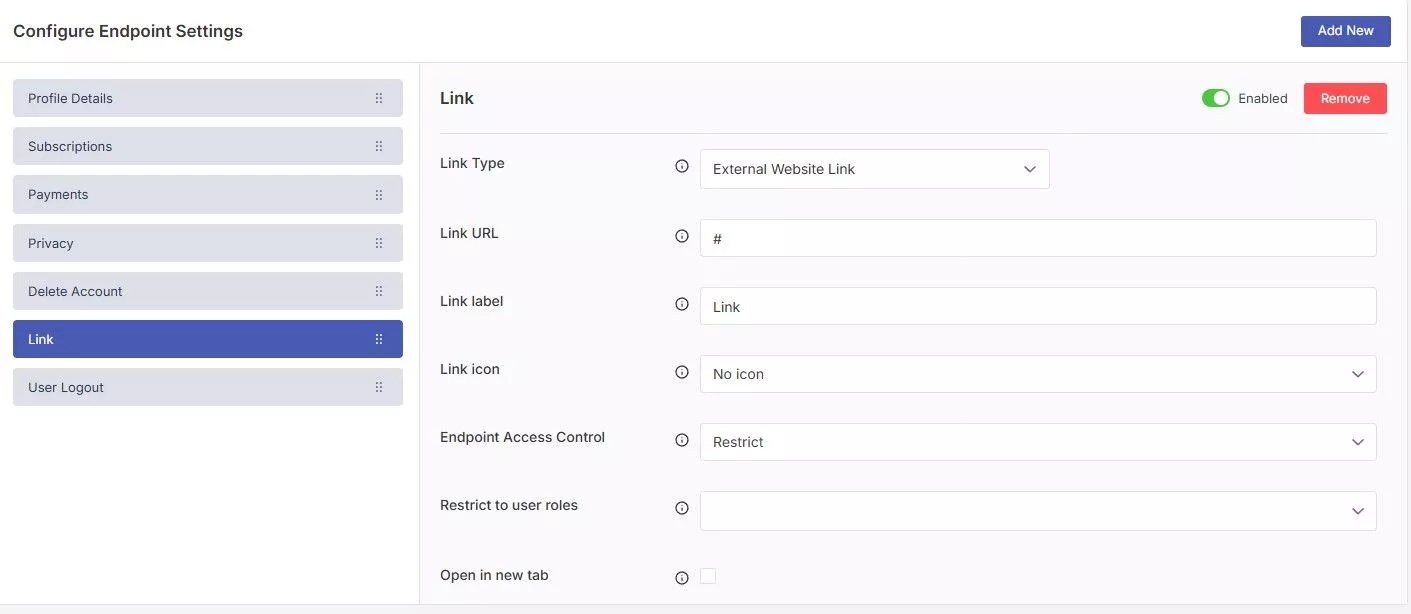
Click Save to add the link to your My Account menu.
Configuring Access Control for Tabs
Access control determines who can see each tab based on user roles.
To configure access control, click on any endpoint to open its settings.
Scroll to the Access Control section. You have two options:
Access - Only selected user roles can see this tab
Restrict - Selected user roles cannot see this tab
After choosing Access or Restrict, select the user roles from the dropdown menu.
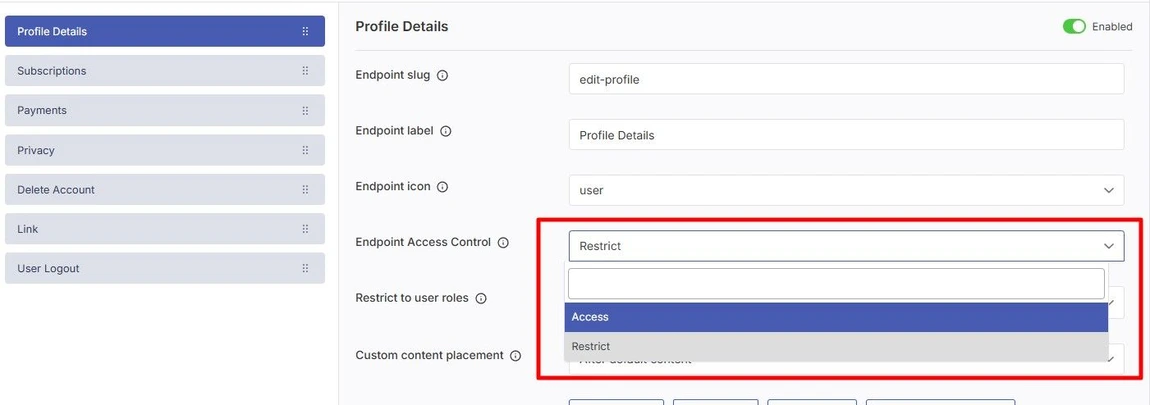
For example, if you select Access and choose Subscriber, only subscribers will see that tab. Other roles won't see it in their navigation.
Adding Custom Content with Smart Tags
Smart tags are placeholders that automatically display the logged-in member's information.
To add custom content to an endpoint, click on the endpoint to open its settings.
For the Dashboard endpoint, enable Modify default content to replace the default message.
Use the content editor to add your message. The editor supports:
Text formatting - Bold, italic, headings, lists
Images and media files
Links to internal pages or external URLs
Smart tags for dynamic content
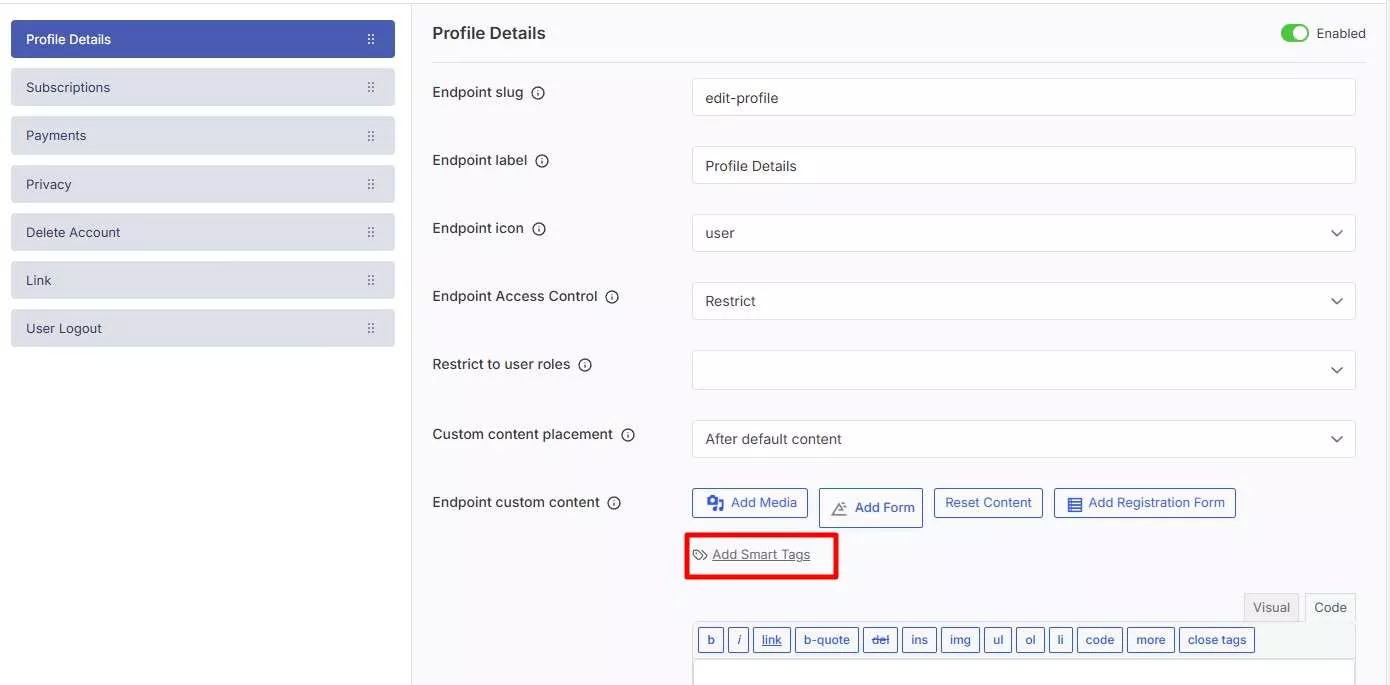
Available smart tags include:
{{first_name}} - Member's first name
{{last_name}} - Member's last name
{{username}} - Member's username
{{email}} - Member's email address
{{display_name}} - Member's display name
Choose where to place your custom content:
Before - Content appears above the default endpoint content
After - Content appears below the default endpoint content
Override - Your content completely replaces the default content
Organizing Tabs with Drag and Drop
To reorder tabs, go to User Registration & Membership > Settings > My Account > Customize My Account.
Here, you'll see the complete list of all endpoints in your My Account menu.
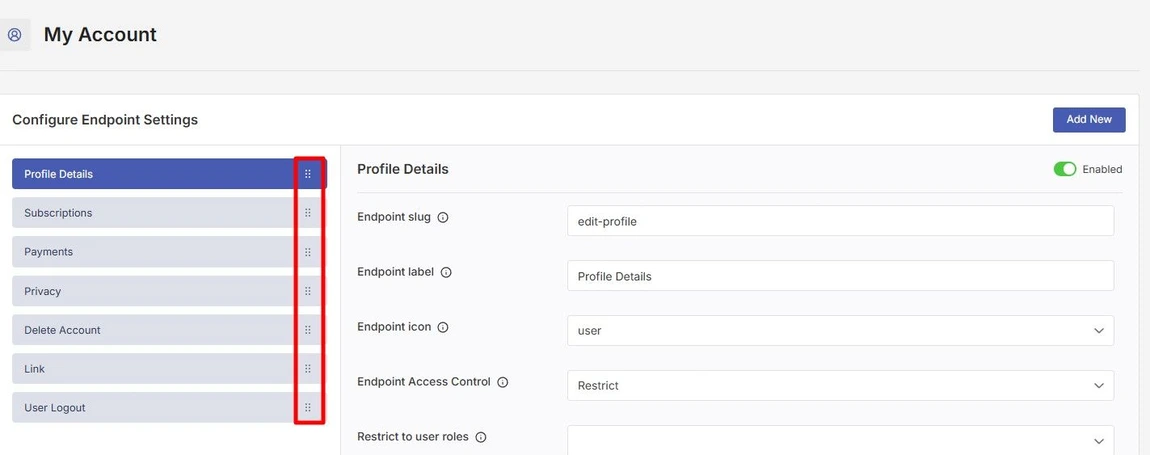
To change the tab order:
Hover over the endpoint you want to move
Click and hold the drag handle (six dots icon)
Drag the endpoint up or down to the desired position
Release to drop it in the new position
The order you set here is the order members will see in their My Account navigation.
Hiding and Deleting Tabs
To hide a tab without deleting it, click on the endpoint to open its settings.
Toggle the Enabled option to off. The tab will be hidden from the My Account page but remains in your settings for future use.
To delete a custom tab, click on the endpoint you want to remove. Scroll to the bottom of the settings panel and click the Delete button.
Default tabs (Edit Profile, Edit Password, User Logout etc) cannot be deleted. You can only hide or customize them.
Customizing Page Styling
The Style Customizer lets you change the visual appearance of your My Account page.
To open the Style Customizer, go to User Registration & Membership > Settings > My Account > Customize My Account.
Click the Load Style Customizer button.
The customizer has six sections for styling different elements:
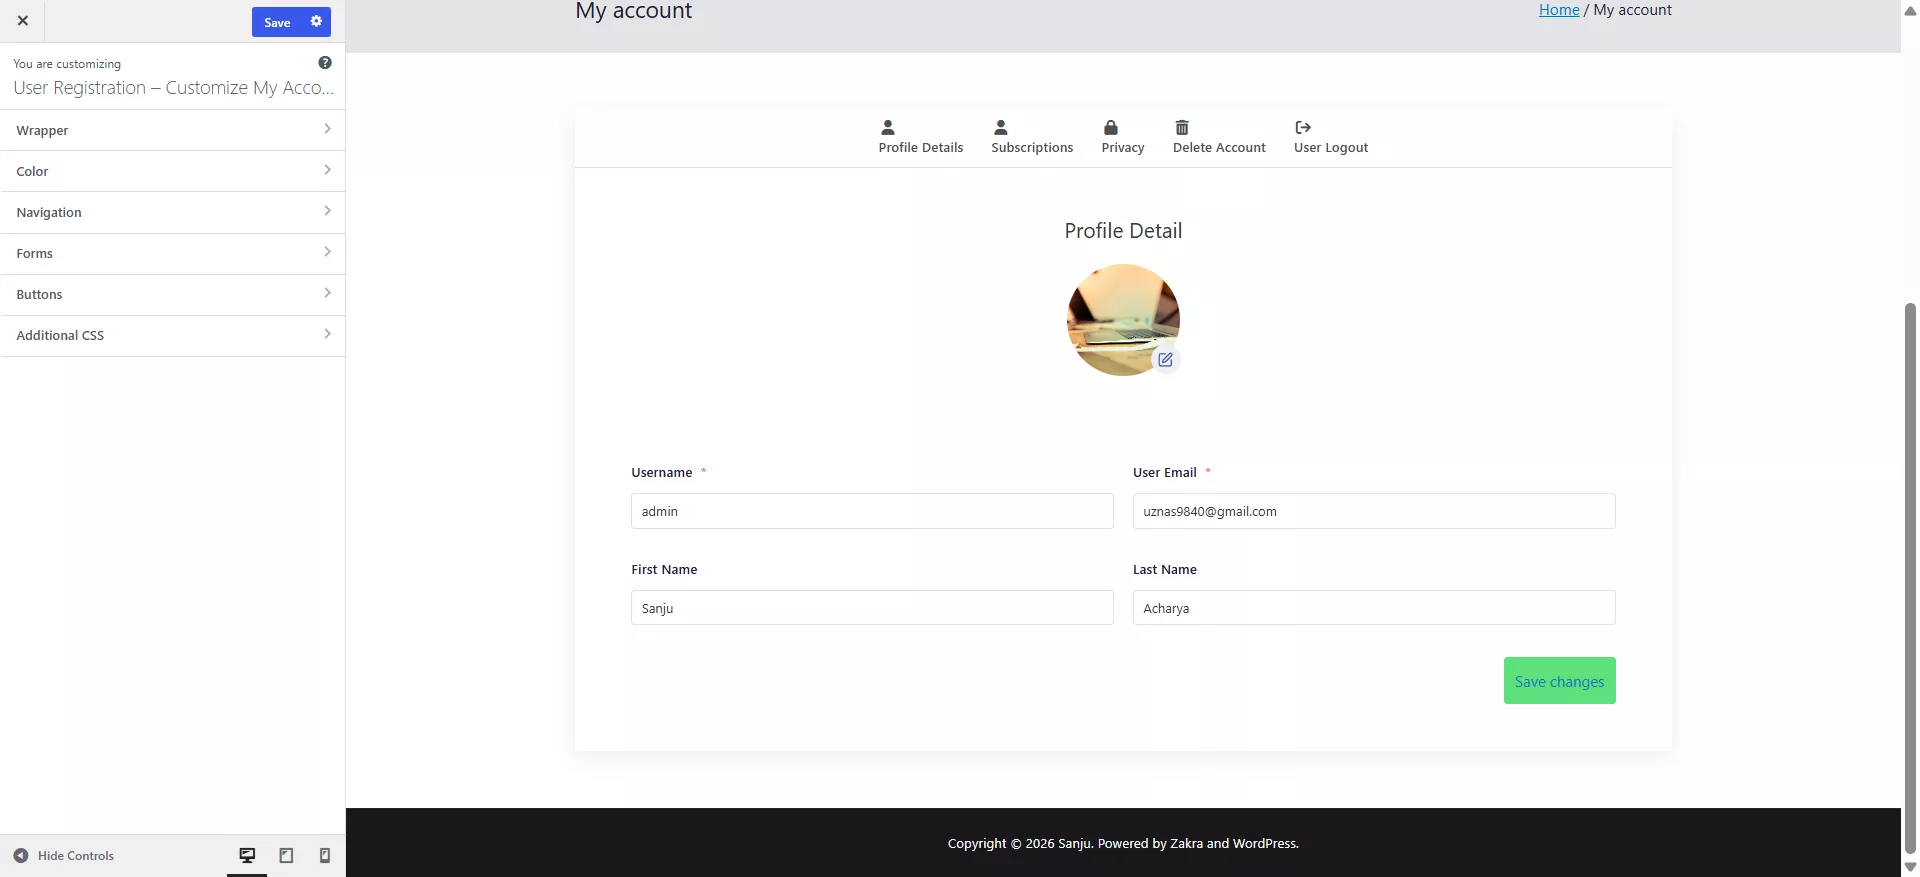
Wrapper Settings
Controls the overall container and layout of the My Account page.
Available options:
Background Color – Set the background color for the entire My Account area.
Border Type – Choose the border style, such as solid, dashed, dotted, or none.
Border Radius – Adjust the corner radius of the My Account area.
Content Padding – Set the spacing between the content and the edges of the My Account area.
Margin – Set the spacing around the My Account area.
Color Settings
Controls text and link colors throughout the My Account page.
Available options:
Heading Color – Set the default color for headings in the My Account area.
Body Color – Set the default color for body text.
Link Color – Set the color for clickable links.
Link Hover Color – Set the color displayed when users hover over links.
Navigation Settings
Controls the appearance of the My Account tab navigation menu.
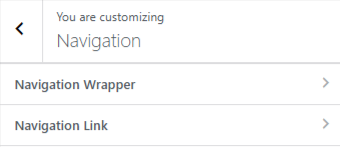
Controls the appearance of the My Account tab navigation menu.
The navigation settings are divided into two categories:
Navigation Wrapper
Navigation Style – Choose between Vertical or Horizontal navigation.
Background Color – Set the background color of the navigation wrapper.
Border Type – Choose the border style, such as solid, dashed, dotted, or none.
Border Radius – Adjust the corner radius of the navigation wrapper.
Navigation Link
Background Color – Set the background color of the navigation links.
Background Hover Color – Set the background color displayed when users hover over a navigation link.
Text Color – Set the text color of the navigation links.
Text Hover Color – Set the text color displayed when users hover over a navigation link.
Border Type – Choose the border style for the navigation links.
Border Hover Color – Set the border color displayed when users hover over a navigation link.
Border Radius – Adjust the corner radius of the navigation links.
Padding – Set the spacing inside the navigation links.
Form Settings
Controls the styling of forms within the My Account page.
The Form Settings are divided into three categories:
Field Label
Controls the appearance and styling of field labels, including their color, typography, and spacing.
Field Styles
Controls the appearance of form fields, including their background, border, border radius, text color, padding, and other styling options.
Checkbox/Radio Styles
Controls the appearance of checkbox and radio button fields, including their colors, borders, size, and other styling options
Button Settings
Controls the appearance of buttons throughout the My Account page.
Available options:
Font Size – Set the font size of the button text.
Background Color – Set the button's default background color.
Background Hover Color – Set the background color displayed when users hover over the button.
Text Color – Set the default color of the button text.
Text Hover Color – Set the text color displayed when users hover over the button.
Margin – Set the spacing around the button.
Padding – Set the spacing inside the button.
Additional CSS
Use the Additional CSS section to add custom CSS code for advanced styling or to override the default appearance of your My Account page. Enter your CSS in the editor and click Publish to save your changes.
Testing Your Customizations
After configuring your My Account page, test it to ensure everything works correctly.
Log out of your WordPress admin account. Then, log in as a regular member to view the My Account page from a member's perspective.
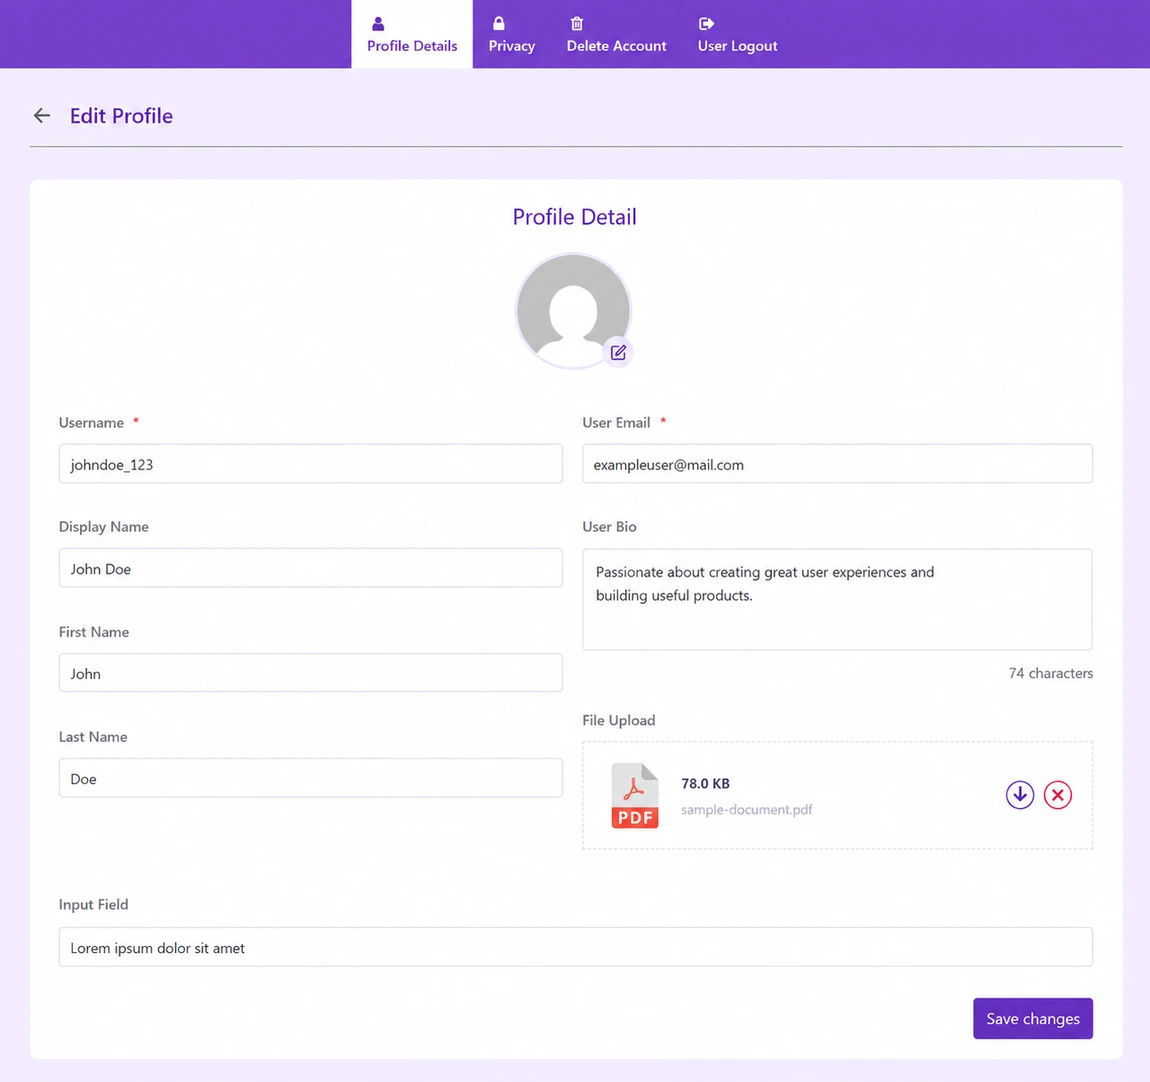
Check the following:
All tabs appear in the correct order
Custom content displays properly
Smart tags show the correct member information
Access restrictions work for different user roles
Links open correctly (internal pages and external URLs)
Styling matches your brand colors and design
If you need to make changes, log back into your admin account and return to User Registration & Membership > Settings > My Account > Customize My Account.
Frequently Asked Questions
Can I delete the default Dashboard tab?
No, the four default endpoints (Dashboard, Edit Profile, Edit Password, User Logout) cannot be deleted. However, you can customize their content and styling, or hide them using the Enabled toggle.
What are smart tags and how do I use them?
Smart tags are placeholders that automatically display member information. For example, {{first_name}} shows the member's first name, and {{email}} shows their email address. You can use smart tags in any custom content area by typing them directly into the editor.
Can I restrict certain tabs to specific membership levels?
Yes, use the Access Control settings for each endpoint. Select Access and choose which user roles or membership levels can see that tab. Only members with those roles will see the tab in their navigation.
Will my customizations be lost if I update the plugin?
No, your customizations are stored in the WordPress database and will not be affected by plugin updates. Your custom tabs, content, and styling will remain intact after updates.
Can I add the same tab to multiple user roles?
Yes, when configuring Access Control, you can select multiple user roles that should have access to a specific endpoint. All selected roles will see the tab in their My Account page.