Team Membership
ProSell and manage group memberships with centralized billing, allowing organizations to provide shared access to multiple team members under one subscription.
Last updated on Jul 15, 2026
The Team Membership add-on enables you to sell and manage memberships for teams rather than individual users. This feature is ideal for businesses, agencies, schools, or organizations that need to provide shared access to multiple members under a single subscription with centralized billing and management.
Before You Begin
Ensure you have:
User Registration & Membership Pro installed and activated with a valid license key
A Plus or Professional plan (Team Membership is not available on basic plans)
At least one membership plan created (or be ready to create one)
Activate the Team Membership Add-on
Go to User Registration & Membership → Addons in your WordPress dashboard
Locate Team Membership in the add-ons list (you can use the search field if needed)
Toggle the switch to Activate the add-on
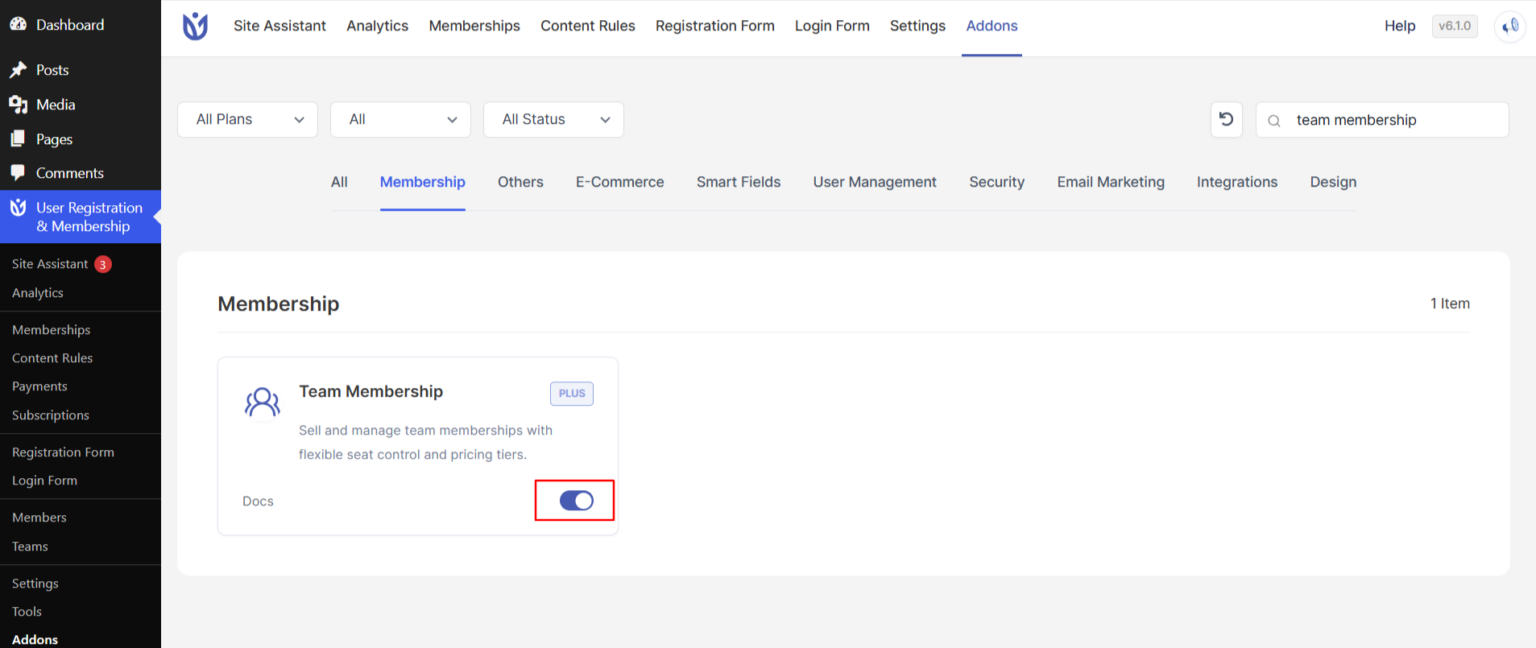
The add-on is now active and ready to use.
Configure Team Pricing for a Membership
Team pricing determines how much a team is charged based on the number of seats and your chosen pricing model.
Step 1: Create or Edit a Membership Plan
Navigate to User Registration & Membership → Memberships
Click Create new Membership to create a new plan, or click Edit on an existing membership
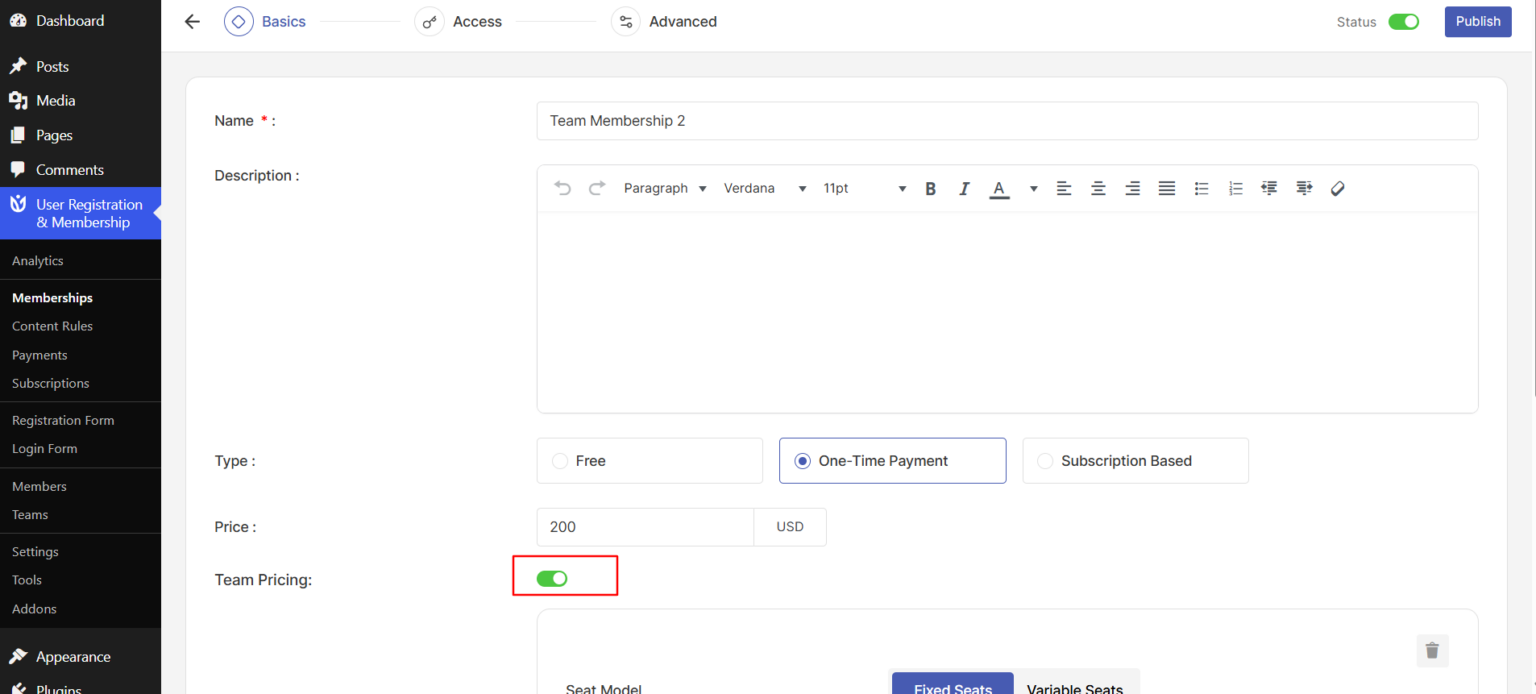
Locate the Team Pricing option in the membership settings
Toggle Enable Team Pricing to activate team membership for this plan
Step 2: Create Your First Pricing Tier
A pricing tier defines how many seats are available and how much the team will pay.
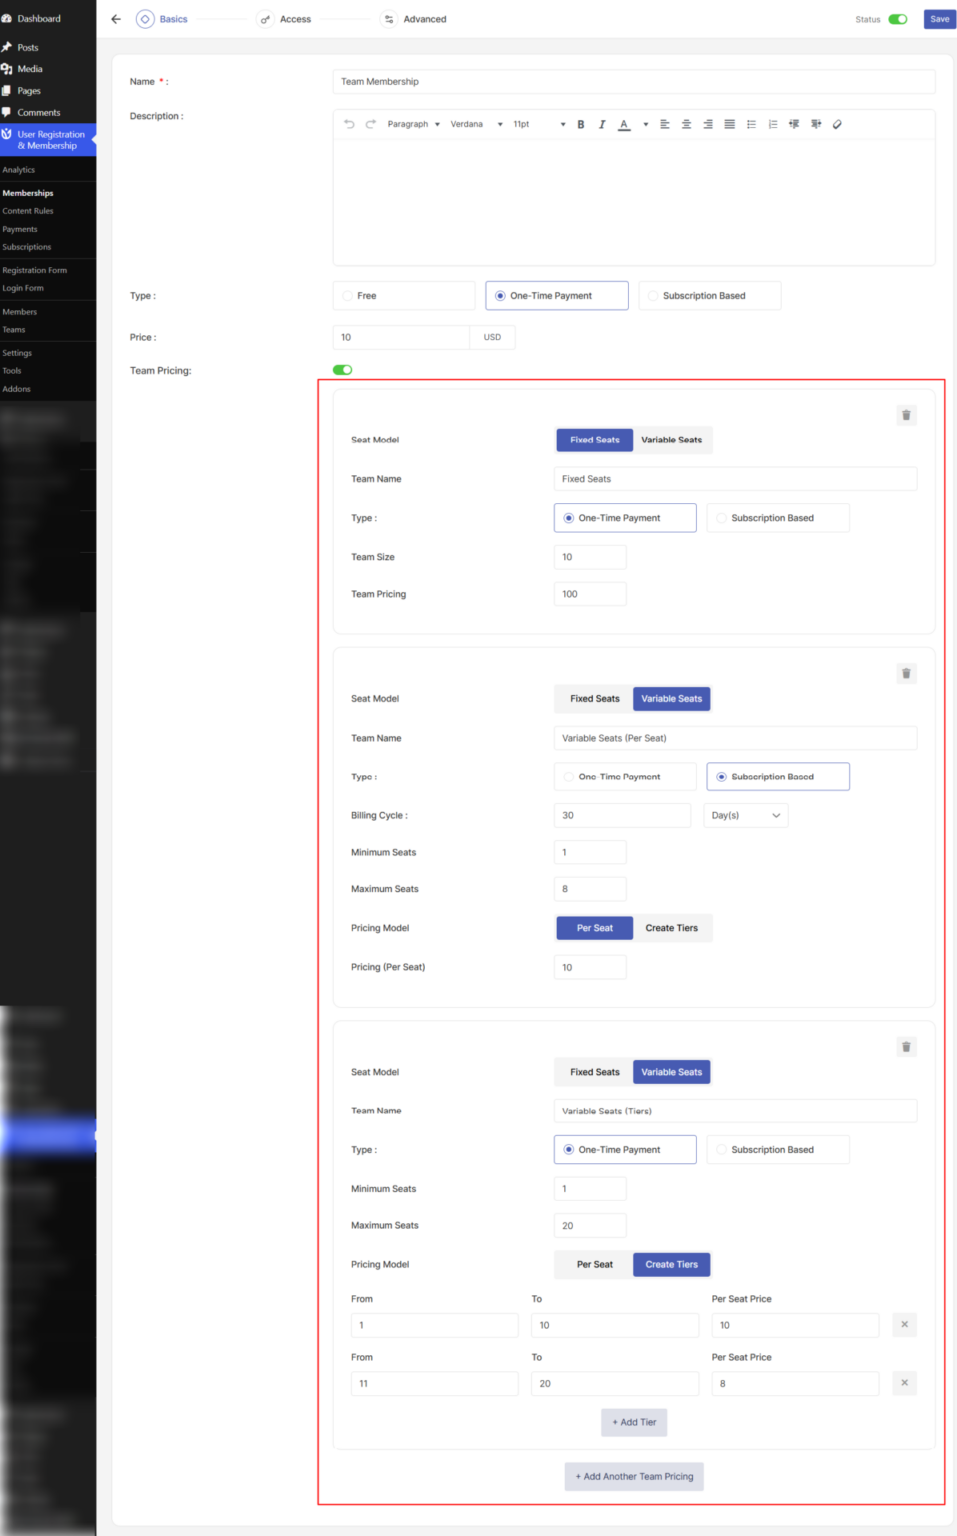
Enter a Team Name (e.g., "Small Team," "Enterprise Team," "Starter Package")
Choose your Seat Model:
Fixed Seats: Enter a specific number of seats (e.g., 10 seats). The team size is locked to this number.
Variable Seats: Enter a minimum and maximum seat range (e.g., 5–50 seats). Buyers can choose how many seats they need within this range.
Configure pricing based on your seat model:
If you chose Fixed Seats:
Enter a single Team Price (e.g., $200 for 10 seats)
If you chose Variable Seats:
Select a Pricing Model:
Per Seat Pricing: Enter a price per seat (e.g., $20 per seat). Total cost = seats × price per seat.
Tiered Pricing: Create multiple price tiers based on seat ranges. For example:
1–5 seats: $25 per seat
6–10 seats: $20 per seat
11–25 seats: $15 per seat
Click Add Tier to add additional pricing tiers
Choose your Pricing Type:
One-time payment: Team pays once for lifetime access
Subscription Based: Recurring payments (monthly, yearly, or custom intervals)
To create multiple team pricing tiers for the same membership (e.g., Small Team, Medium Team, Enterprise Team), click Add Another Team Pricing and repeat the configuration.
Step 3: Save Your Membership
Click the Publish button in the top right corner to save your team pricing configuration
Your team membership is now live and ready for purchase.
How Team Membership Appears on Registration Forms
When users visit your registration form, they will initially see individual membership pricing for all available plans. When a user selects a membership configured with team pricing, the form dynamically updates to display:
All available pricing tiers displayed as selectable cards or options
Team name, seat range, and pricing details with subscription duration clearly shown
Seat input field (for variable seats) allowing users to enter the number of seats they want to purchase within the allowed range
Tier selection option (for tiered pricing) where users first select a tier, then the seat input is restricted to that tier's range
Real-time price calculation that updates as users select or change the number of seats
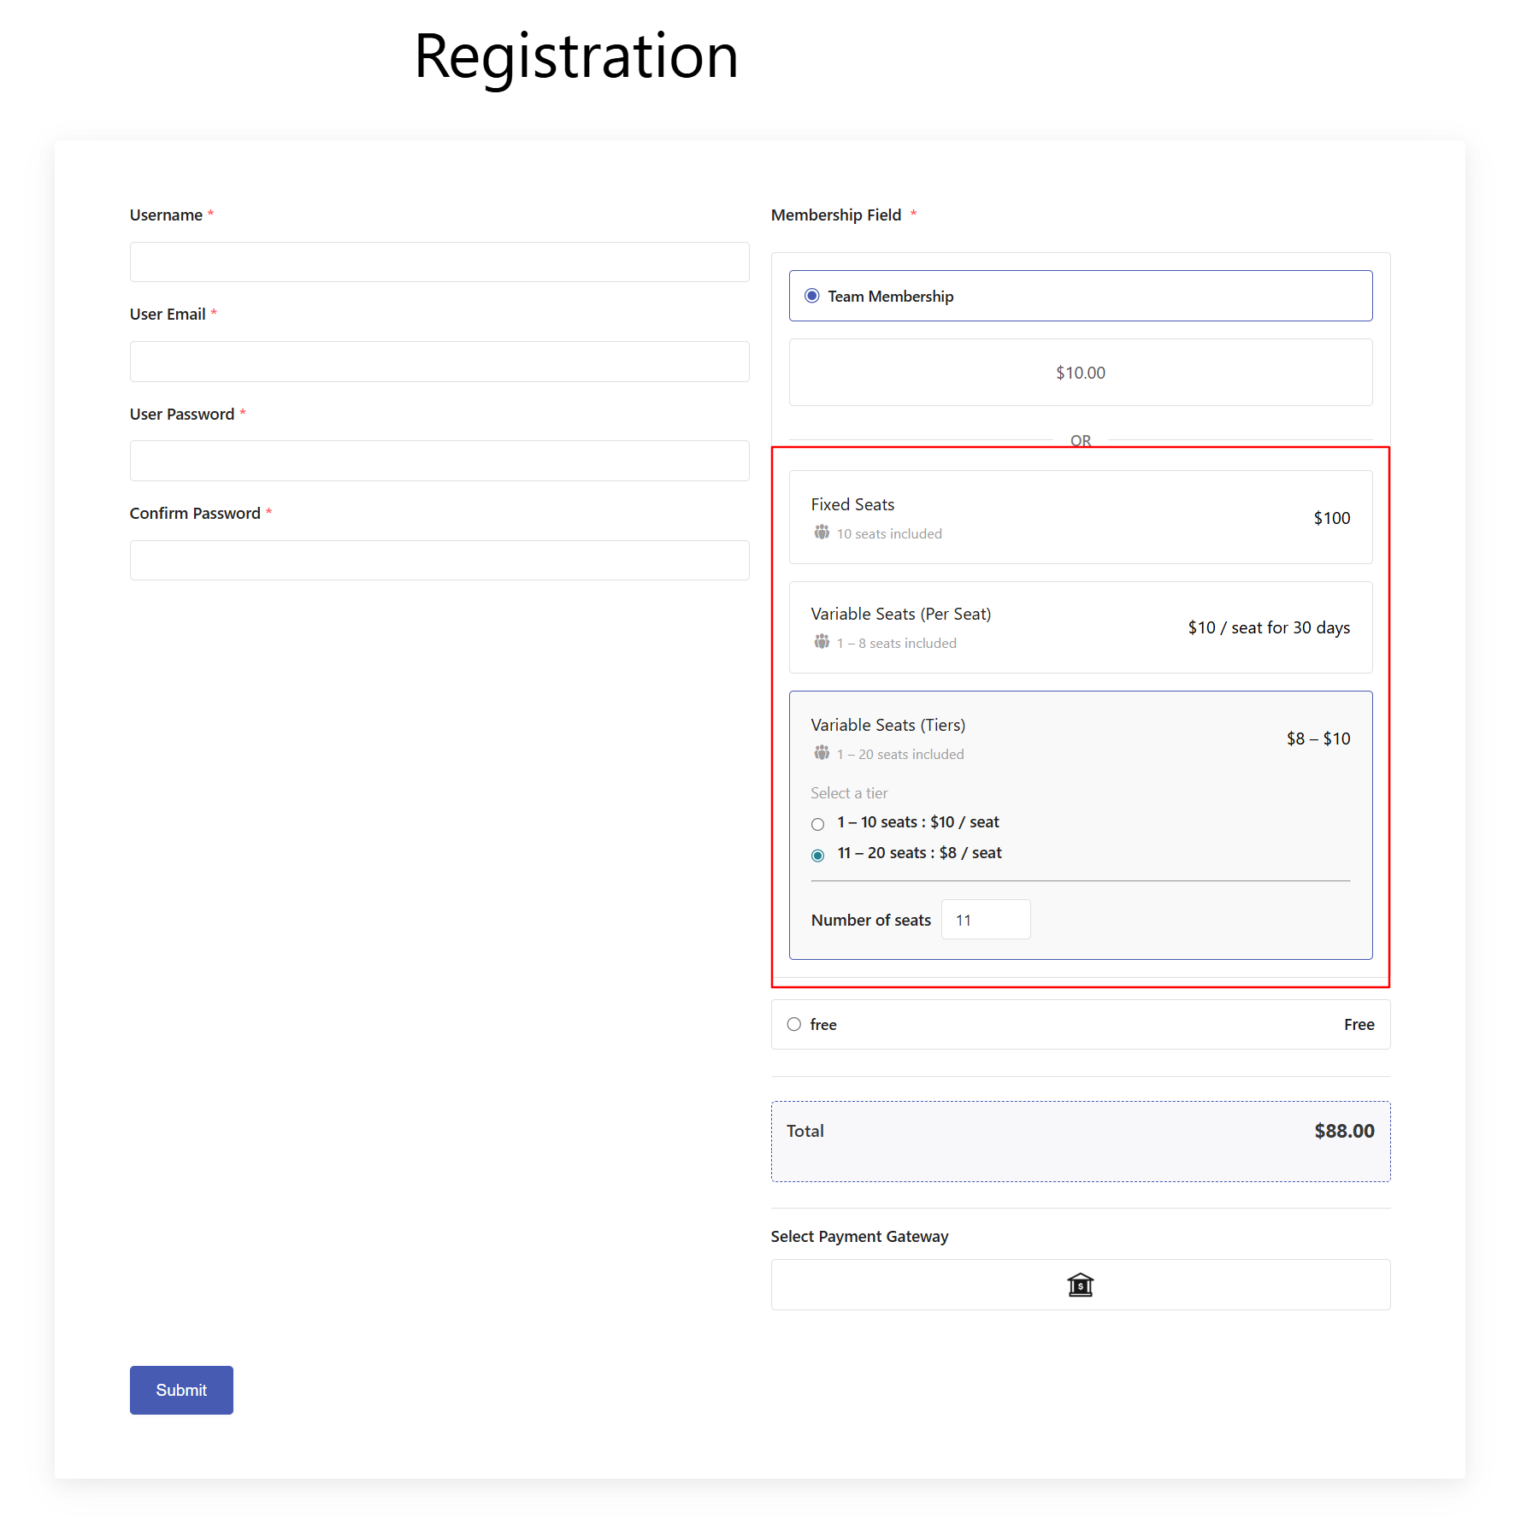
Users complete the registration form, select their desired team size, and proceed to payment. Upon successful payment, they become the team leader.
Managing Teams (Admin)
As an administrator, you have full control over all teams created on your site.
Access the Teams Dashboard
Go to User Registration & Membership → Teams in your WordPress dashboard
You will see a list of all teams with the following information:
Team name
Assigned team leader
Number of team members
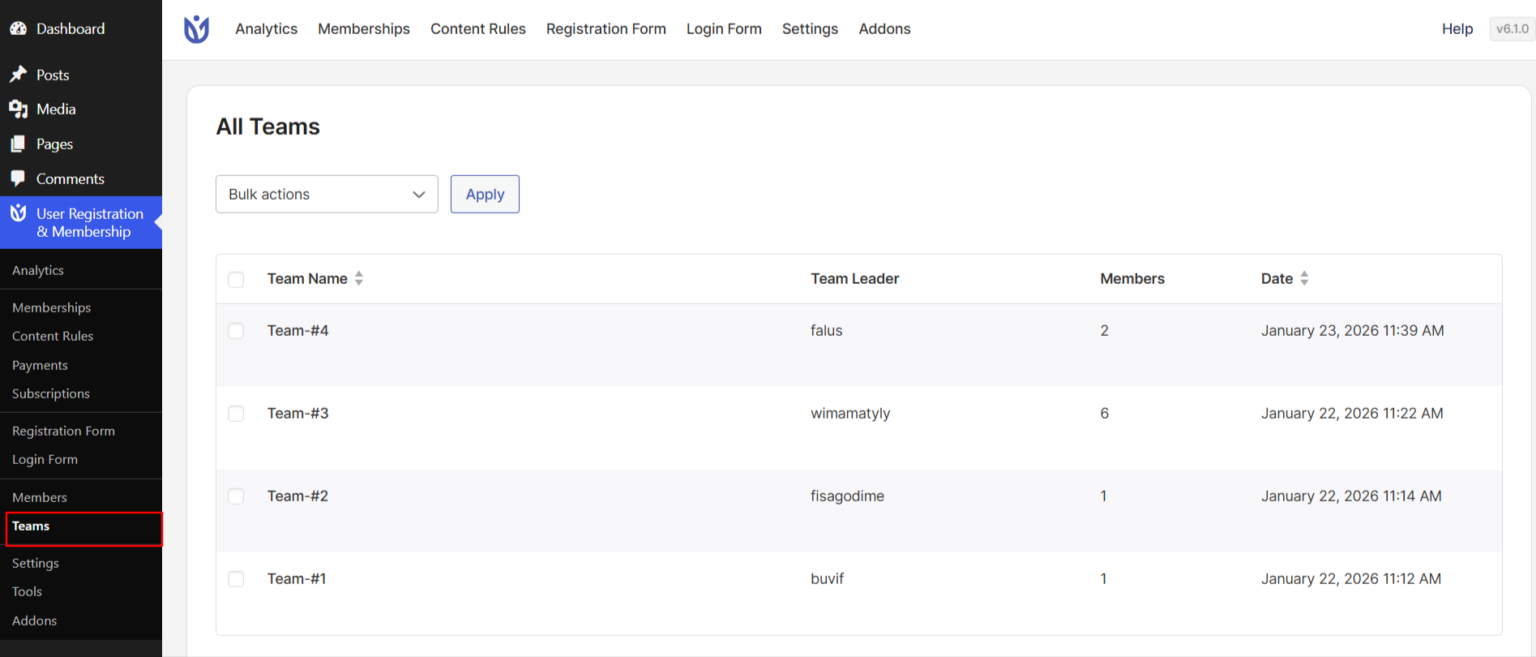
Edit Team Details
Hover over the team row you want to edit
Click the Edit button
You can update the following:
Team Name: Enter a new name for the team
Team Leader: Assign or change the team leader by selecting a user from the dropdown
Team Seats: Update the total number of seats allocated to the team
Team Members: Add or remove team members (see below)
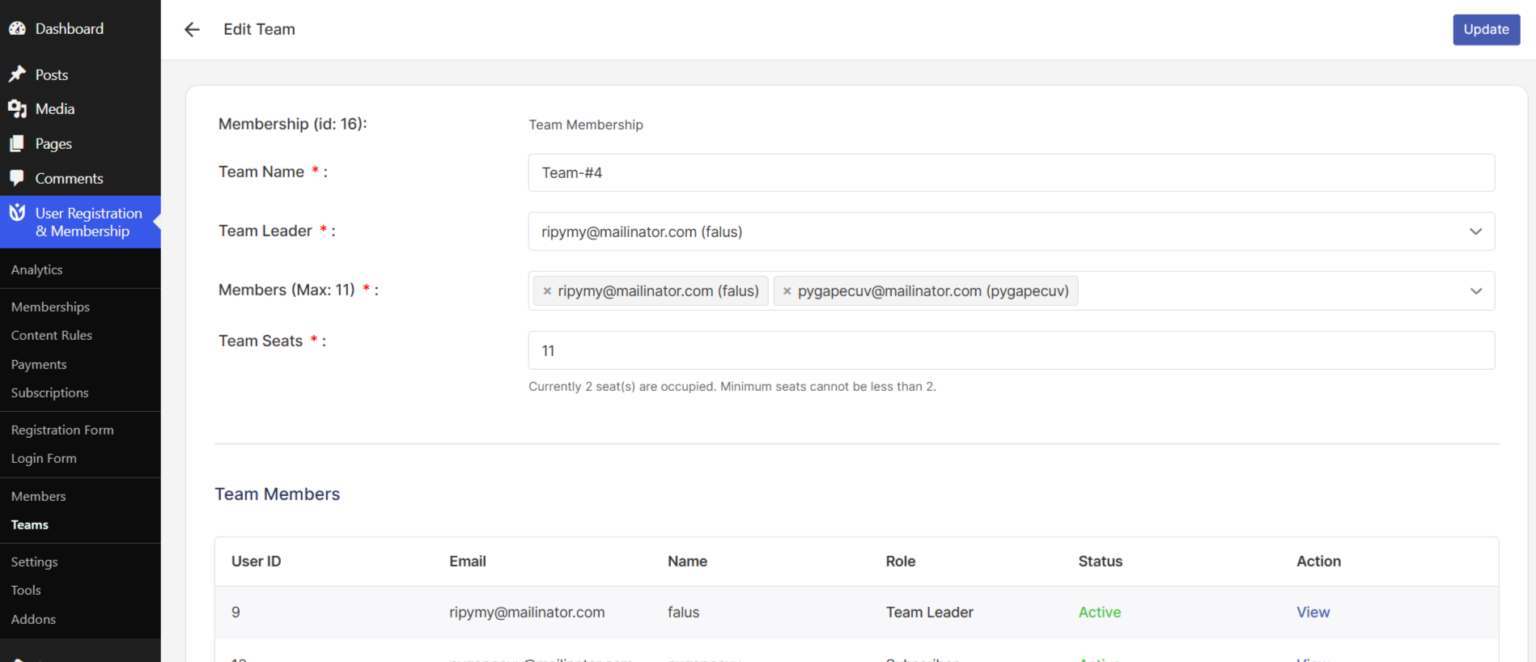
Change the Team Leader
In the team edit form, locate the Team Leader field
Click the dropdown and select a new team leader from the list of registered users
Click Update in the top right corner to save the change
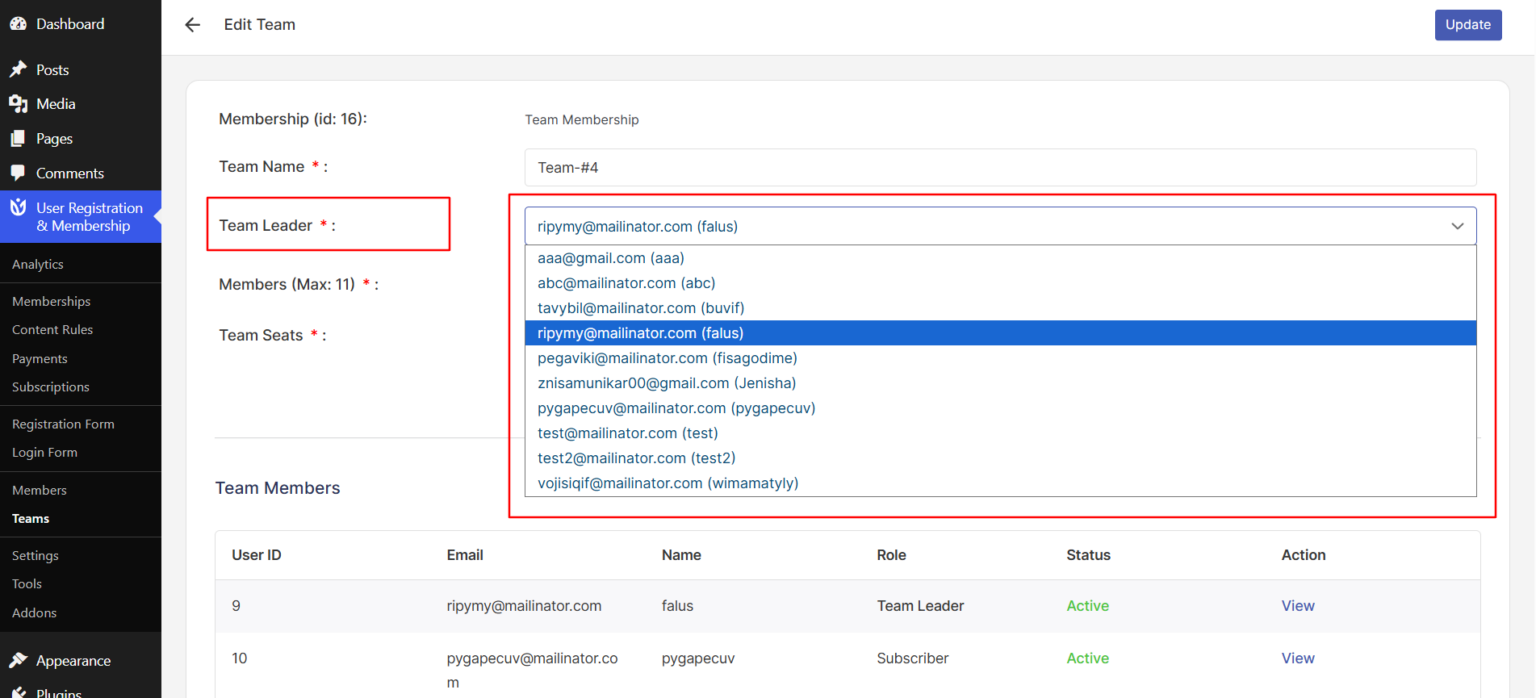
Changing the team leader does not remove the previous leader from the team members list. They remain a member unless manually removed.
Add Team Members
You can add existing users or invite new users to the team.
To add an existing user:
In the Members field, click the dropdown
Select the user from the list of registered users
The user is added to the team immediately
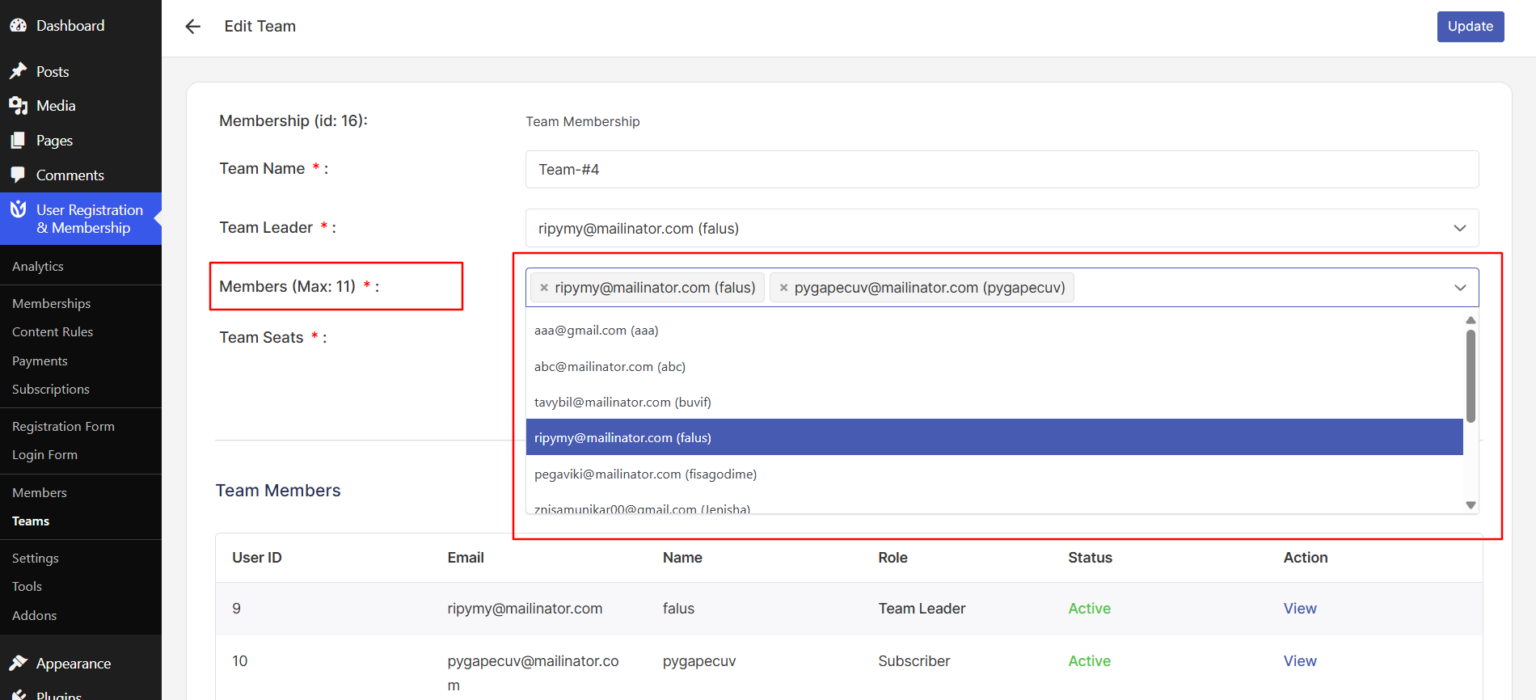
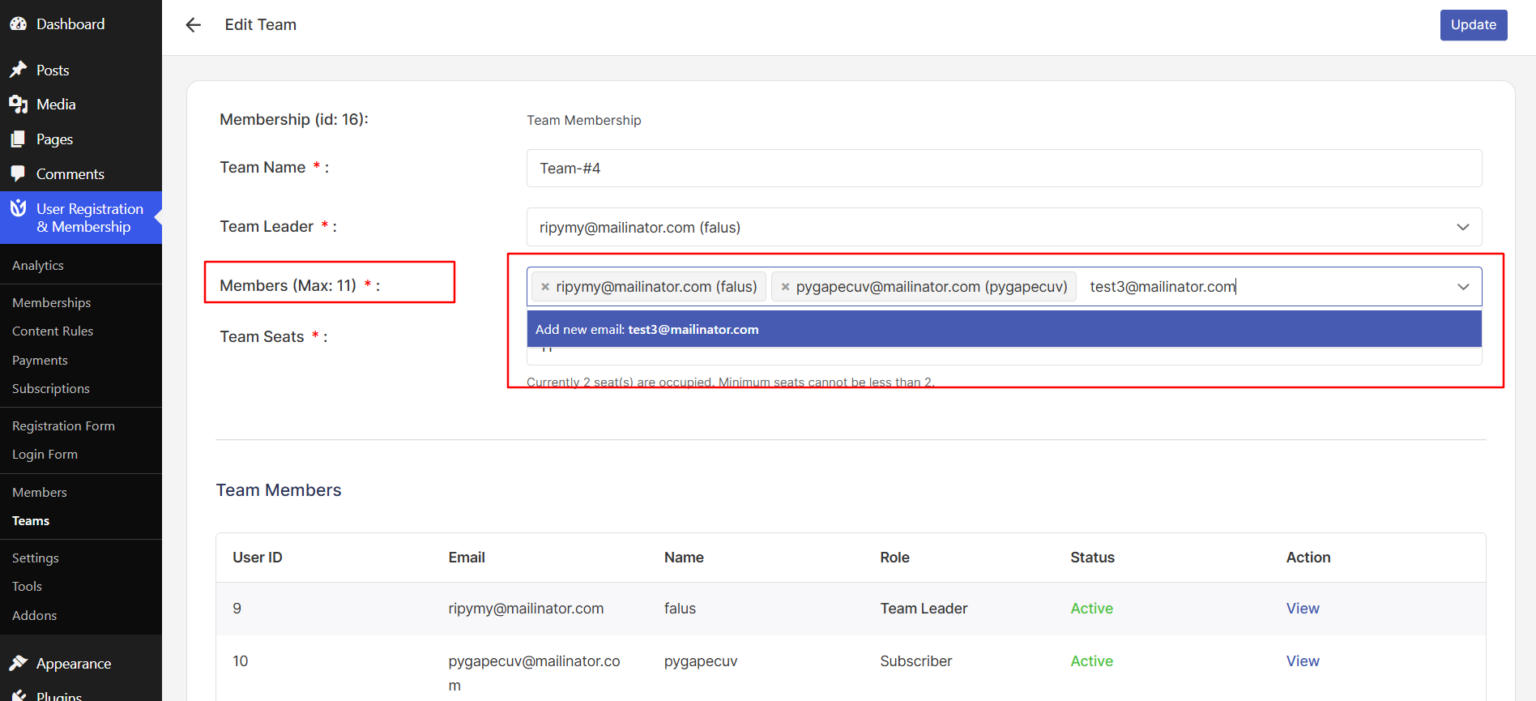
To invite a new user:
In the Members field, type the email address of the new user
An Add new email option will appear
Click the option to add the user
An email is sent automatically to the new user with their login credentials and a password reset link
Remove Team Members
In the Members field, locate the user you want to remove
Click the X button on the email tag
The user is removed from the team
View Member Details
Below the edit form, you can view detailed information about each team member, including:
User ID
Email address
Name
User role
Account status
After making any changes to team details, team leader, or team members, click the Update button in the top right corner. Your changes are saved and applied immediately.
Team Leader Account Page
When a user purchases a team membership, they automatically become the team leader and gain access to team management tools through their account page.
Access the Team Management Page
Log into your account on the website
Navigate to My Account → Team from the sidebar menu
You will see all teams you have created or purchased
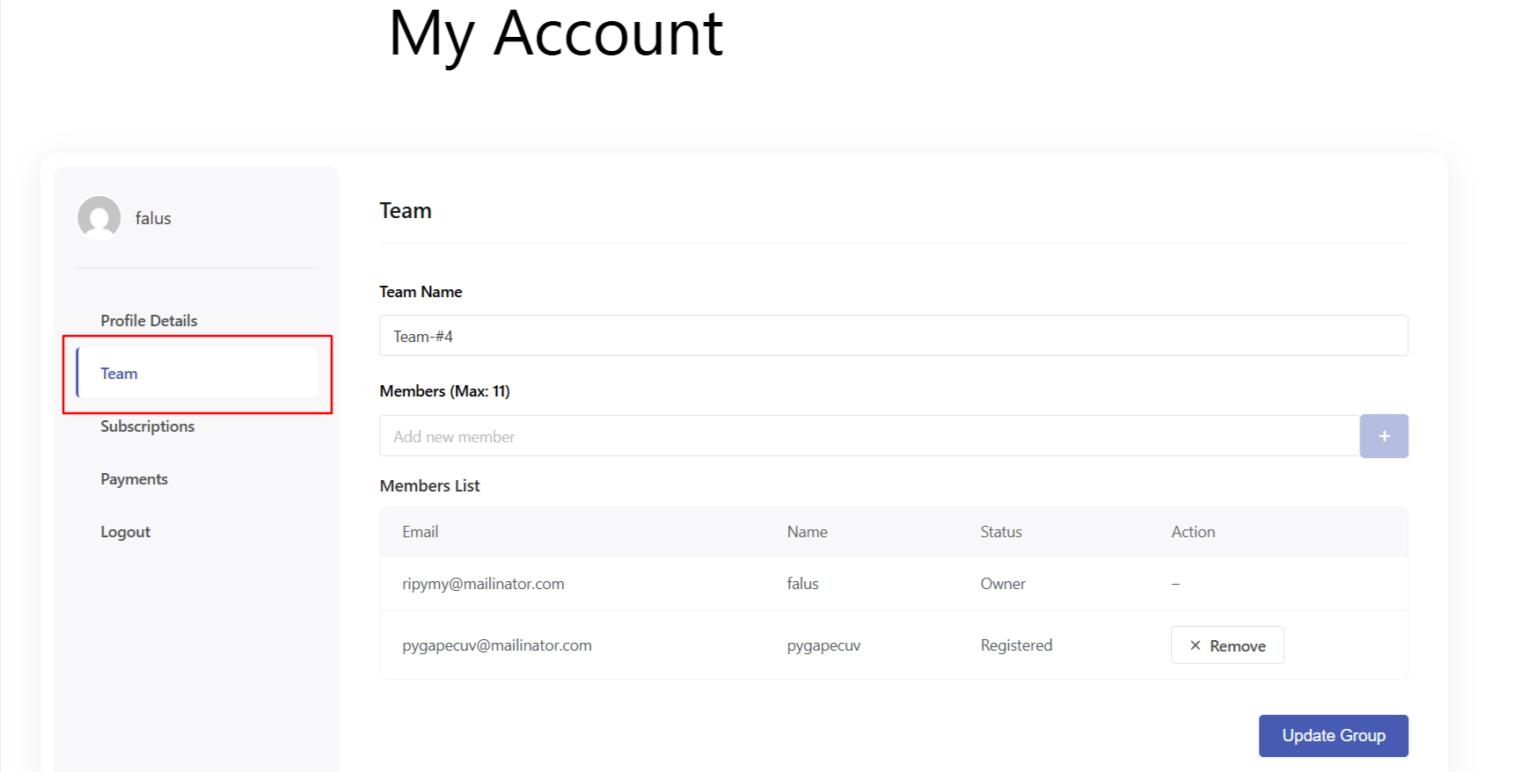
The Team menu item only appears for users who have purchased at least one team membership.
Edit Team Details
If you have only one team:
Clicking the Team tab in the sidebar will directly open the team edit form
If you have multiple teams:
Clicking the Team tab will display a table listing all your teams
Click the Edit button for the team you want to manage
Team leaders can update the following:
Team Name (required): Give your team a meaningful name
Members List: Add or remove member email addresses
Add Team Members
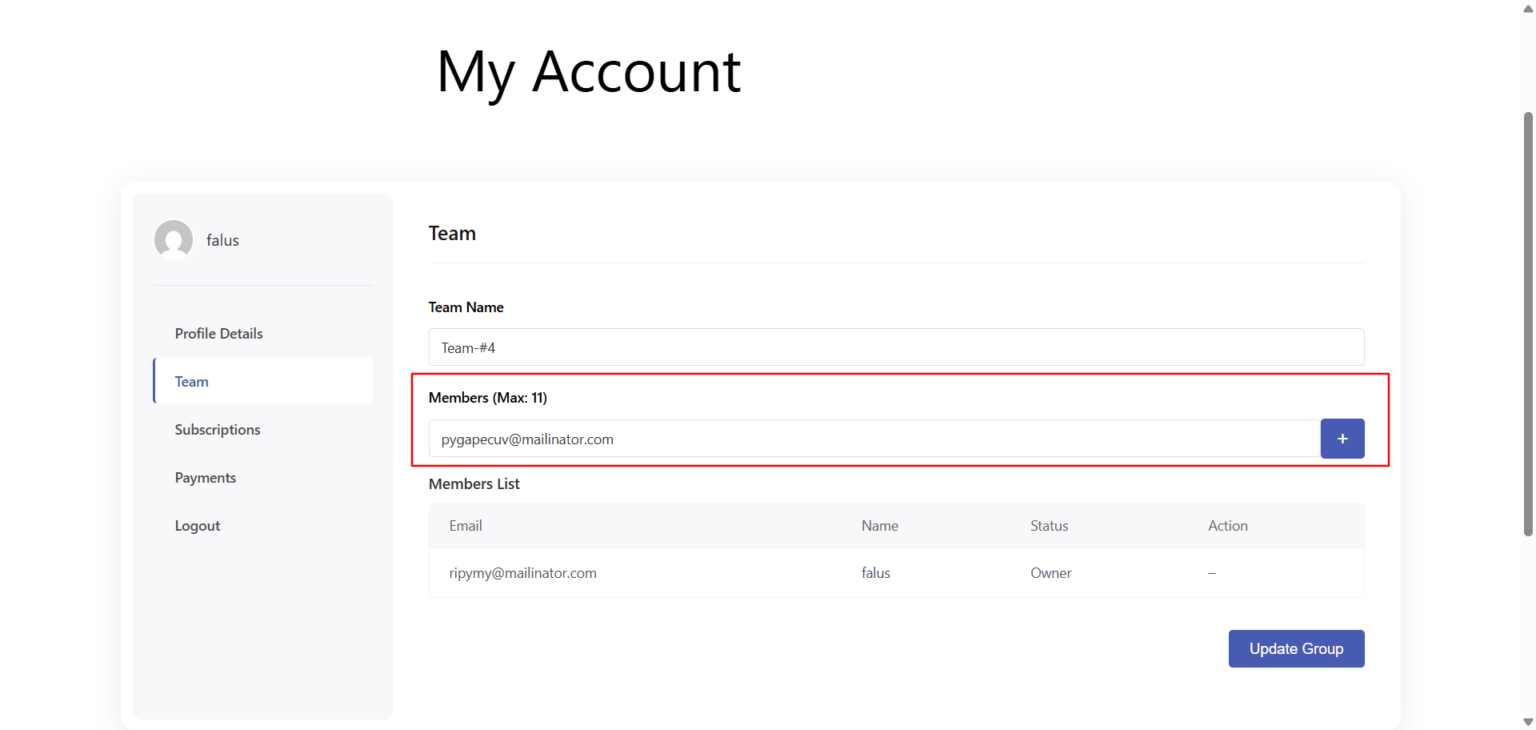
In the Members section, enter the email address of the person you want to add
Click the + button
The member is added to the team
An email is sent automatically to the new member with their login credentials and a password reset link after you update the team
Remove Team Members
In the Members List section, locate the member you want to remove
Click the Remove button next to their name
The member is removed from the team
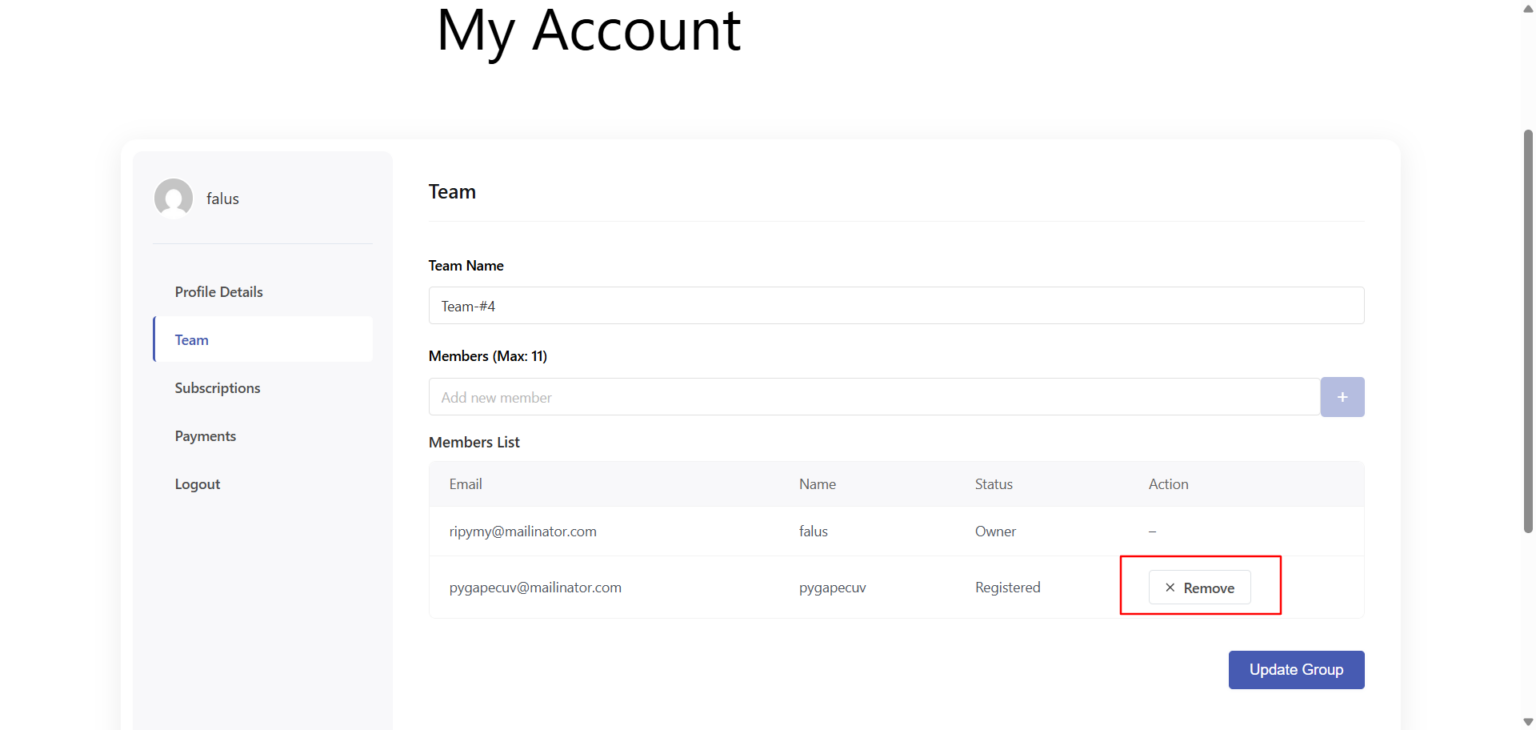
View Member Details
In the Members List section, you can view information about each team member, including:
Email address
Name
Account status
After adding or removing team members or updating team details, click the Update button. Your changes are saved and team members are notified as needed.
Email Notifications
The Team Membership add-on sends automated emails to team members at key moments. You can customize these email templates to match your branding and communication style.
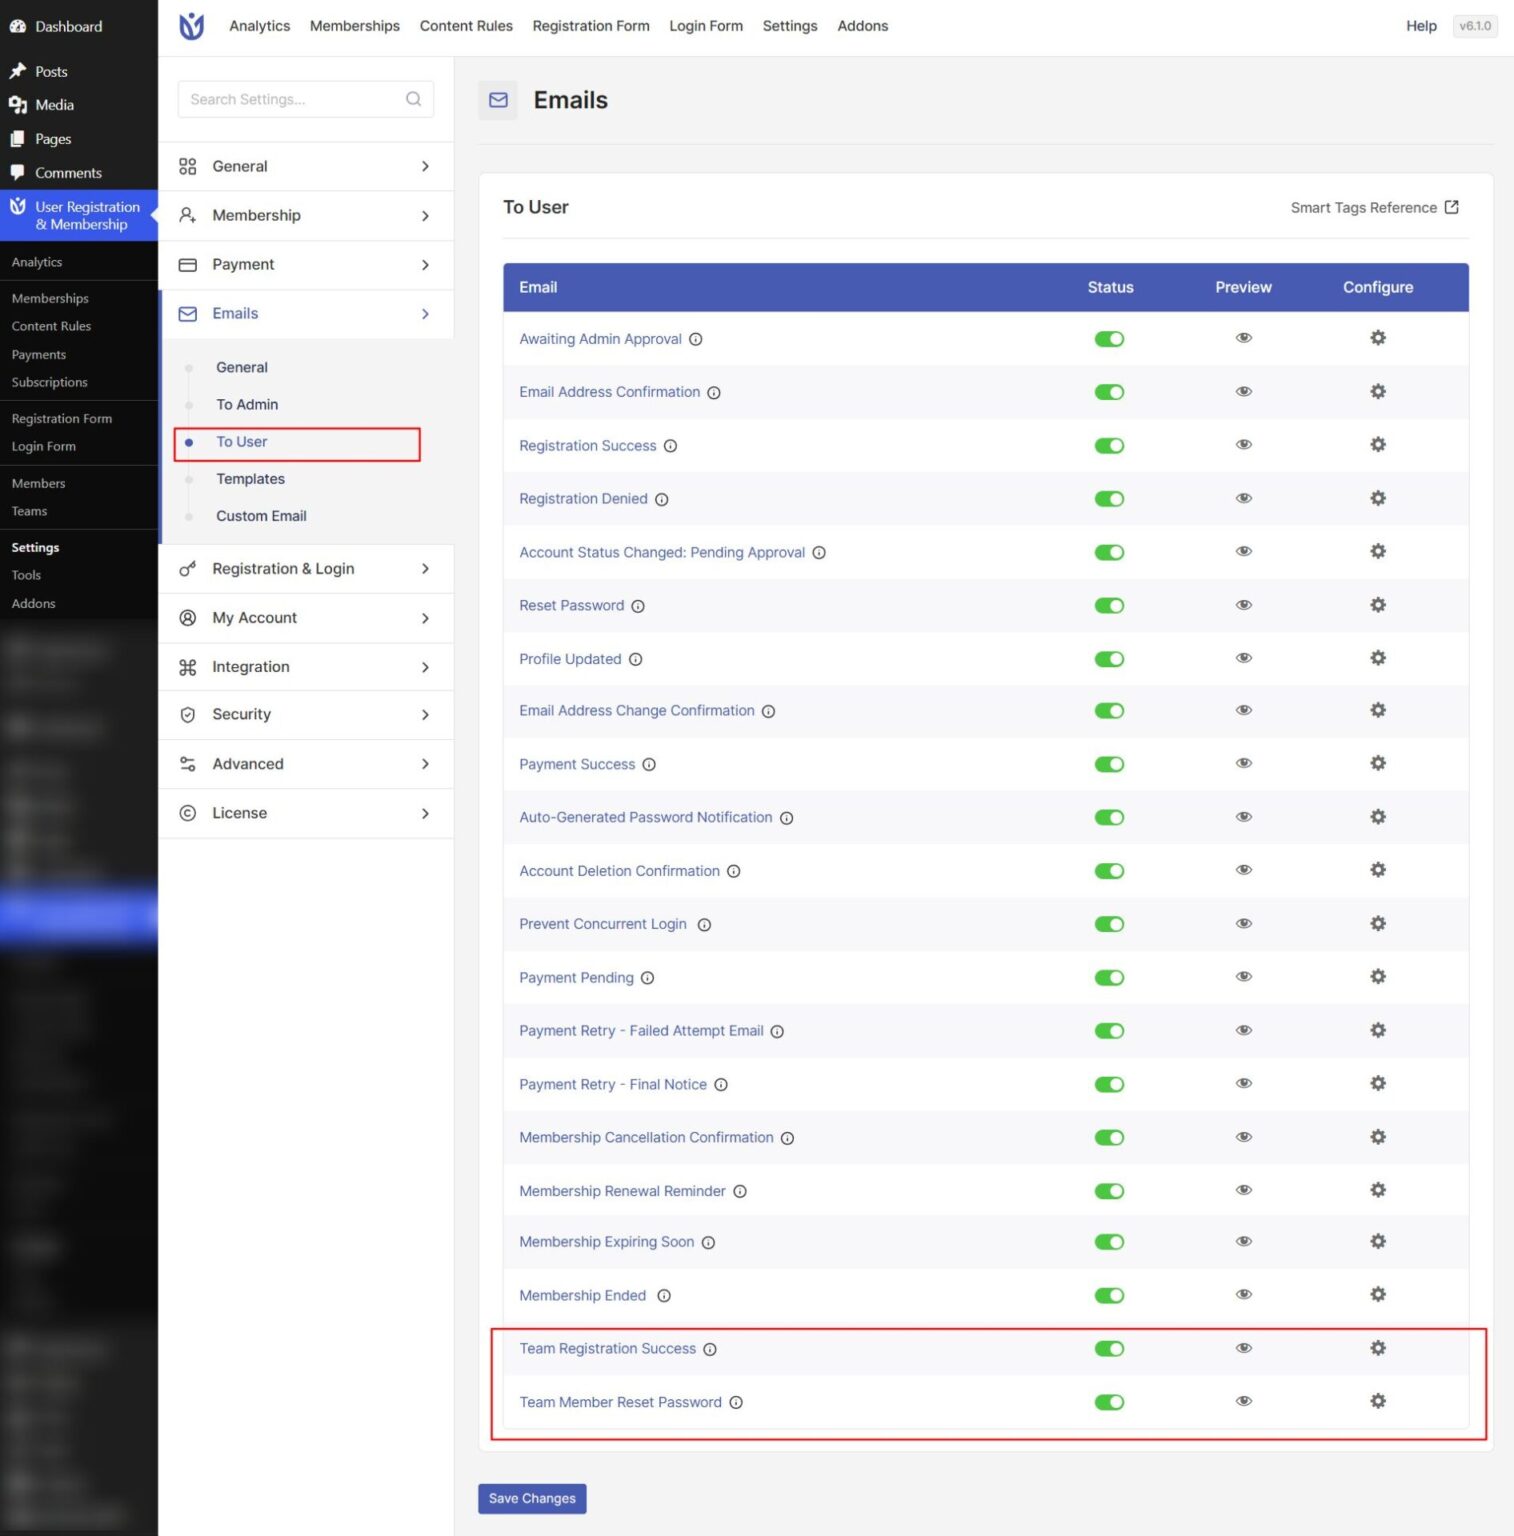
You can customize team-related emails from User Registration & Membership → Settings → Emails → To User.
Team Registration Success Email: Sent when someone joins a team
Team Member Reset Password Email: Sent only when a new user (not already registered) is added to the team.