
Subscription Upgrade Path in Memberships
Learn how to configure membership tier upgrade paths with automatic proration, allowing members to switch plans while crediting their remaining subscription time.
Last updated on Jul 15, 2026
Would you like to let your members switch between membership tiers without losing their investment?
User Registration & Membership allows you to create upgrade paths that let members move from one plan to another—with automatic proration that credits their remaining time. This tutorial will show you how to set up membership upgrade paths and manage the upgrade process.
Before getting started, make sure you've installed and activated the User Registration & Membership plugin on your WordPress site. Then, make sure you've created at least two membership plans that you want to connect with an upgrade path.
Understanding Upgrade Paths
An upgrade path defines which membership plans your members can switch to from their current plan. When you enable upgrade paths, members see a Change Plan button in their account dashboard that lets them move to a different tier.
User Registration & Membership supports two upgrade pricing models(for subscriptions):
Full Amount Upgrade — Members pay the complete price of the new membership plan
Proration Upgrade — Members pay only the difference based on their remaining subscription time
Proration Upgrade requires User Registration & Membership Pro v5.3.0 or higher.
Enabling Upgrade Action for a Membership Plan (Pro)
To make a membership plan upgradeable, you'll configure its upgrade settings in the membership editor.
From your WordPress dashboard, go to User Registration & Membership → Memberships. Here, you'll see a list of all your membership plans.
Click Edit on the membership plan you want to make upgradeable. This opens the membership editor where you can configure all plan settings.
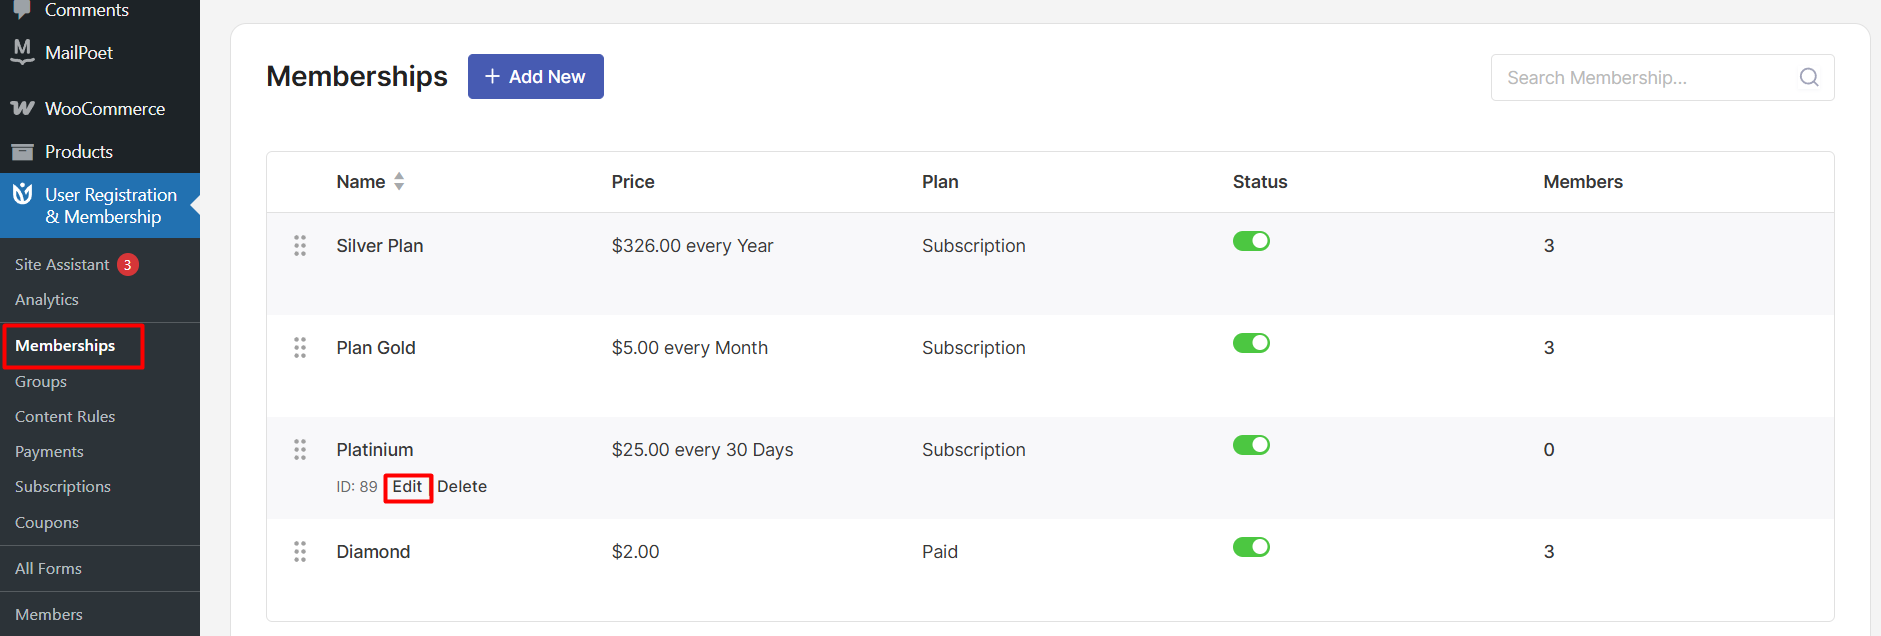
Click on the Advanced tab. Here, you'll find the upgrade configuration options.
Toggle the Upgrade Action switch to enable upgrade functionality for this plan. Once enabled, additional upgrade settings will appear below.
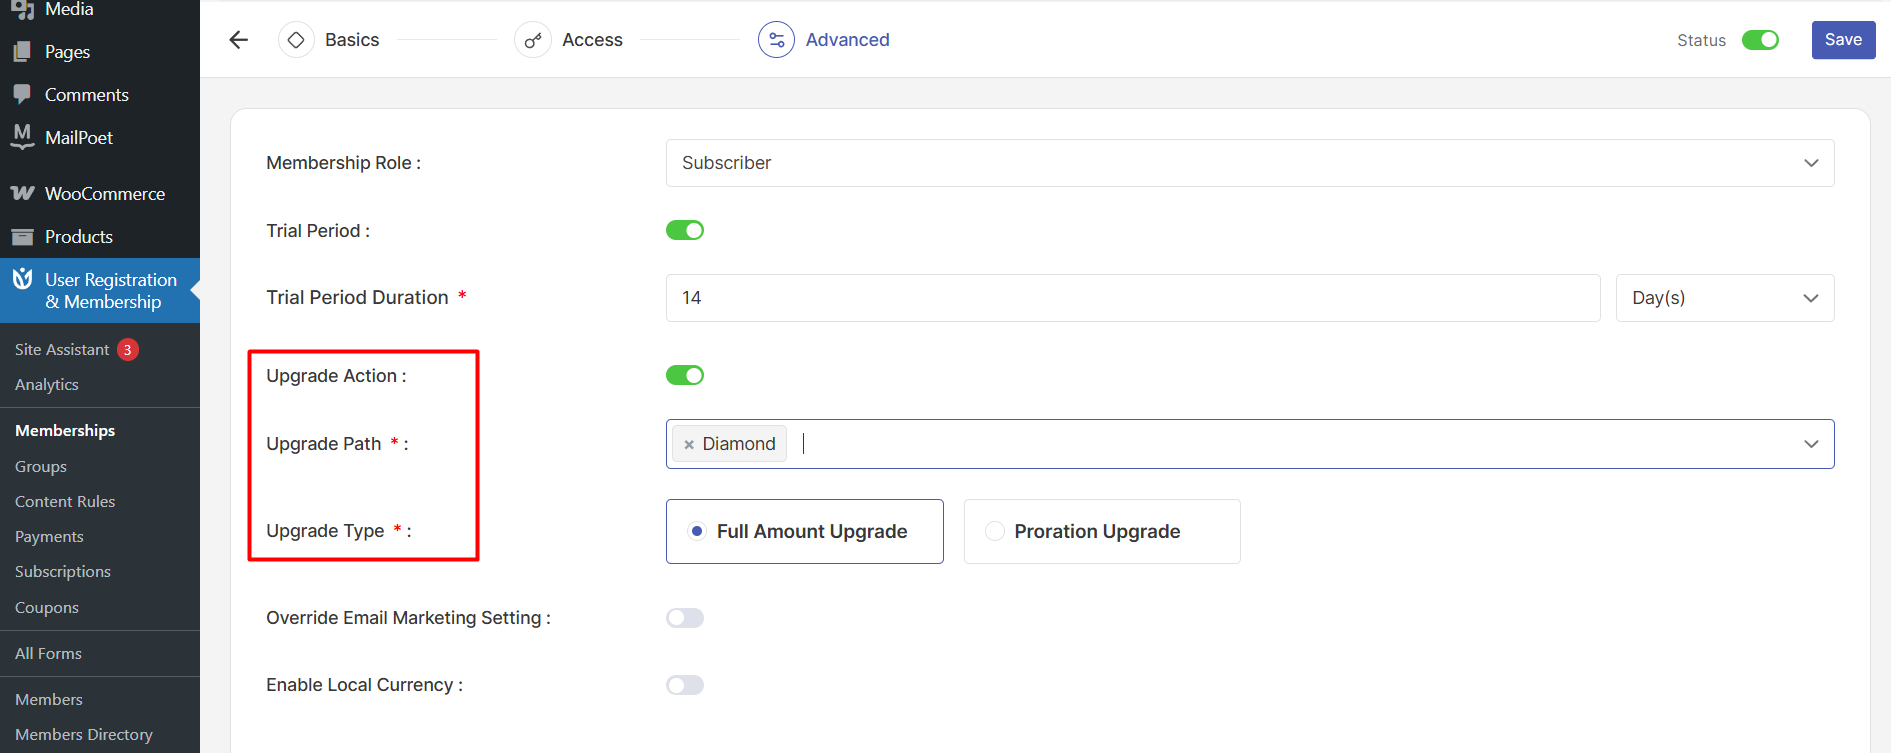
Selecting the Upgrade Path
Once Upgrade Action is enabled, you'll see the Upgrade Path field. This field determines which membership plans members can upgrade to from the current plan.
Click in the Upgrade Path field. A dropdown appears showing all your available membership plans. Select one or more plans that you want members to be able to upgrade to.
For example, if you're editing a Basic plan, you might select Gold and Diamond plans as upgrade options. Members on the Basic plan will then see both Silver and Gold as available upgrades. Or, just Diamond like this screenshot and user will be upgraded to Diamond from Basic plan.
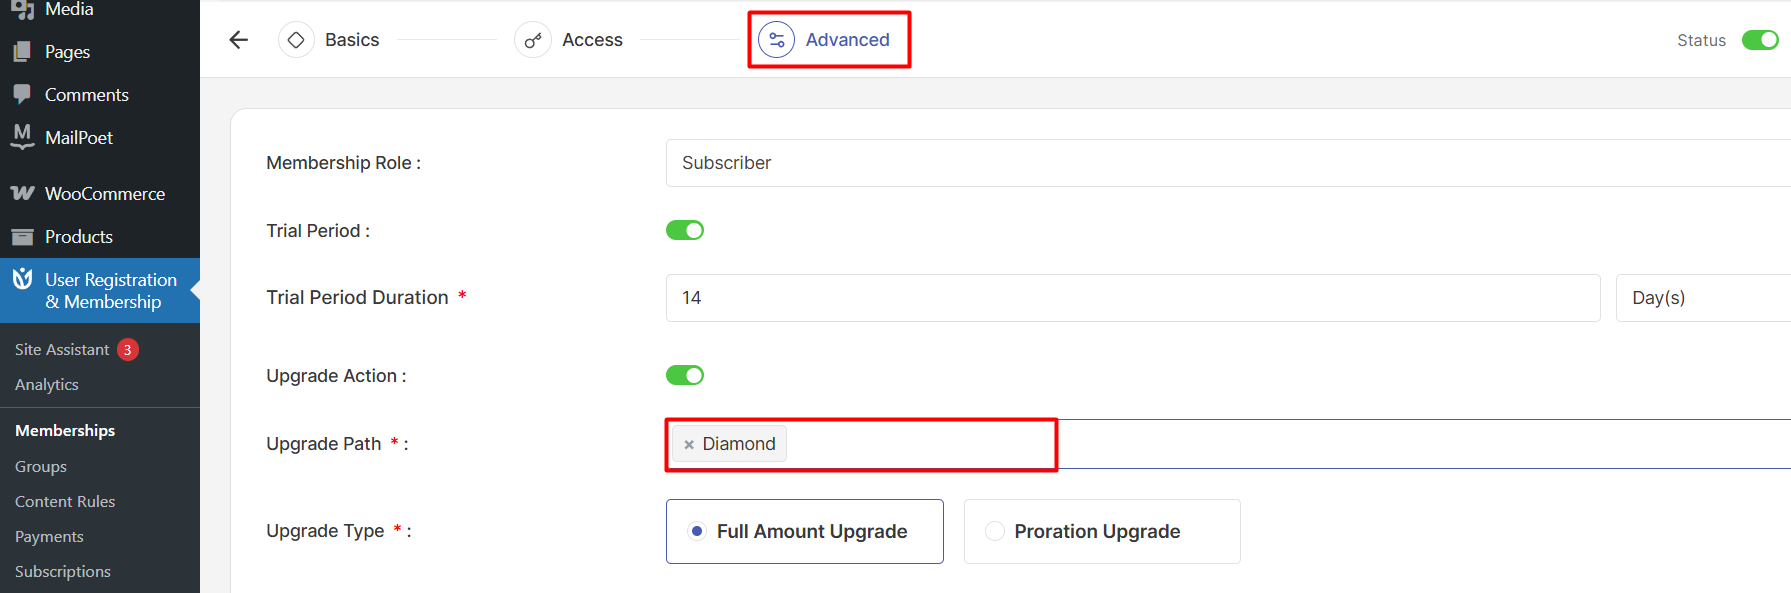
You can select multiple upgrade options to give members flexibility in choosing their next tier.
Design your upgrade paths to make sense for your members:
Linear Progression:
Basic → Premium → Professional
Each tier builds upon the previous with additional features
Flexible Options:
Basic → Premium OR Professional
Allow members to choose the upgrade that best fits their needs
Choosing the Upgrade Pricing Model
After selecting your upgrade path, choose how upgrade pricing will be calculated.
User Registration & Membership offers two pricing models:
Full Amount Upgrade — Members pay the complete price of the new membership plan. This is the simpler option and works for all membership types, including upgrades from free plans to paid plans.
Proration Upgrade — Members pay only the difference based on their remaining subscription time. The system automatically calculates how much of their current subscription they've used, credits the unused portion, and charges only the difference for the new plan.
The proration formula works like this:
final_price = upgrade_price - (initial_paid_price - (price_per_day × days_passed))Here's what each part means:
Days Used — How many days have passed since the member started their current subscription
Daily Rate — The daily cost of their current plan (total price ÷ subscription days)
Remaining Credit — The value of unused time on their current plan
Final Price — What the member pays for the upgrade
Proration only applies to paid subscription plans. Upgrades from free plans always use the full amount pricing model.
Click Save to save your upgrade configuration.
Before members can upgrade, you need to ensure your payment gateways are properly configured.
Testing the Upgrade Flow
Before going live, test your upgrade path using sandbox or test mode.
Create a test member account and purchase the base membership plan using test payment credentials. Log in as that test member and navigate to the Membership tab in their account dashboard.
You should see the Change Plan button next to the current membership. Click it to view available upgrade options.
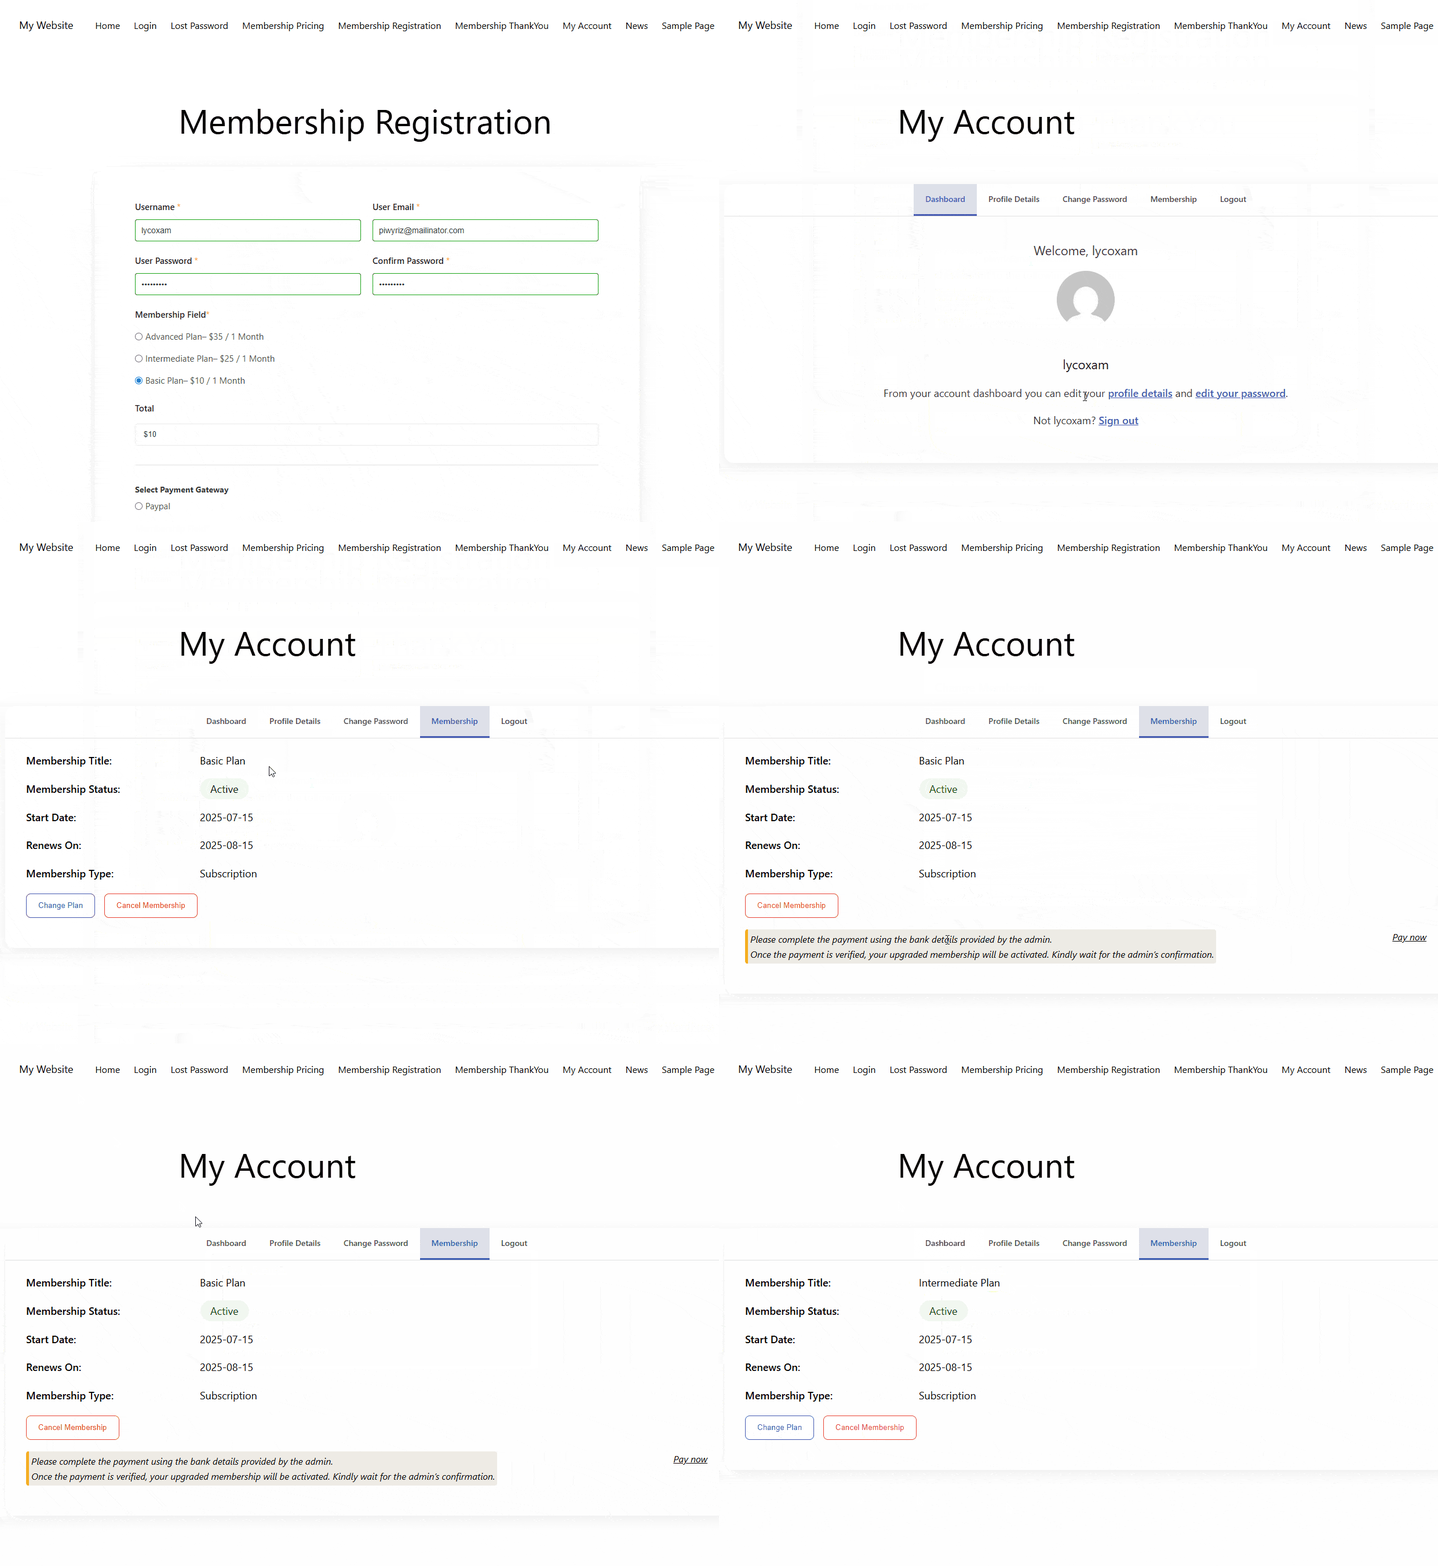
Select an upgrade option from the pop-up. The system displays the upgrade price based on your pricing model (full amount or prorated).
Choose a payment gateway and complete the test payment. For PayPal, you'll be redirected to PayPal's sandbox site. For Stripe, you can enter test card details directly.
After successful payment, verify that the member's account immediately reflects the new membership tier and that they have access to the upgraded content.
How Members Upgrade Their Membership
Once you've configured upgrade paths, here's how the upgrade process works for your members.
Members log into their account and click the Membership tab in their account dashboard. They see their current membership plan with a Change Plan button.
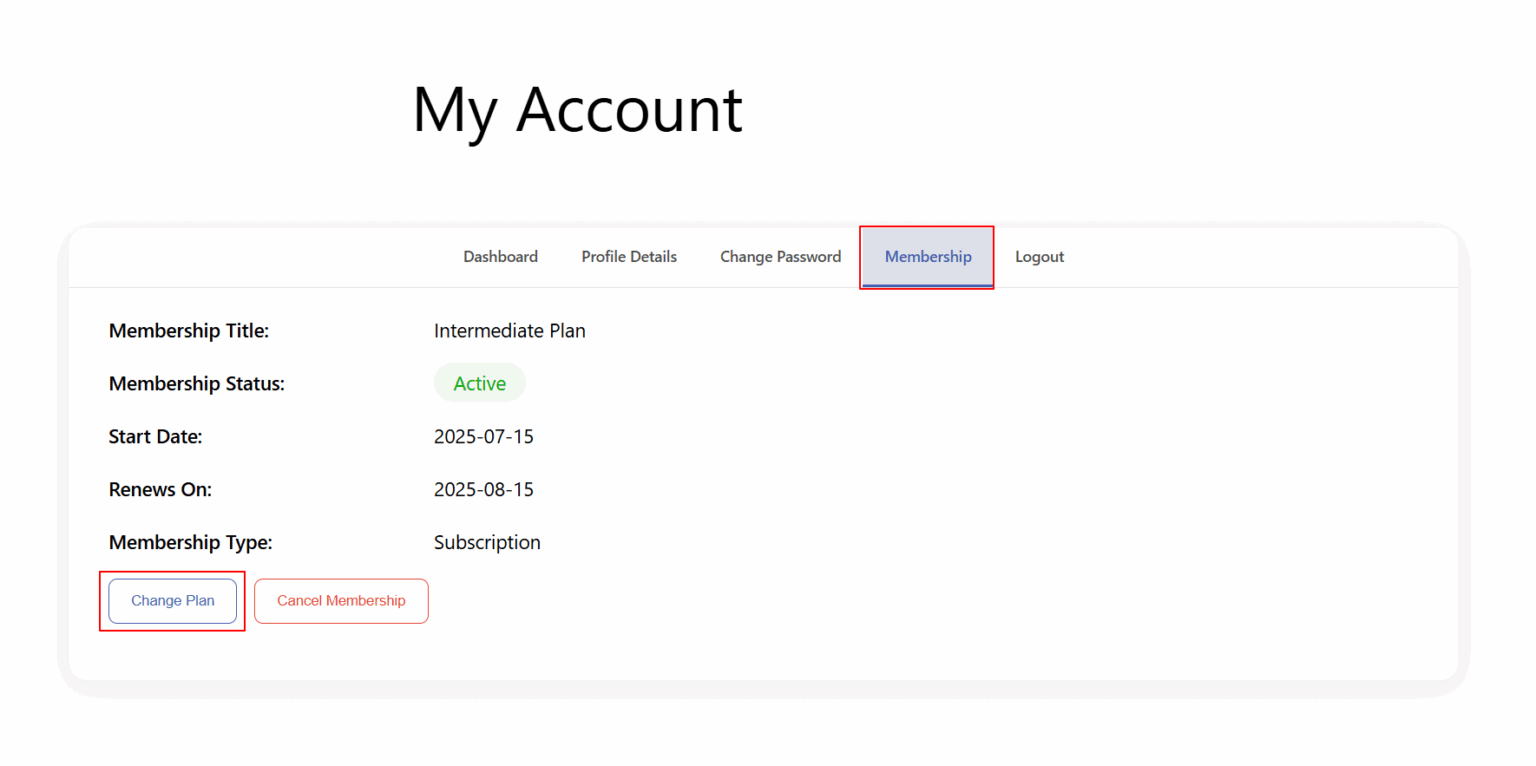
When they click Change Plan, a pop-up appears showing all available upgrade options you've configured in the upgrade path.
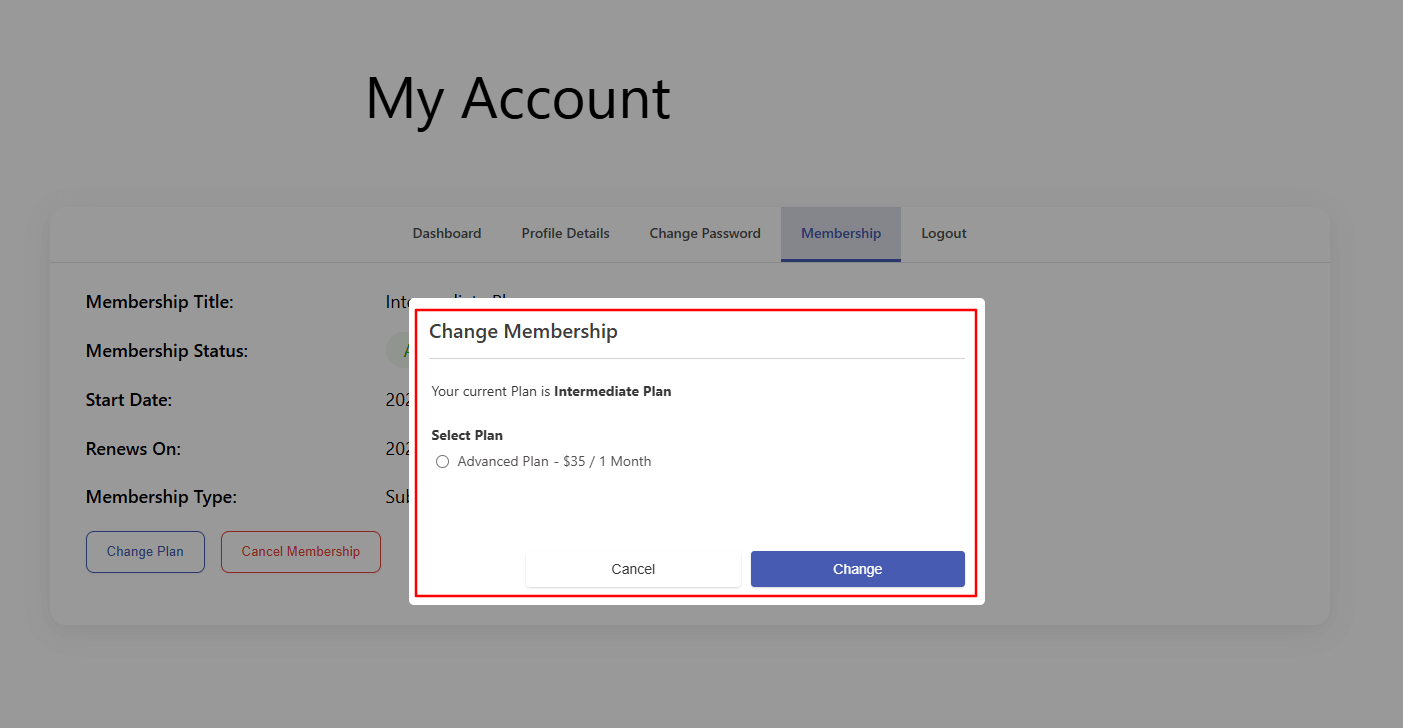
Members select their desired upgrade option. The system displays the upgrade price - either the full amount or the prorated amount based on your configuration.
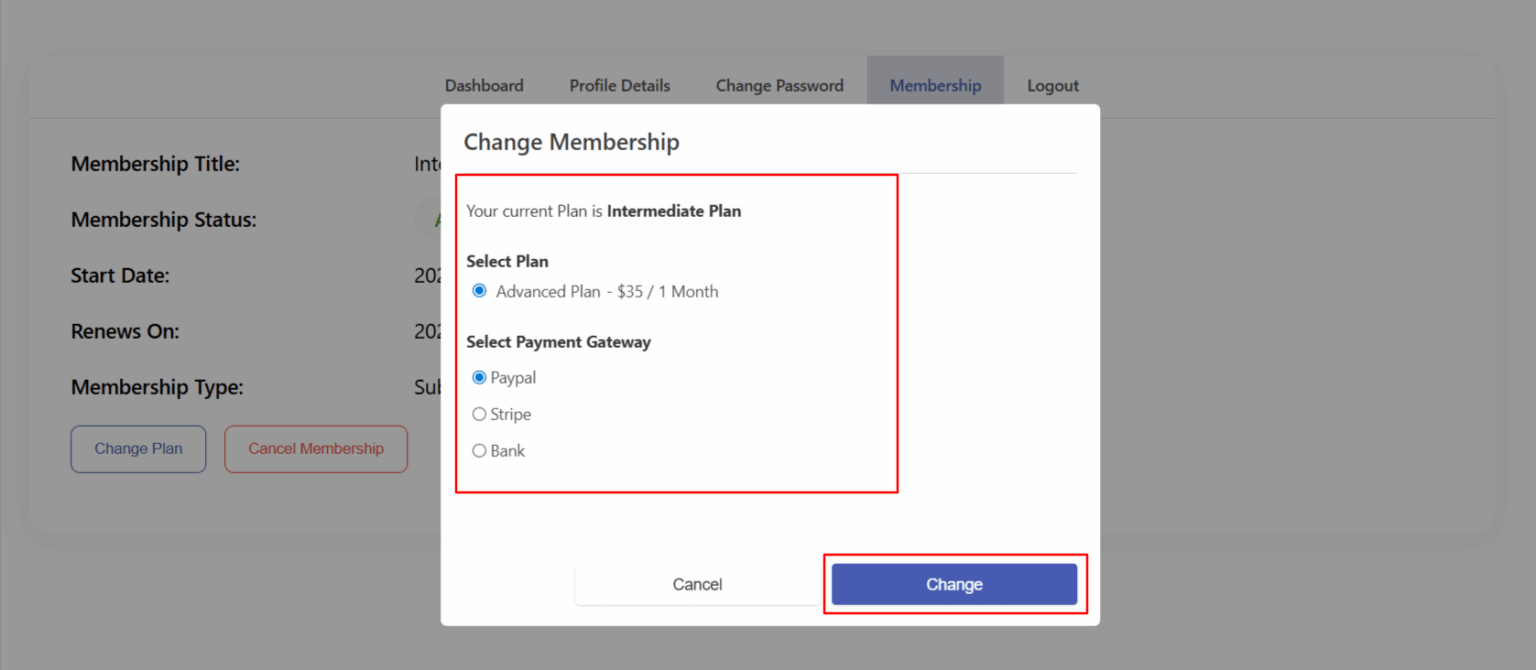
Members choose their preferred payment gateway from the available options (Stripe, PayPal, Bank Transfer, etc.).
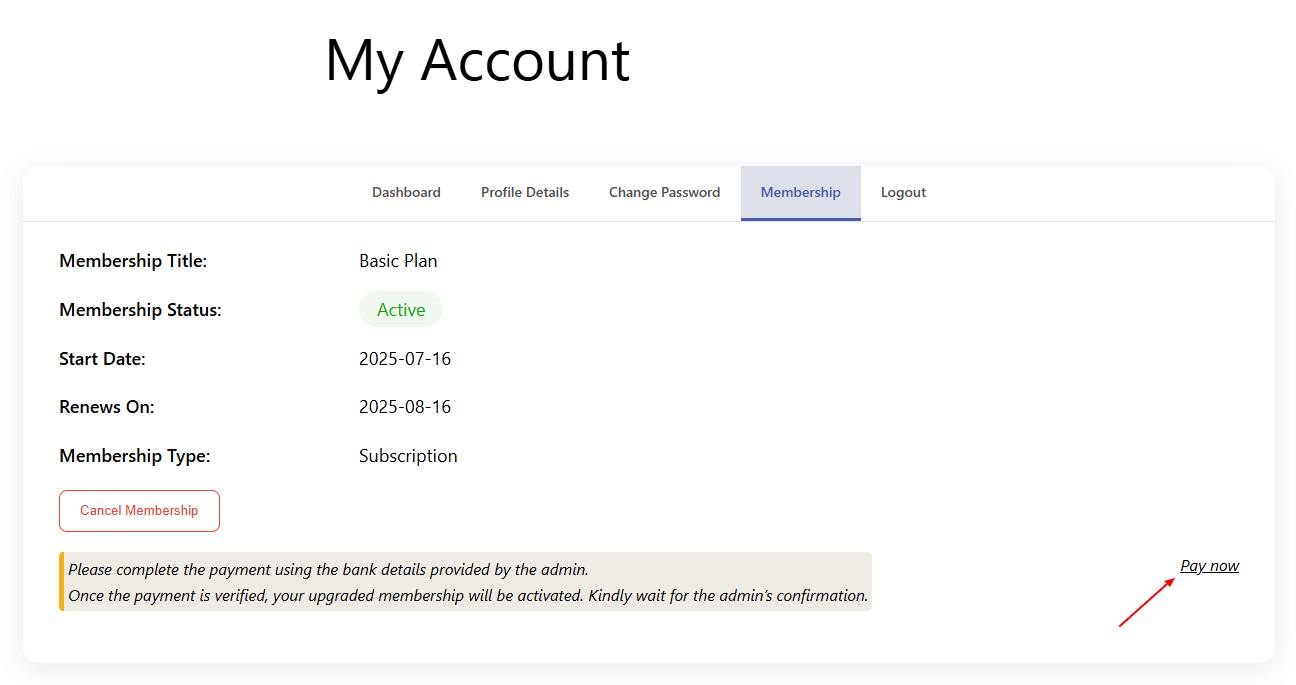
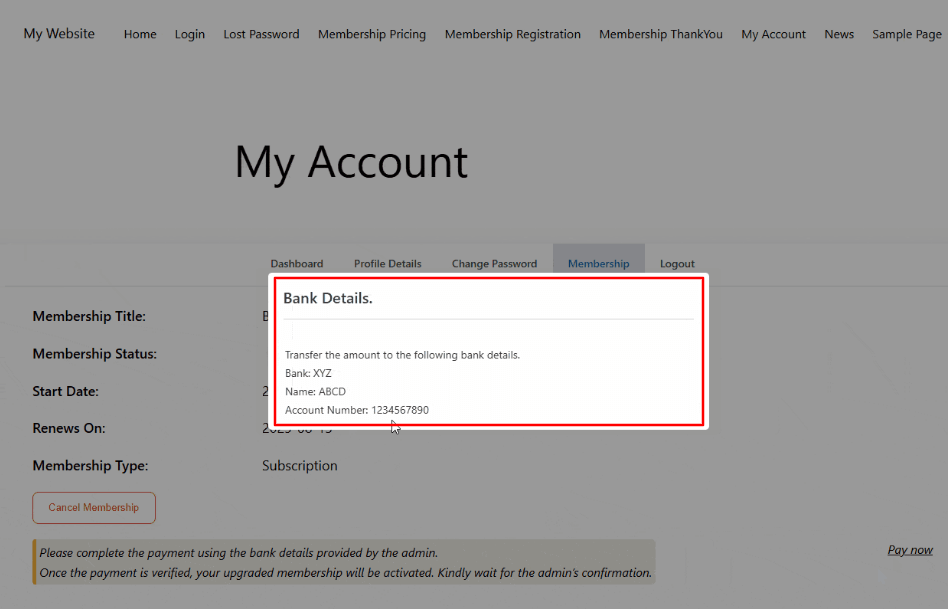
For PayPal, members are redirected to PayPal to complete payment. For Stripe, they enter their card details directly on your site. For bank transfer, they receive instructions for making the payment.
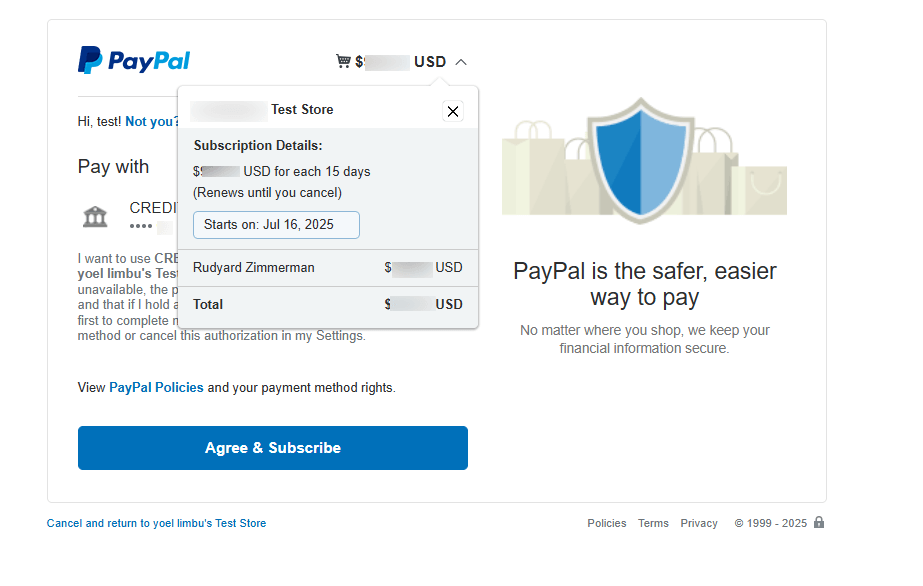
After successful payment, the member's account updates immediately. They gain access to all content and features included in their new membership tier.
If a member chooses bank transfer, you'll need to manually approve the payment from the Payment History tab before their upgrade takes effect.
Understanding Upgrade vs. Downgrade Behavior
User Registration & Membership handles upgrades and downgrades differently based on the membership type.
Upgrades from subscription plans — When a member upgrades from a recurring subscription to a higher-tier subscription, the change happens immediately after payment. Their billing cycle adjusts to the new plan's schedule.
Downgrades from subscription plans — When a member downgrades to a lower-tier subscription, the change is delayed until their current subscription expires. This ensures they receive the full value of what they've already paid for.
Downgrades from one-time payment plans — When a member downgrades from a one-time payment plan to either a free plan or a subscription plan, the change happens immediately.
Upgrades from free plans — Upgrades from free memberships always use full amount pricing, since there's no previous payment to prorate.
Common Upgrade Scenarios
Here are some common upgrade path configurations and how they work:
Three-tier membership (Bronze → Silver → Gold) — Set Bronze to upgrade to Silver and Gold. Set Silver to upgrade to Gold only. Gold has no upgrade path since it's the top tier.
Freemium model (Free → Premium) — Set the free plan to upgrade to one or more paid plans. Use full amount pricing since there's no previous payment to prorate.
Flexible upgrades — Allow members to upgrade to multiple options at once. For example, a Basic plan might offer upgrades to both a Premium plan and a Premium Plus plan, giving members choice.
Subscription to lifetime — Set a monthly or yearly subscription to upgrade to a lifetime access plan. Members pay once and never renew again.