
Cloud Storage
ProIntegrate Dropbox or Google Drive to automatically backup files uploaded through registration forms to your cloud storage account.
Last updated on Aug 13, 2026
Would you like to automatically send user-uploaded files from registration forms directly to Dropbox or Google Drive? User Registration & Membership allows you to integrate cloud storage services, so every file uploaded through your forms is automatically backed up to your cloud account. This tutorial will show you how to set up cloud storage integration step by step.
Before getting started, make sure you've installed and activated the User Registration & Membership Pro plugin on your WordPress site. Then, make sure you've installed and activated the Cloud Storage add-on.
Installing the Cloud Storage Add-on
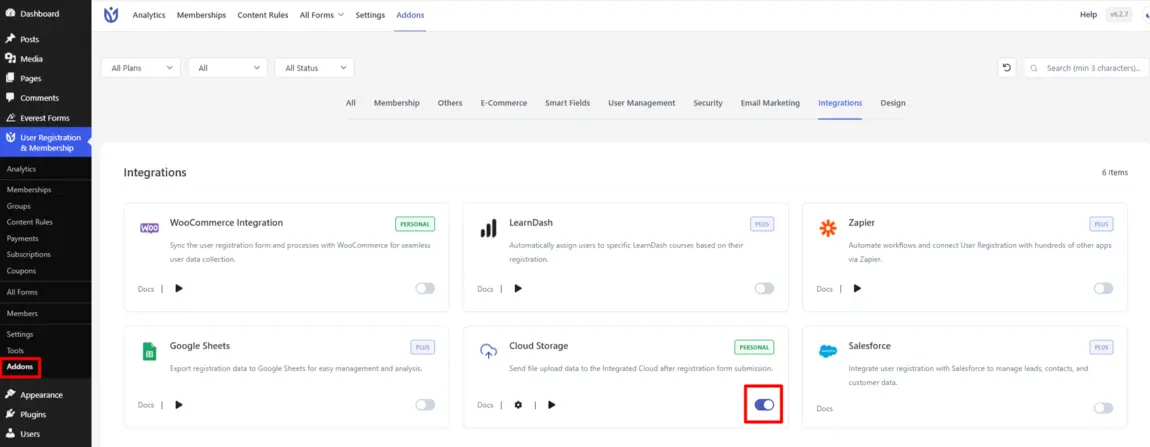
To install the Cloud Storage add-on, go to User Registration & Membership > Addons. Locate the Cloud Storage add-on and toggle the switch to Activate.
Setting Up Dropbox Integration
The Dropbox integration allows you to connect User Registration & Membership with your Dropbox account and store uploaded files in Dropbox.
Follow the steps below to create a Dropbox app, configure OAuth 2.0, connect your Dropbox account, and configure the upload folder.
1. Create a Dropbox App
First, log in to your Dropbox account and open the Dropbox Developer Platform.
Click App Console.
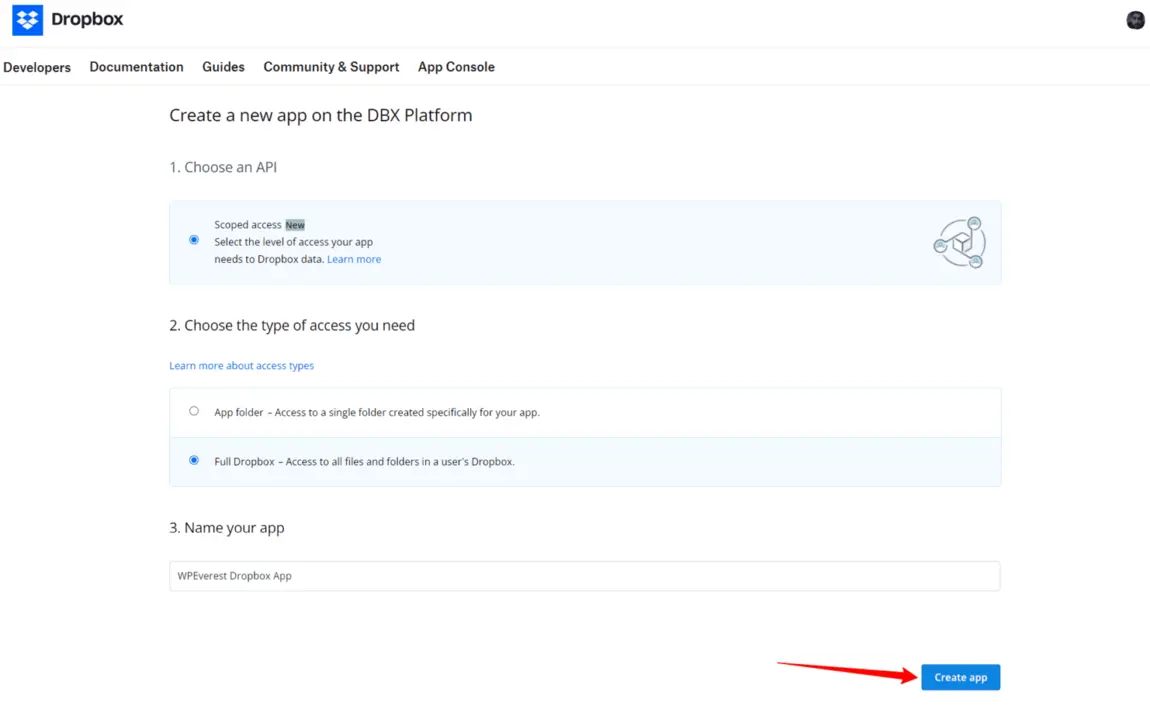
Click Create app.
Select Scoped App.
Select the appropriate access type for your integration.
Enter a name for your app.
Click Create app.
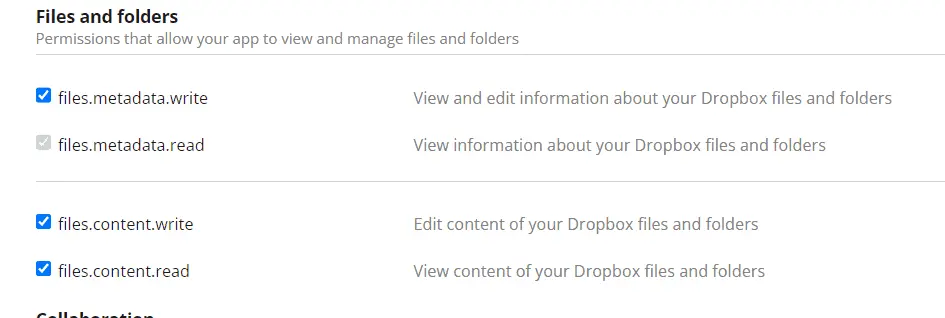
Dropbox uses scopes to control what your application can access. Select only the permissions required by the integration.
2. Configure OAuth 2.0
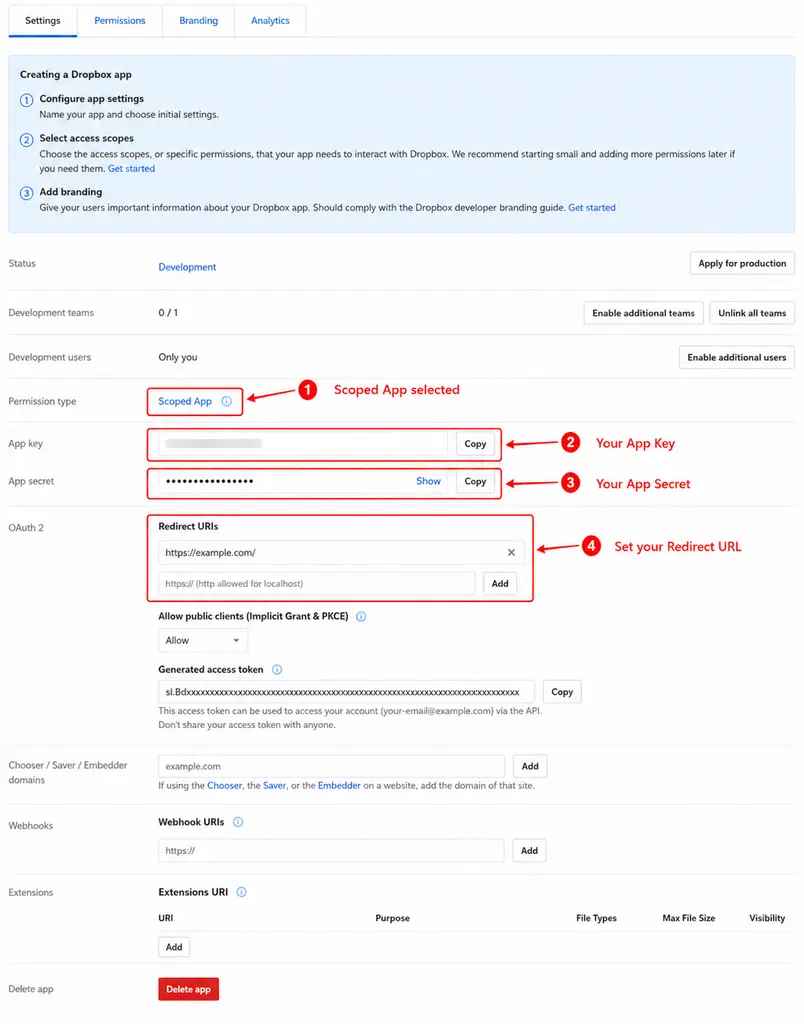
After creating the app, open the Settings tab and locate the OAuth 2 section.
Under Redirect URIs, enter your website URL.
For example:
https://example.com/
Click Add to save the redirect URI.
The redirect URI configured in Dropbox must exactly match the URI used by the integration. Dropbox verifies the redirect URI during the OAuth authorization process.
For more information, see the Dropbox OAuth 2 Guide.
3. Get the App Key and App Secret
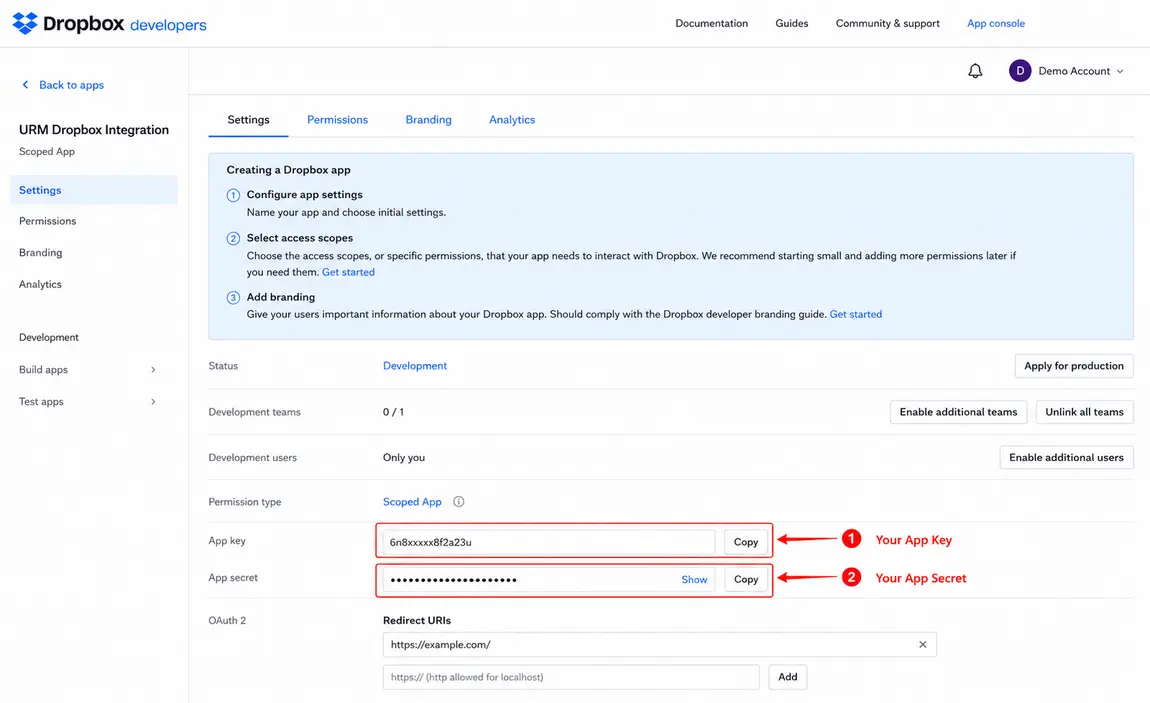
In the Settings tab, locate the App key and App secret.
Copy both values. You will need them when connecting Dropbox to User Registration & Membership.
4. Connect Dropbox to User Registration & Membership
In your WordPress dashboard, go to:
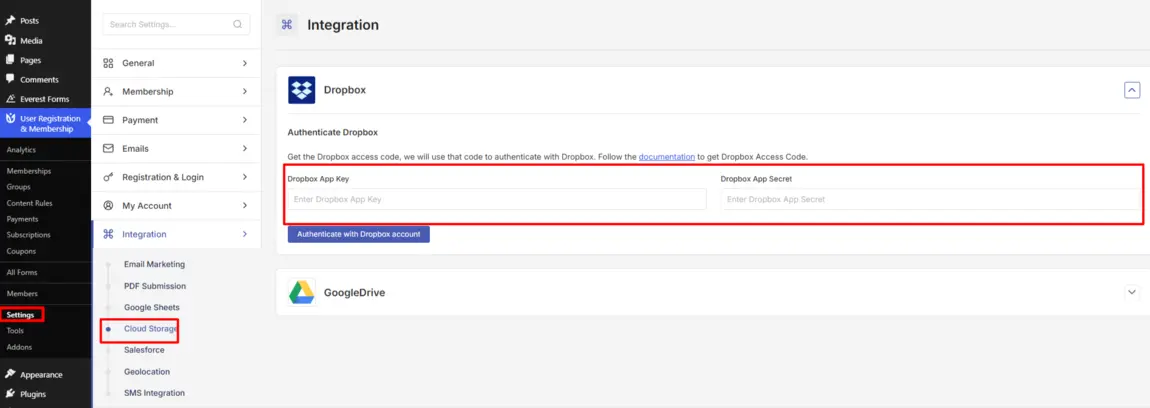
User Registration & Membership → Settings → Integration → Cloud Storage
Then:
Open the Dropbox tab.
Enter your App Key.
Enter your App Secret.
Click Save Changes.
Click Connect with Dropbox.
Sign in to Dropbox if prompted.
Review and authorize the requested permissions.
After authorization is completed, you will be redirected back to your website and the Dropbox connection will be established.
5. Configure the Dropbox Upload Folder
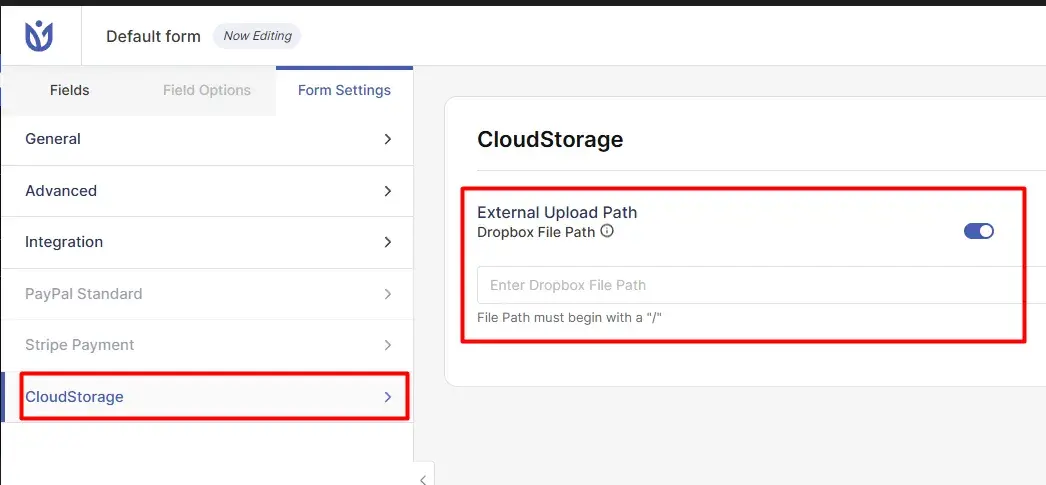
Once Dropbox is connected, configure the folder where uploaded files should be stored.
Enter the desired folder path in the Folder Path field.
For example:
/UserRegistrationFiles
The folder path should start with a forward slash (/).
If the specified folder does not exist, Dropbox will create it automatically.
6. Verify the Connection
After completing the configuration, upload a file through a User Registration & Membership form that uses file upload functionality.
Check your Dropbox account and verify that the uploaded file appears in the configured folder.
For additional information about Dropbox app configuration, see the Dropbox Getting Started Guide.
Setting Up Google Drive Integration
Follow the steps below to connect Google Drive with User Registration & Membership and configure it as your cloud storage provider.
1. Create a Google Cloud Project
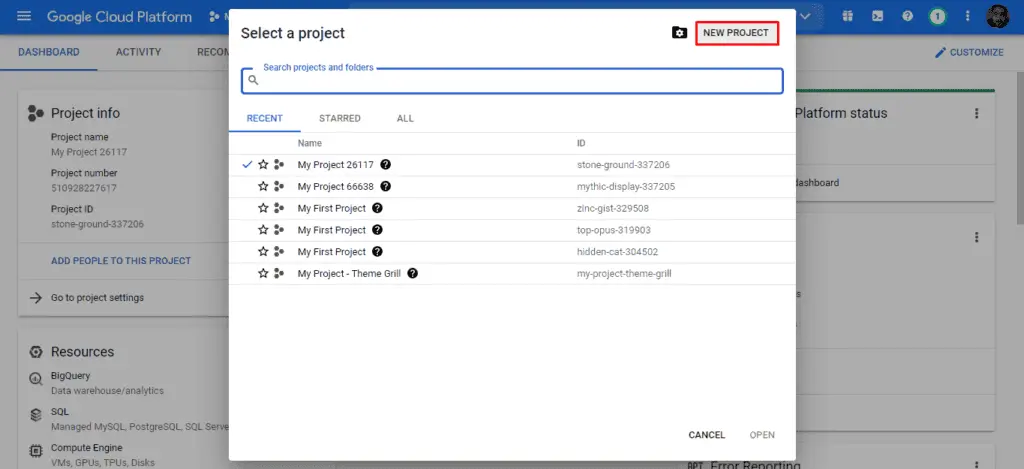
Log in to the Google Cloud Console and create a new project.
Click Create Project.
Enter a name for your project.
Click Create.
Once the project is created, select it from the project dropdown at the top of the page.
2. Enable the Google Drive API
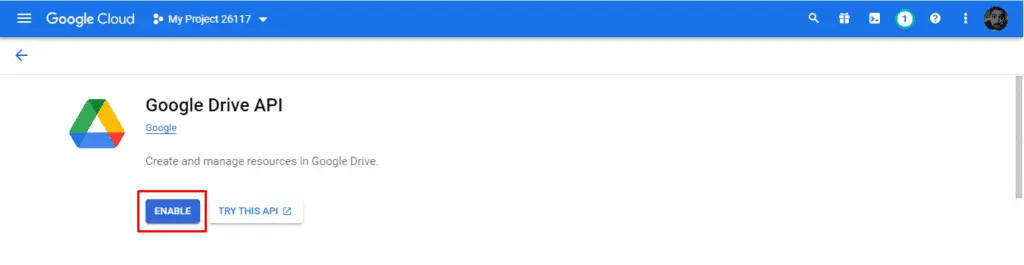
After creating your project, enable the Google Drive API.
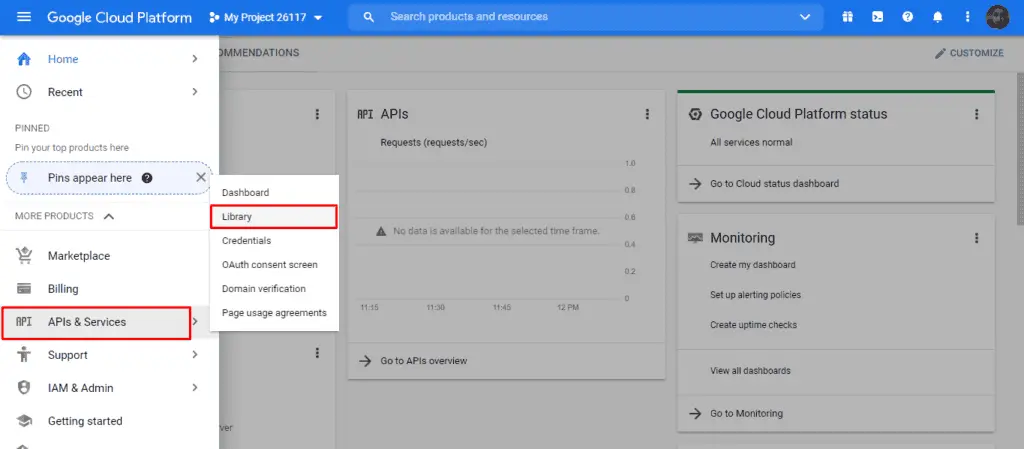
In the Google Cloud Console, go to APIs & Services → Library.
Search for Google Drive API.
Select Google Drive API from the search results.
Click Enable.
3. Configure the OAuth Consent Screen
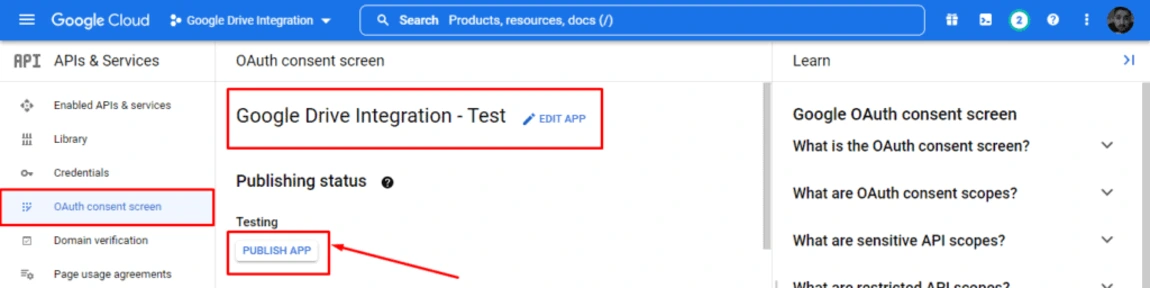
Before creating OAuth credentials, configure the OAuth consent screen for your application.
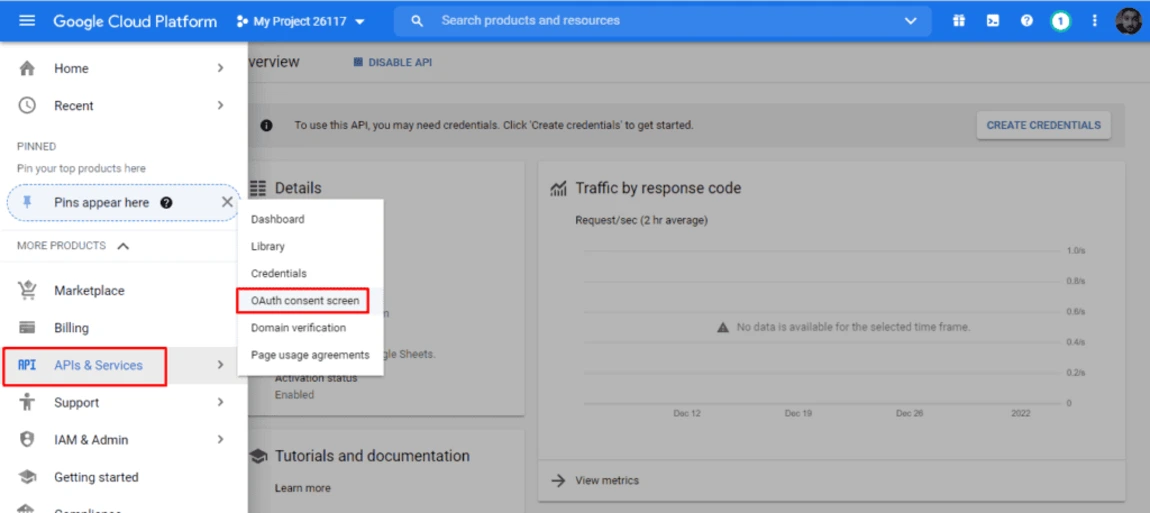
Go to Google Auth Platform or APIs & Services → OAuth consent screen, depending on the Google Cloud Console interface.
Select the appropriate user type.
Enter your application name and required application information.
Configure the required scopes and test users if prompted.
Save the configuration.
Note: Google may require additional verification or test-user configuration depending on the type of Google account and scopes used by your application.
4. Create OAuth Credentials
After configuring the consent screen, create OAuth credentials.
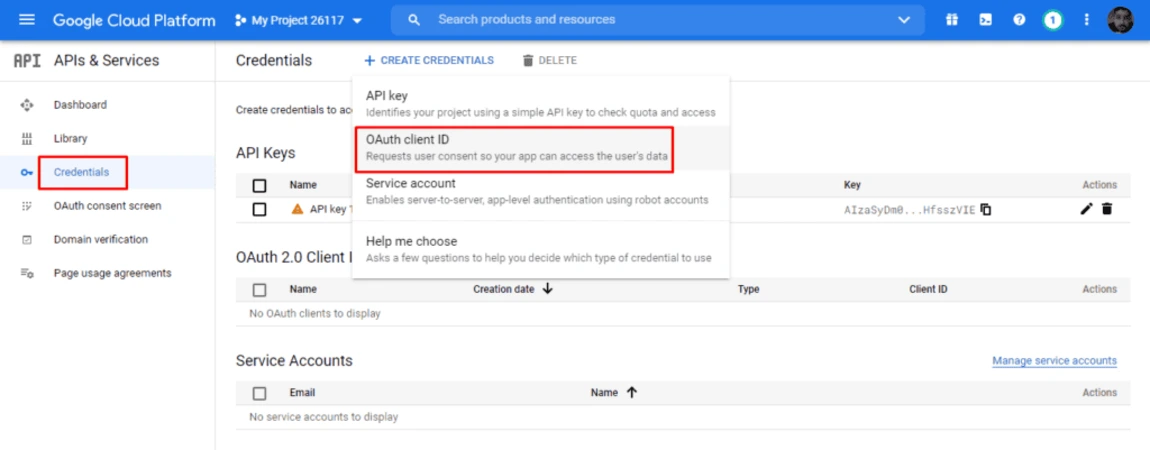
Go to APIs & Services → Credentials.
Click Create Credentials.
Select OAuth client ID.
Choose Web application as the application type.
Add your site URL to the Authorized JavaScript origins field.
Add your redirect URL to the Authorized redirect URIs field.
The redirect URL should be your site URL followed by:
/wp-admin/admin.php
For example:
https://example.com/wp-admin/admin.php
Click Create.
Google will generate your OAuth credentials. Copy the Client ID and Client Secret.
5. Connect Google Drive to User Registration & Membership
In your WordPress dashboard, go to:
User Registration & Membership → Settings → Integration → Cloud Storage
Then:
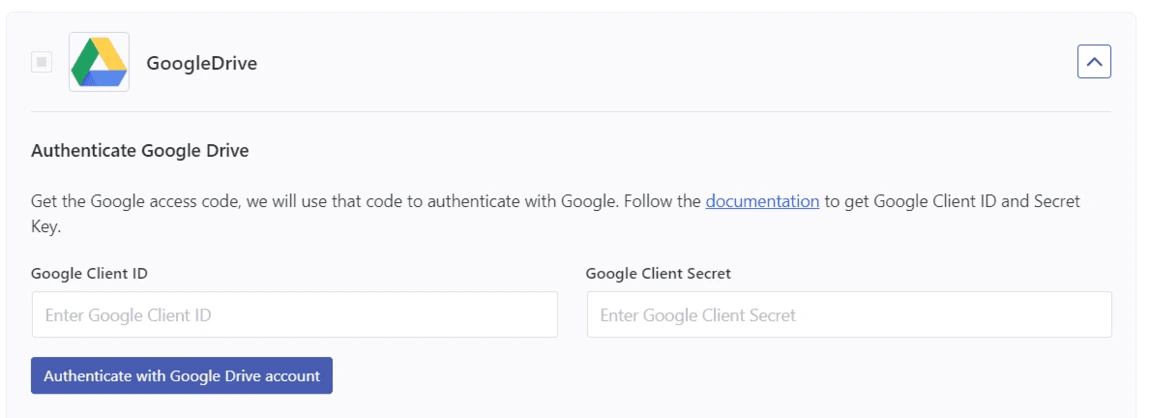
Select the Google Drive tab.
Enter your Client ID.
Enter your Client Secret.
Click Save Changes.
Click Connect with Google Drive.
Select your Google account when prompted.
Review and grant the requested permissions.
After authorization is complete, you will be redirected back to your website and a success message will be displayed.
6. Configure Google Drive Upload Settings
After connecting Google Drive, configure the folder where uploaded files should be stored.
Enter the desired Folder Name in the Google Drive upload settings.
For example:
UserRegistrationFiles
This will create or use a folder named UserRegistrationFiles in the root directory of your Google Drive.
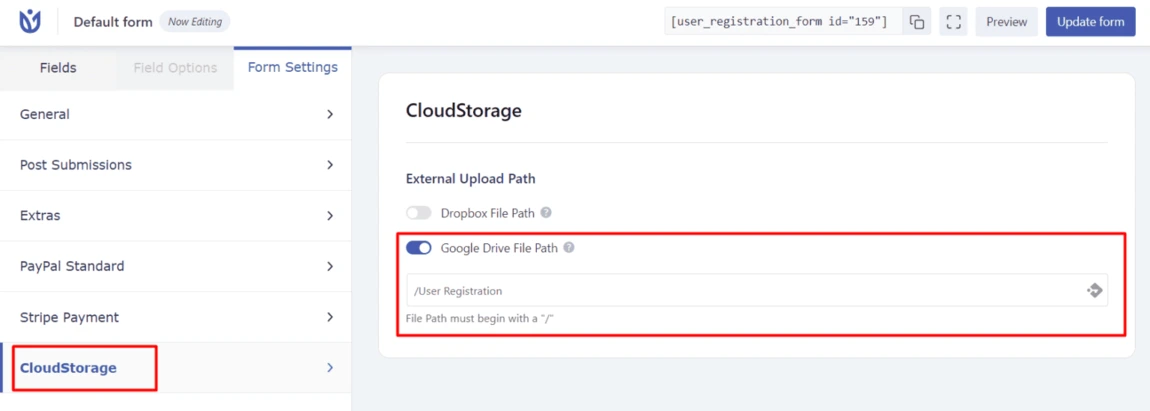
If the specified folder does not exist, Google Drive will create it automatically.
Testing Your Cloud Storage Integration
To verify that your Google Drive integration is working correctly:
Create a test registration form.
Add a File Upload field to the form.
Configure the form and publish it.
Submit the form with a test file.
Open your connected Google Drive account.
Navigate to the configured folder.
Verify that the uploaded file appears in the folder.
You can follow the same process to test your Dropbox integration.
That's it! Your Google Drive cloud storage integration is now configured and ready to store files uploaded through your registration forms.
For more information, see the and .