
Send Data to Custom URL (Webhook)
ProAutomatically send registration form data to external services via custom URL endpoints, enabling seamless integration with CRMs, marketing tools, and third-party applications.
Last updated on Jul 15, 2026
Would you like to automatically pass user data to an external service whenever someone registers on your site? The Webhook feature in User Registration & Membership lets you connect your registration forms to any custom URL endpoint, so form submission data is sent automatically — without any custom code.
This is useful for syncing new registrations with CRMs, marketing tools, internal databases, or any third-party application that accepts HTTP requests.
This feature requires User Registration & Membership Pro.
Prerequisites
Before you begin, make sure the following are in place:
The User Registration & Membership plugin is installed and activated.
The User Registration & Membership Pro add-on is installed and activated with a valid license key.
You have a working custom URL endpoint (HTTP or HTTPS) that is ready to receive incoming data.
Accessing the Webhook Settings
To find the webhook configuration options, navigate to:
User Registration & Membership → Settings → Misc → AdvancedThe webhook settings are located within the Advanced section of the Misc tab.
Setting Up Your Webhook
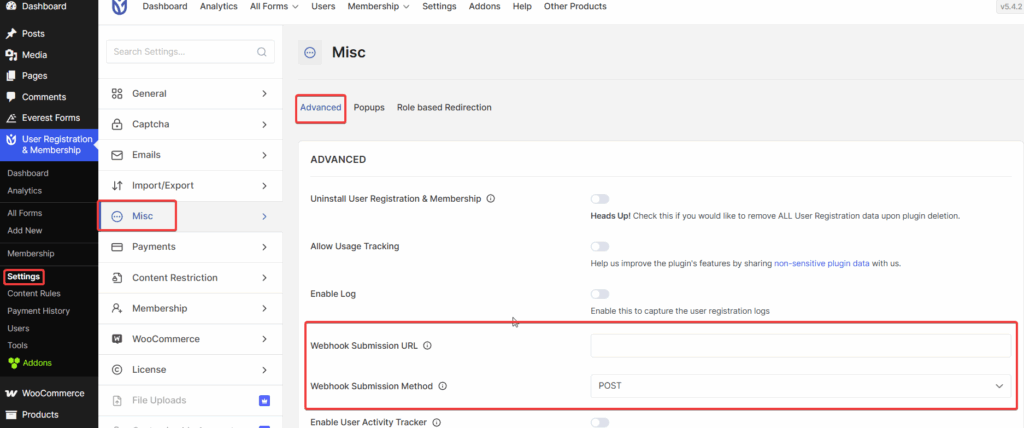
Follow these steps to configure your webhook:
Go to User Registration & Membership → Settings → Misc → Advanced.
In the URL field, enter the custom endpoint where you want to send registration data.
In the Method dropdown, select the HTTP method that your endpoint requires.
Optionally, enable Profile Details Update if you want the webhook to also fire when users update their profile.
Click Save Changes to activate the integration.
Once saved, User Registration & Membership will automatically send data to your custom URL whenever a new user registers.
Only newly registered users' data will be sent once this feature is enabled. Data for users who registered before the webhook was configured will not be sent retroactively.
Webhook Settings Explained
URL
Enter the full endpoint URL where registration data should be sent. This must be a valid HTTP or HTTPS address that your external service or application has provided to receive incoming requests.
Example:
https://yourapp.com/api/webhook/registerMake sure the URL is accessible from your server and is not blocked by any firewall or authentication layer.
Method
Select the HTTP method to use when sending data. User Registration & Membership supports three options:
Method | Description | When to Use |
|---|---|---|
Post | Sends data as a standard form-encoded POST request. | Compatible with most traditional web servers and basic form handlers. |
Post (JSON) | Sends data as a JSON-formatted POST request. | Recommended for modern REST APIs and third-party integrations. |
GET | Sends data as query parameters appended to the URL. | Suitable for simple endpoints or services that only accept GET requests. |
If you are unsure which method to use, check your external service's API documentation. Most modern APIs expect Post (JSON).
Profile Details Update
By default, the webhook only fires when a new user completes registration.
Enabling Profile Details Update extends this behavior so the webhook also sends data when an existing user updates their profile from the My Account page.
This is useful if you need to keep an external system in sync whenever user information changes — not just at the point of registration.
What Data Is Sent?
When the webhook fires, it sends all form field data submitted during registration or profile update. This includes standard fields such as username, email, and first/last name, as well as any custom fields you have added to your registration form.
The exact payload structure depends on the HTTP method you selected:
Post and Post (JSON) send data in the request body.
GET sends data as URL query parameters.
Testing Your Webhook
After saving your settings, test the webhook to confirm it is working correctly:
Open a separate browser window or use an incognito tab.
Go to your registration form and submit a test registration.
Check your external endpoint or service to confirm the data was received.
If your external service provides request logs, review them to verify the payload structure and confirm all expected fields were included.
Tip: Tools like Webhook.site or RequestBin allow you to create a temporary URL to inspect incoming webhook payloads. This is helpful for verifying your setup before connecting to your actual service.
Frequently Asked Questions
When does the webhook send data?
The webhook sends data automatically when a new user completes registration. If you have enabled the Profile Details Update option, it also sends data when existing users update their profile information from the My Account page.
What data is sent to the custom URL?
All form field data submitted during registration or a profile update is included — such as name, email address, and any custom fields on your registration form.
Can I send data to multiple URLs simultaneously?
The webhook settings support a single custom URL. For routing data to multiple destinations, consider using a middleware service such as Zapier, which can receive a single webhook and forward it to multiple applications.
Does the webhook send data for users who registered before I enabled it?
No. The webhook only sends data for users who register after the feature has been enabled. It does not process historical registration data. However, once Profile Details Update is enabled, existing users' data will be sent the next time they update their profile.
My endpoint isn't receiving data. What should I check?
Confirm the URL is correct and publicly accessible.
Check that your endpoint supports the HTTP method you selected.
Verify there are no firewall rules or authentication requirements blocking incoming requests from your server.
Test your endpoint using a tool like Webhook.site to rule out configuration issues on your site.
Once your webhook is configured and saved, User Registration & Membership will automatically deliver registration data to your custom URL on every new signup. You can return to Settings → Misc → Advanced at any time to update the URL, change the method, or toggle the profile update option.
For connecting to 1,500+ apps without a custom endpoint, see our guide on the Zapier integration.