
Smart Tags
Dynamic placeholders that automatically populate emails and forms with personalized user data like usernames, membership details, and site information.
Last updated on Aug 7, 2026
Overview
Would you like to personalize your emails and forms with dynamic user information? User Registration & Membership allows you to insert smart tags - dynamic placeholders that automatically populate with real data like usernames, membership details, and site information.
This tutorial will show you how to use smart tags to create personalized email notifications and set default form values.
What Are Smart Tags?
Smart tags are dynamic placeholders that automatically insert real WordPress data into your emails, messages, and forms. Instead of manually entering user information, smart tags pull data like usernames, email addresses, membership plan names, and site details automatically.
Example: Instead of writing "Hello," you can write "Hello {{first_name}}," and each user will see their actual first name.
Before You Begin
Before getting started, make sure you've installed and activated the User Registration & Membership plugin on your WordPress site.
Finding Available Smart Tags
User Registration & Membership provides two ways to view all available smart tags.
Method 1: From the Dashboard
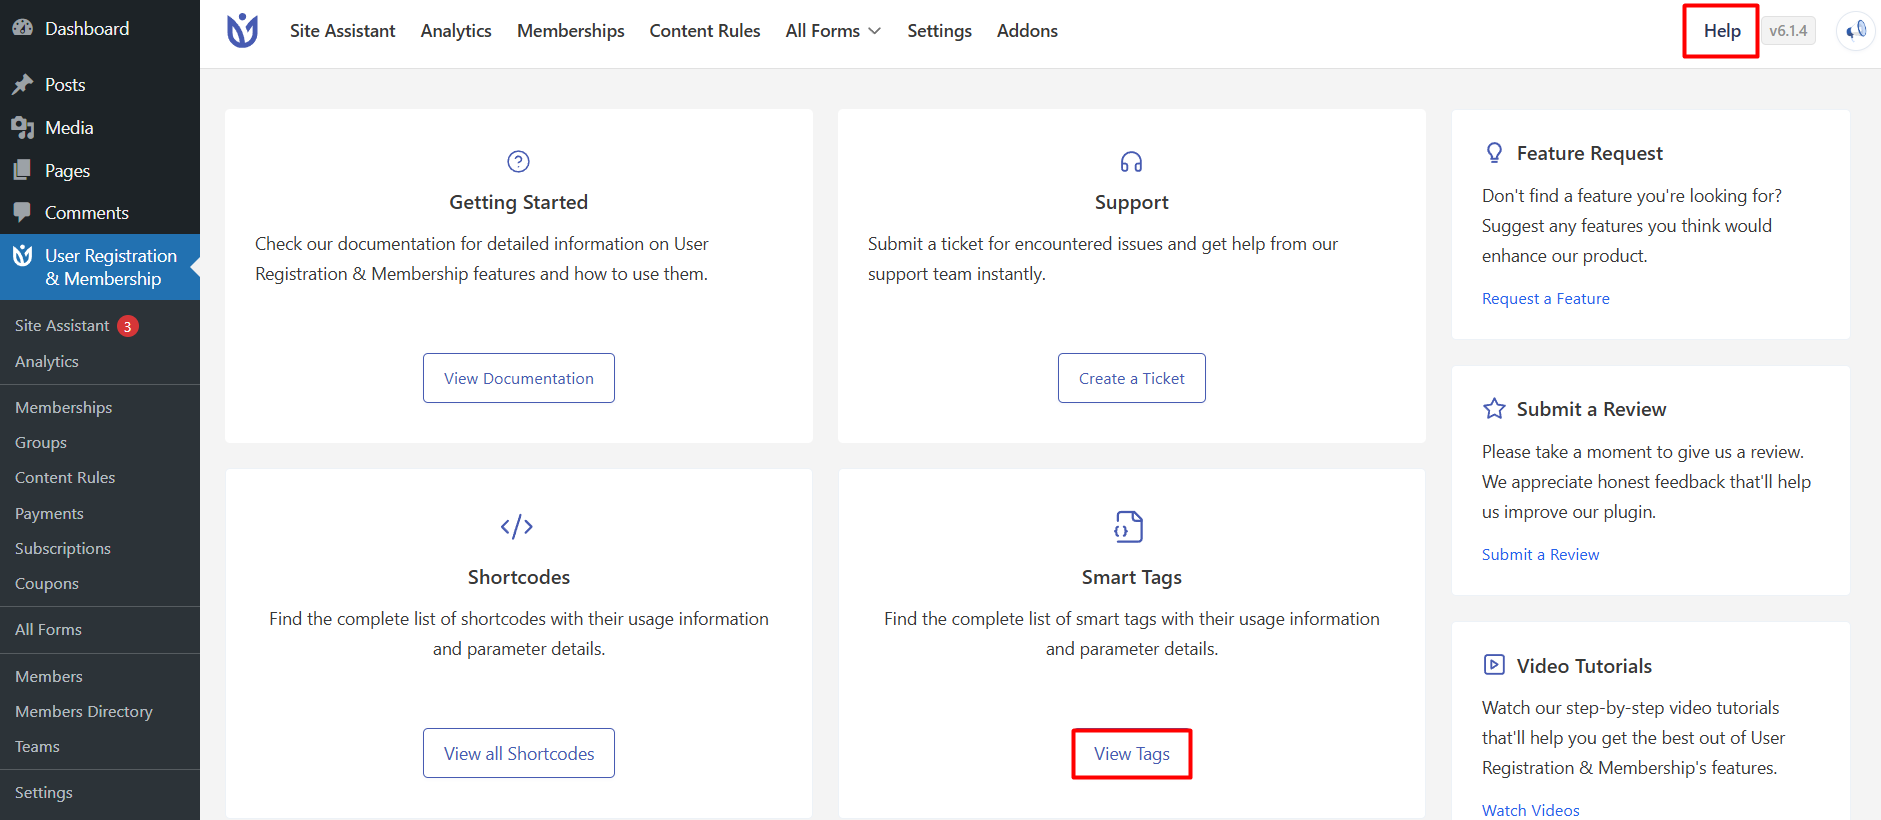
Go to User Registration & Membership → Dashboard
Click the Help tab
Under the Smart Tags section, click View Tags
Click the + sign next to each category to explore available tags
Method 2: In-Context While Editing
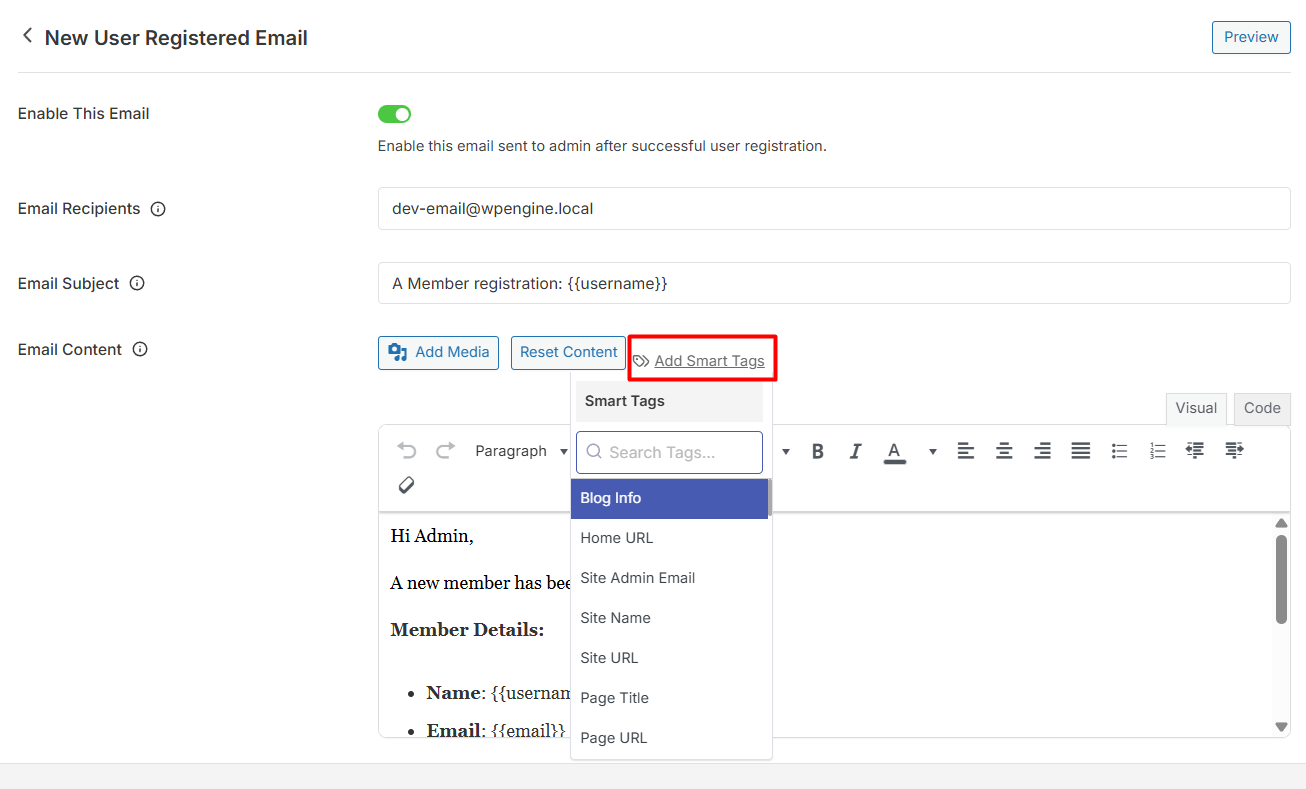
When editing emails or messages, look for the Smart Tags button or Insert Smart Tag option. This shows you tags relevant to that specific context.
Adding Smart Tags to Email Notifications
Email notifications are one of the most common places to use smart tags. Here's how to add them to your email templates.
Step 1: Access Email Settings
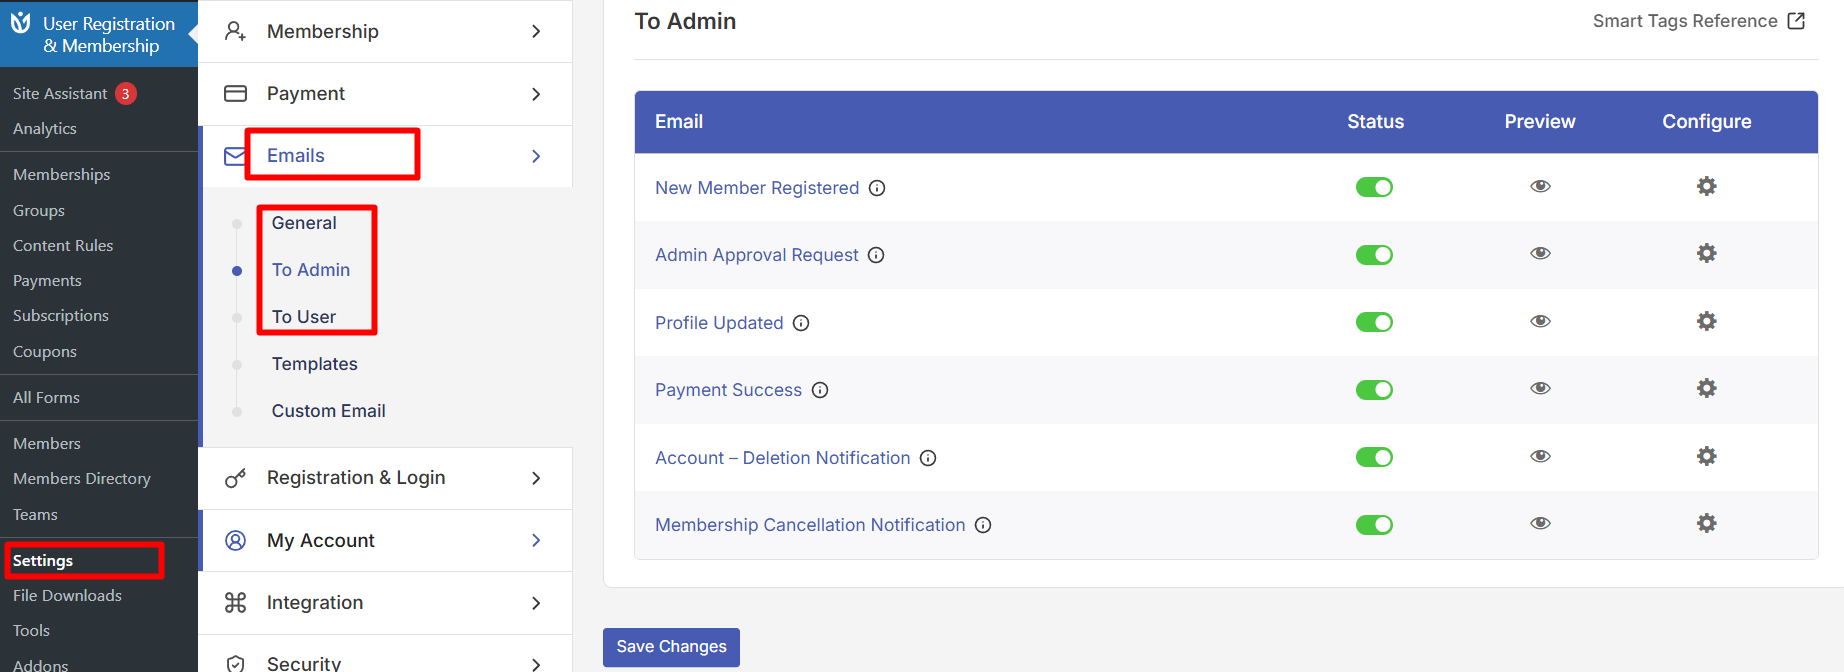
Navigate to User Registration & Membership → Settings
Click the Emails tab
Choose the appropriate tab based on your recipient:
General — Global email settings
To Admin — Emails sent to site administrators
To User — Emails sent to registered users
Step 2: Select an Email Template
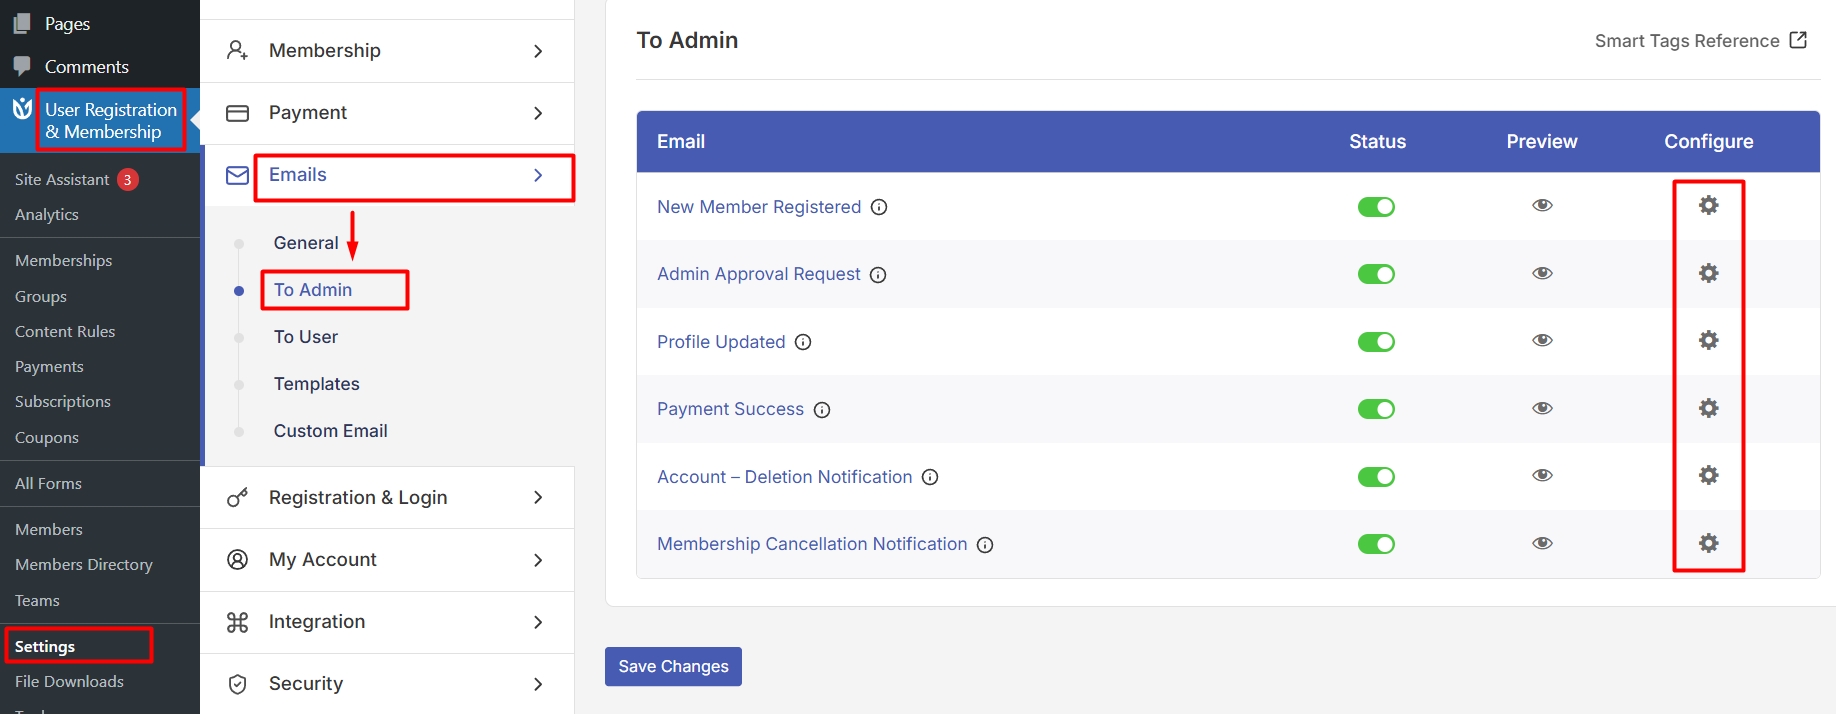
Find the email template you want to customize
Click the settings icon under the Configure tab for that email
Step 3: Insert Smart Tags
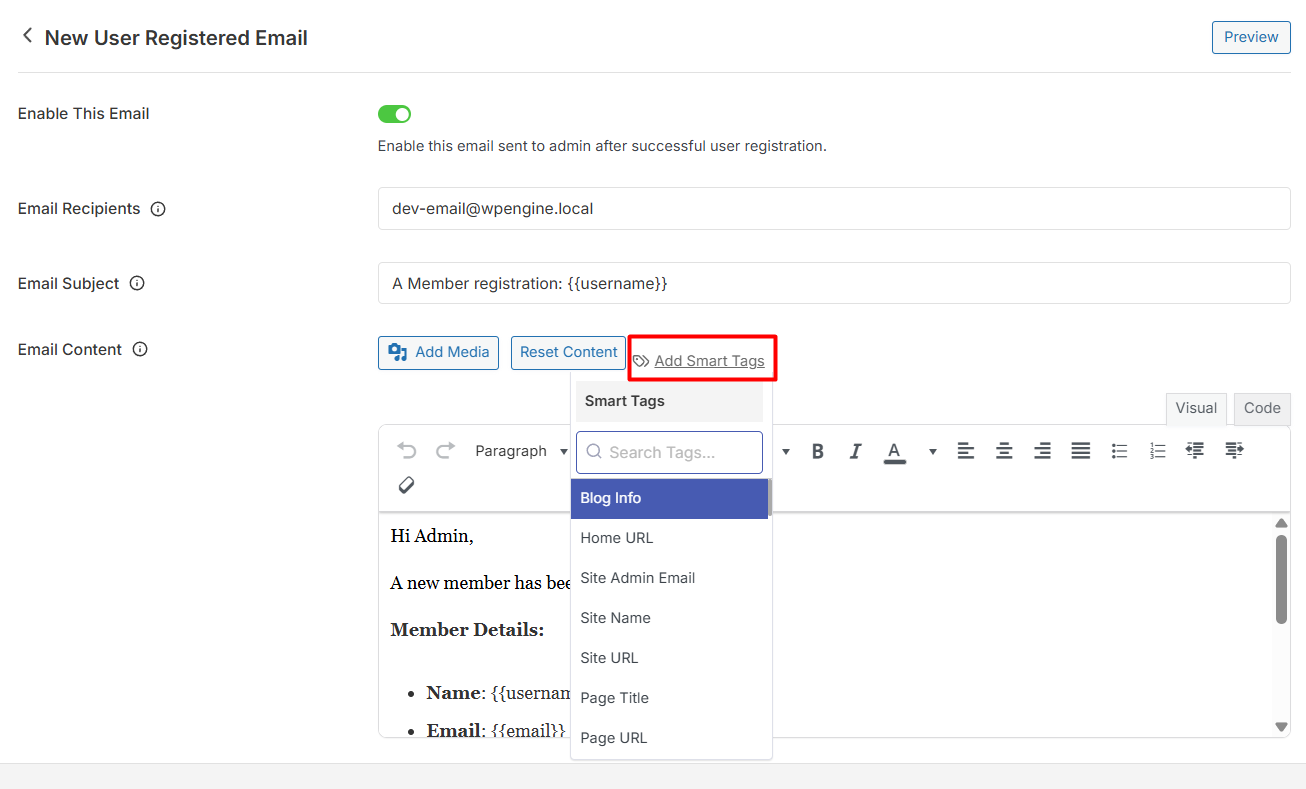
In the email editor, place your cursor where you want the smart tag to appear
Click the Add Smart Tags link
Select the appropriate smart tag from the list
The tag will be inserted in double curly brace format: {{tag_name}}
Step 4: Save and Preview
Click Save to preserve your changes
Use the Preview option to see how the email will look with sample data
Send a test registration to verify smart tags work correctly
Using Smart Tags for Default Form Field Values
Smart tags can also set default values for registration form fields, saving users time and reducing errors.
Step 1: Open the Form Builder
Go to User Registration & Membership → All Forms
Select the form you want to edit, or create a new one
Step 2: Configure Field Default Value
Drag and drop an input field onto your form
Click on the field to open Field Options
Navigate to Advanced Settings
Find the default value option for the selected field
Step 3: Insert Smart Tags
Click the <> button to see the list of available smart tags
Select the smart tag you want to use
The field will now auto-populate with that data when users view the form
Example: Use {{unique_id}} to automatically generate a unique identifier for each user registration.
Smart Tags for Custom Form Fields
If you've created custom fields in your registration form, you can use their values as smart tags in emails and other forms.
Finding Custom Field Smart Tags
Go to the form builder
Click on the custom field you created
Under Field Options, find the field name or unique key
Copy the unique key
Using Custom Field Smart Tags
Custom field smart tags follow this format:
{{field_name_with_unique_key}}Example: If your country field has the unique key country_1748242489, the smart tag would be:
{{country_1748242489}}Adding Custom Field Tags to Emails
Navigate to User Registration → Settings → Emails
Select the email template you want to customize
Insert the custom field smart tag using the format above
Save your changes
Complete Smart Tags Reference
User Registration & Membership provides smart tags organized into several categories. Here's a comprehensive reference of all available tags.
Basic User Information
Smart Tag | Description | Example |
|---|---|---|
| User's login username | |
{{ur_login}} | Alternative username tag | |
| User's first name | |
| User's last name | |
| User's display name | |
| User's biographical information | |
| User's nickname | |
| Unique user ID number | |
| Unique identifier for each registration |
Website Information
Smart Tag | Description |
|---|---|
| Your website's name |
| Your website's URL |
| Your site's home page URL |
| Site administrator's email address |
Membership Information
Smart Tag | Description |
|---|---|
| Name of the user's membership plan |
| Name of the user's team (Team Membership addon) |
| Membership expiration date |
| Remaining time until drip content becomes available |
Date and Time
Smart Tag | Description |
|---|---|
| Today's date |
| Current time |
Security and Tracking
Smart Tag | Description |
|---|---|
| Email verification link |
| Password reset link |
| User's geographic location (Geolocation addon) |
Form Information
Smart Tag | Description |
|---|---|
| Name of the registration form |
| Unique form ID number |
Smart Tag Best Practices
Follow these guidelines to get the most out of smart tags:
Always Test Before Going Live
Send test registrations to verify that smart tags display correctly in emails and forms. Check both the subject line and email body.
Use Descriptive Context
When using smart tags in emails, provide context so users understand what the dynamic content represents.
Good: "Welcome to {{site_name}}, {{first_name}}! Your username is {{username}}."
Poor: "{{first_name}} {{username}} {{site_name}}"
Preserve Smart Tag Syntax
Smart tags must use the exact double curly brace syntax: {{tag_name}}. Don't modify the tag names or remove the braces.
Combine Smart Tags with Static Text
Mix smart tags with regular text to create natural, personalized messages:
Hi {{first_name}},

Thank you for joining {{site_name}}! Your {{membership_plan}} membership is now active.

You can log in at {{site_url}} using your username: {{username}}

Welcome aboard!
Check Smart Tag Availability
Not all smart tags work in every context. For example, membership-related tags only work when the Membership module is active and the user has a membership plan.
Common Smart Tag Use Cases
Here are practical examples of how to use smart tags effectively.
Personalized Welcome Email
Subject: Welcome to {{site_name}}, {{first_name}}!

Hi {{first_name}},

Thank you for registering at {{site_name}}. Your account has been created successfully.

Username: {{username}}
Email: {{email}}

You can log in at {{site_url}} to access your account.

Best regards,
The {{site_name}} Team
Membership Confirmation Email
Subject: Your {{membership_plan}} Membership is Active

Hello {{first_name}},

Your {{membership_plan}} membership at {{site_name}} is now active!

Membership Details:
- Plan: {{membership_plan}}
- Expiration: {{expiry_date}}

Access your member dashboard at {{site_url}}/my-account

Thank you for your support!
Password Reset Email
Subject: Reset Your Password for {{site_name}}

Hi {{username}},

We received a request to reset your password for {{site_name}}.

Click the link below to create a new password:
{{reset_link}}

If you didn't request this, you can safely ignore this email.

Best regards,
{{site_name}}
Auto-Generated User ID Field
Set the default value of a hidden field to {{unique_id}} to automatically assign each user a unique identifier during registration.
Troubleshooting Smart Tags
If smart tags aren't working as expected, check these common issues:
Smart Tags Display as Plain Text
Problem: Email shows {{username}} instead of the actual username.
Solution: Make sure you're using the exact smart tag syntax with double curly braces. Check that the smart tag name is spelled correctly.
Custom Field Smart Tags Don't Work
Problem: Custom field values don't appear in emails.
Solution: Verify you're using the field's unique key, not just the field label. The unique key can be found in the field options under the form builder.
Membership Smart Tags Are Empty
Problem: Membership-related tags like {{membership_plan}} show nothing.
Solution: Ensure the Membership module is active and the user has an assigned membership plan. These tags only work for users with memberships.
Smart Tags Work in Preview but Not in Actual Emails
Problem: Preview shows correct data, but sent emails don't.
Solution: Send a test registration to verify. If the issue persists, check your email delivery settings and SMTP configuration.
That's It! Now you know how to use smart tags to personalize emails and set default form values in User Registration & Membership. Smart tags save time, reduce errors, and create a more professional experience for your users.
Next, would you like to learn how to customize email templates to match your brand? Be sure to check out our guide on customizing email content for all the details.