
Custom Email
ProAutomate membership communications by creating custom email campaigns that trigger when members sign up, upgrade, or when their membership expires.
Last updated on Jul 14, 2026
Want to send automated emails to members when they sign up, when their membership expires, or when they upgrade? User Registration & Membership allows you to create custom email campaigns that trigger automatically based on membership actions. This tutorial will show you how to set up and customize these automated emails.
Before getting started, make sure you've installed and activated the User Registration & Membership Pro plugin on your WordPress site. Then, make sure you've installed and activated the Custom Email add-on. This feature requires a Personal plan or higher.
Activating the Custom Email Add-on
To use custom emails, you'll first need to activate the add-on. Navigate to User Registration & Membership → Addons in your WordPress dashboard. Locate the Custom Email add-on and toggle it to Activate.
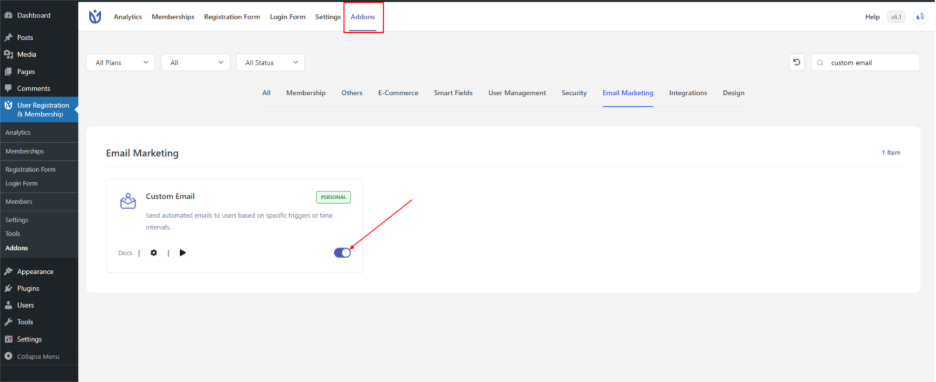
Once activated, you'll be able to create automated emails that send based on membership events.
Creating Your First Custom Email
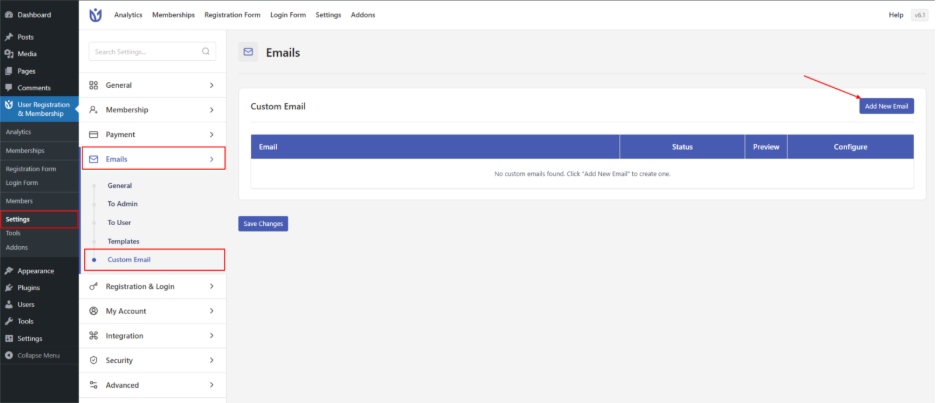
Go to User Registration & Membership → Settings → Email → Custom Email. Here, you'll see the interface for creating custom emails.
Click the Add New Email button to enable your custom email.
Configuring Email Settings
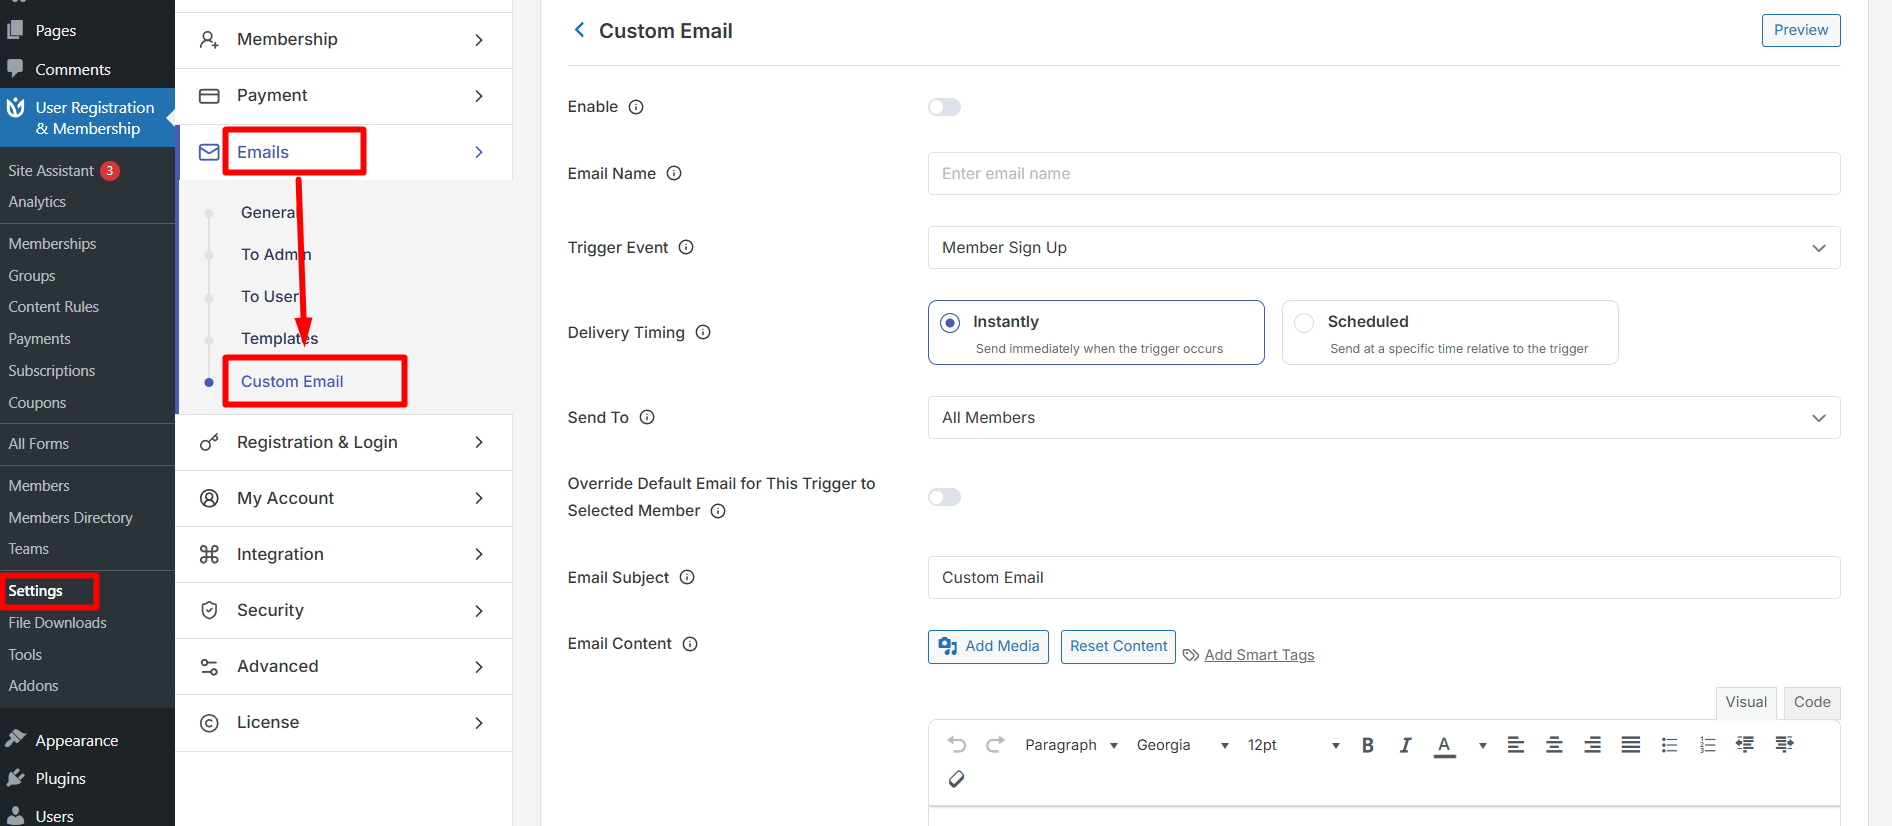
Once enabled, you'll configure several key settings for your custom email.
Naming Your Email
Enter a reference name in the Email Name field. This name is for your internal use only—members won't see it. Use a descriptive name like "Welcome Email" or "Expiry Reminder" so you can easily identify the email later.
Choosing a Trigger Event
From the Trigger Event dropdown, select the membership action that will send this email. You can choose from:
Member Signs Up — Sends when someone first purchases a membership
Membership Expired — Sends when a membership reaches its end date
Membership Cancellation — Sends when a member cancels their subscription
Membership Upgrade — Sends when a member upgrades to a higher tier
Membership Renewal Success — Sends when a subscription renews successfully
Membership Renewal Failed — Sends when a renewal payment fails
You can only select one trigger event per custom email. If you need emails for multiple events, create separate custom emails for each one.
Setting Email Timing
Choose when the email should be sent relative to the trigger event:
Send Immediately — The email sends right away when the event occurs
Schedule for Later — The email sends after a delay you specify
If you choose Schedule for Later, you'll configure the delay timing:
Select whether to send the email Before or After the trigger event
Enter the duration value (for example, "3")
Choose the time unit: Minutes, Hours, Days, Weeks, or Months
For example, to send a reminder 7 days before a membership expires, you would:
Select "Before" from the Before/After dropdown
Enter "7" in the duration value field
Select "Days" from the duration unit dropdown
Keep in mind that some trigger events only allow 'After' timing. The system will automatically change 'Before' to 'After' for events like member signs up, membership cancellation, upgrade, downgrade, renewal success, and renewal failed.
Selecting Recipients
From the Send To dropdown, choose who should receive this email:
All Members — Sends to all members when the trigger event occurs
Specific Memberships — Sends only to members with selected membership plans
Site Administrator — Sends to site admins instead of members
If you select Specific Memberships, a new field appears where you can choose which membership plans this email applies to. Only members with those plans will receive the email.
Admin-only emails are useful for notifications about cancellations or failed renewals, so you can follow up with members who need assistance.
Overriding Default Emails
Enable the Replace Default Email option if you want this custom email to replace the plugin's built-in email for the selected trigger event. When enabled, only your custom email will be sent—the default plugin email won't go out.
If you'd prefer to send both the default email and your custom email, leave this option disabled.
Writing Your Email Content
Now you'll write the actual email that members receive.
Creating the Subject Line
In the Email Subject field, enter the subject line that will appear in members' inboxes. Make it clear and relevant to the email's purpose.
For example:
"Welcome to [Membership Name]!"
"Your membership expires in 7 days"
"Payment failed - please update your card"
Composing the Email Body
In the Email Content field, write your email message. This field supports text, HTML, images, and smart tags for dynamic content.
You can format your email using the editor toolbar to add:
Bold, italic, and underlined text
Headings and lists
Links and images
Custom HTML if needed
Adding Smart Tags
Smart tags are placeholders that automatically fill in with member-specific information when the email sends. Click the Add Smart Tags button to see available options.
Common smart tags include:
{{username}} — The member's username
{{email}} — The member's email address
{{first_name}} — The member's first name
{{last_name}} — The member's last name
{{membership_name}} — The name of their membership plan
{{expiry_date}} — When their membership expires
For example, you might write:
Hi {{first_name}},

Your {{membership_name}} membership will expire on {{expiry_date}}.

To continue enjoying member benefits, please renew your subscription before this date.

Thank you,
The Team
When the email sends, the smart tags automatically replace with the actual member's information.
Previewing and Testing Your Email
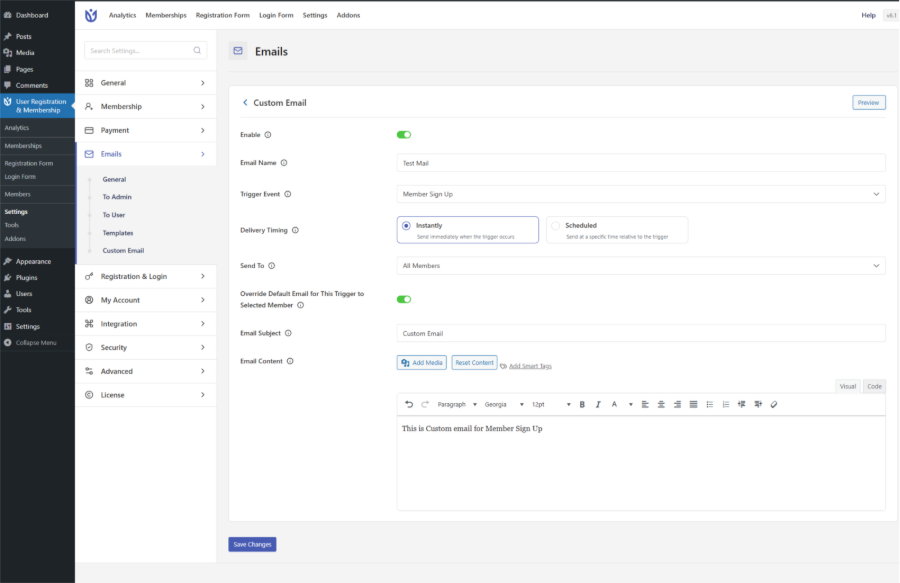
Before saving, use the Preview option to see how your email will look to recipients. This shows you the email with sample data filled in for the smart tags.
Once you're satisfied with the preview, click Save Changes to activate your custom email.
Testing Your Custom Email
To verify your email works correctly, trigger the event and check that:
The email sends at the right time
The timing is correct (immediate or scheduled)
The content displays properly
Smart tags fill in with the correct information
The email goes to the right recipients
For scheduled emails, remember that they depend on WordPress cron jobs running properly on your site.
Managing Multiple Custom Emails
You can create multiple custom emails for different events or different membership plans. Each custom email operates independently with its own trigger, timing, and content.
To create another custom email, simply repeat the process above with different settings.
That's it! Now you know how to create custom automated emails for your membership site. Next, would you like to learn how to customize the email templates to match your brand? Be sure to check out our guide on email template customization for all the details.