- Installation
- Premium Features
- Content Restriction
- Payments(PayPal)
- Frontend Listing
- Advanced Gutenberg Blocks
User Registration Pro is a newly introduced stand-alone add-on that doesn’t require the User Registration free version to be activated. This means that, once you upgrade to the premium version, you won’t be needing the User Registration free version anymore. Similarly, this add-on comprises all the features of the Extras add-on due to which you can get rid of the Extras add-on too. Therefore, one add-on i.e. User Registration Pro will work as the core version and the Extras add-on from now on. To remove any confusion among the users, all the necessary features of this add-on have been explained below.
Please note that the User Registration add-on will include many more features in the near future. Therefore, please be updated and get along with this add-on.
Installation #
- First, you need to purchase the User Registration Premium to get the User Registration Pro plugin/add-on.
- After the successful purchase, you will get the plugin zip file under your WPEverest account page.
- Now, you can download the plugin zip file from there.
- Through your WordPress Dashboard, visit Plugins -> Add New -> Upload and then choose the downloaded zip file and then install and activate it.
- Now you are ready to use this add-on for your site.
Premium Features #
There are many features that are added to your plugin when you activate the User Registration Pro add-on. It has been classified as below.
- Premium Settings for Individual Forms
- Premium Global Settings
Premium Settings for Individual Forms #
Location: User Registration > All Forms > Select a Form to Edit > Form Settings
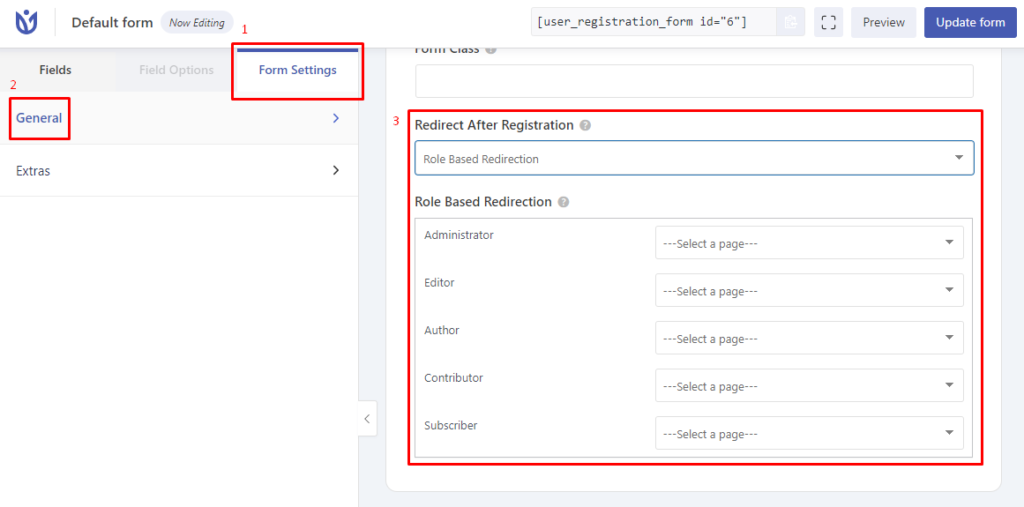
Role Based Redirection #
This feature allows users to be redirected to a specific page based on their roles. Users can be redirected after login, registration, and logout. To enable this, please go to User Registration > All Forms > Select a Form to Edit > Form Settings > General. You will find an option that says ‘Redirect after registration’. Now, select ‘Role Based Redirection’.
Admin Approval after Email Confirmation #
Location: Form Settings > General
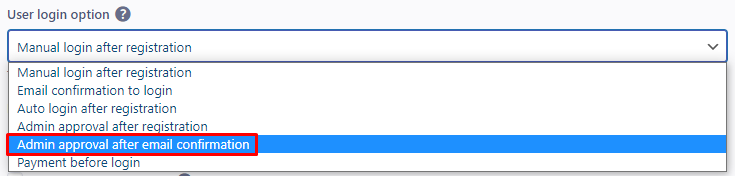
Admin Approval after Email Confirmation: When this option is selected, the user will have to verify the registration from the email sent to them and then the site admin will again verify and approve the registration.
Extras #
Now, some of the features of the Extras add-on have directly been integrated into every individual form once you activate the User Registration Pro add-on. This makes the settings easier and more accurate. Please go to Form’s Settings> Extras to configure the settings that have been included. The image below shows the exact representation of the form’s settings with the User Registration Pro add-on activated.
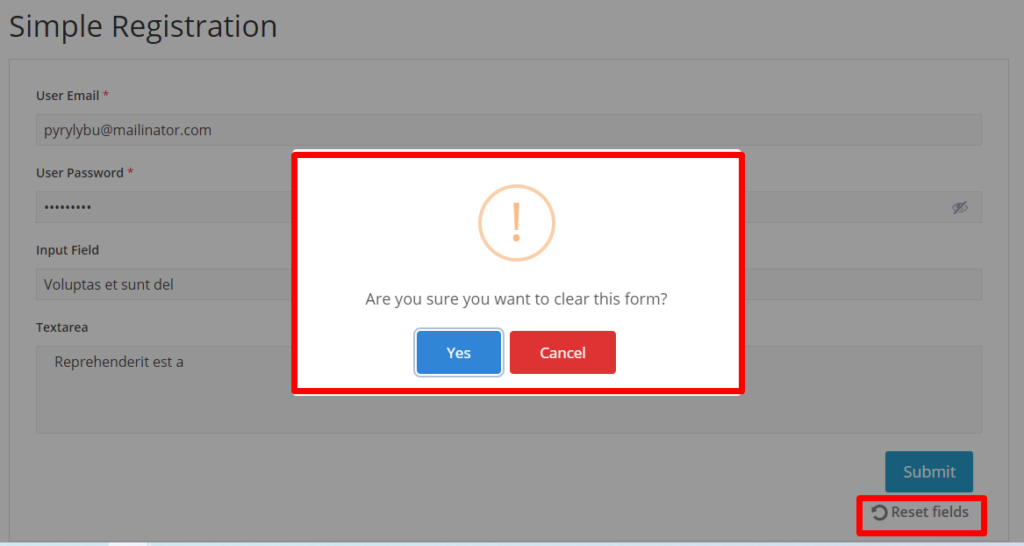
How to reset the user’s default value in the Registration form? #
In each individual form’s setting, you can find an option to enable the reset button which allows you to have the flexibility to reset the form to its original state.
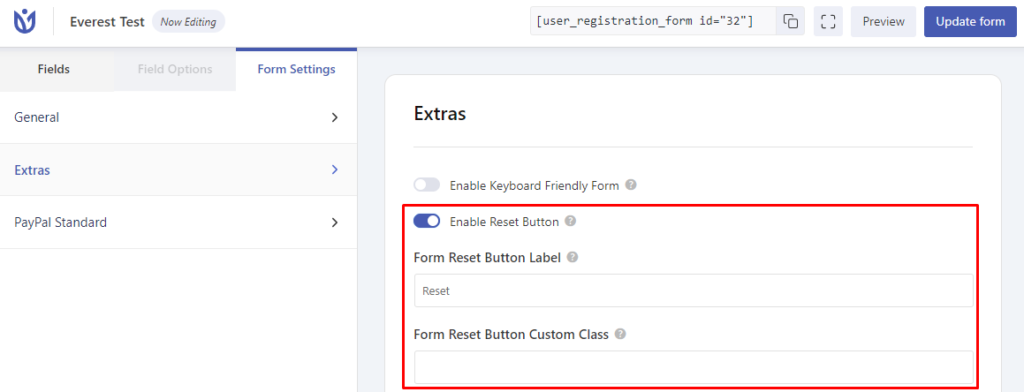
- Enable Reset Button: This option allows you to reset the default values of a user in the registration form.
- Form Reset Button Custom Class: This option enables you to add the Custom CSS class to embed in the reset button. You can enter multiple classes separated by space.
- Form Reset Button Label: This option enables you to Set the label for the reset button.
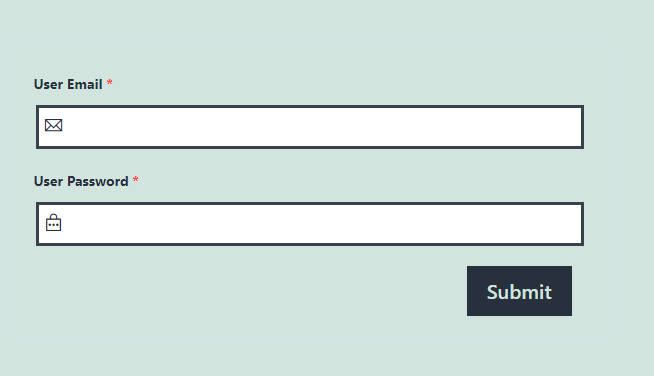
Form Field Icons #
Using this feature, you can show/hide icons for the form field in the login/registration form. Once enabled, the form will look like the image below.
Honeypot Spam Protection #
Now you can also enable Honeypot Spam Protection from each form’s settings. Click on the Activate Spam Protection By Honeypot and you are good to go.
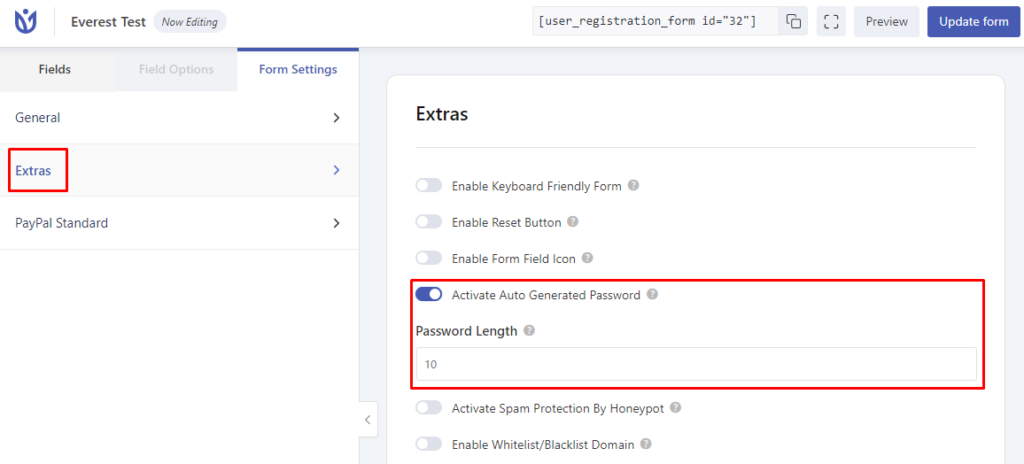
Auto Generated Password #
With this feature, now you can have the option to send the system-generated passwords to the users registering to your site. After you enable this option, users won’t see the password field during registration. They can fill in other fields and the system will generate a password and send it to their email directly. You can find this setting directly in each individual form’s settings.
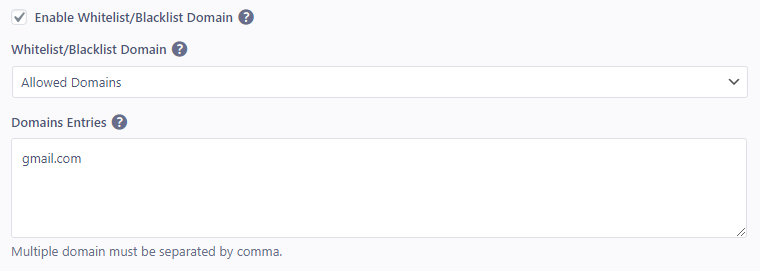
Enable Whitelist/Blacklist Domain #
For each individual form, you can either whitelist or blacklist a set of email domains as per your requirements. For this, select either Allowed Domain or Denied Domain for whitelisting or blacklisting the domains. Now, enter the domain names, and separate them with a comma if you have multiple domains.
Frontend View:

Enable Email Blocking #
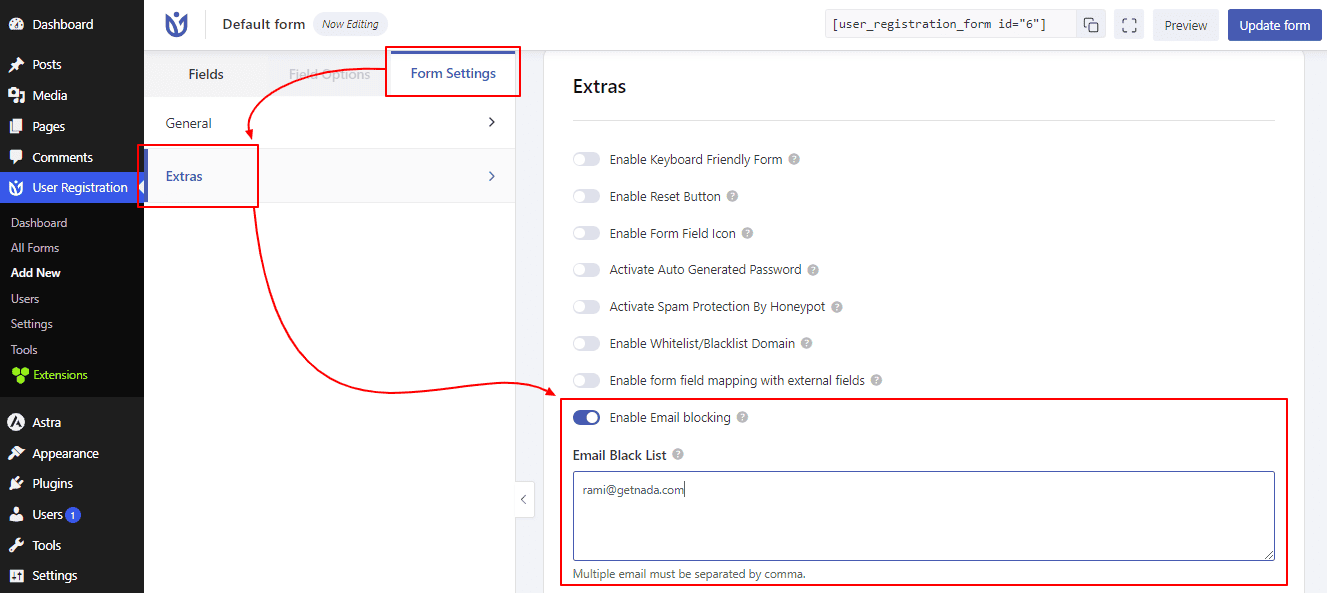
You can write specific email addresses on this option and restrict them from registering via the User Registration form.
Form Fields Related #
How to allow fields to be populated dynamically?(Auto-populate form fields) #
Query string allows you to append information with a given URL by appending parameters to it which automatically populates the related field. This helps website owners to create a form that can have similar entries for certain form fields for a set of users. Users can use the URL provided by the sites to save themselves some time and decrease the confusion to fill out some fields.
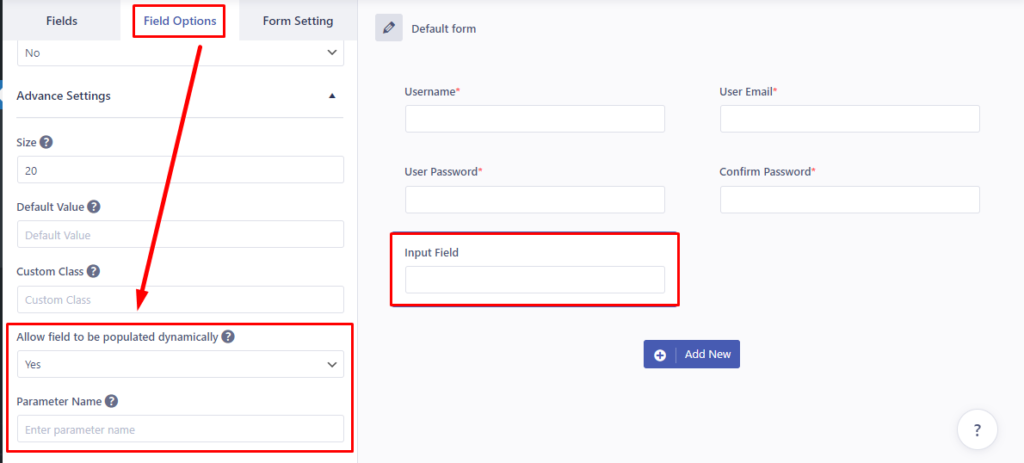
Steps:
- Go to required registration form and click on edit.
- For the field you would like to be auto-populated, click on th field which takes you to the field settings.
- Scroll down to the Advanced Settings, and on ‘Allow field to be populated dynamically’ dropdown, select ‘Yes’.
- Now, add the parameter of your choice.
- Add the form’s shortcode to the registration page.
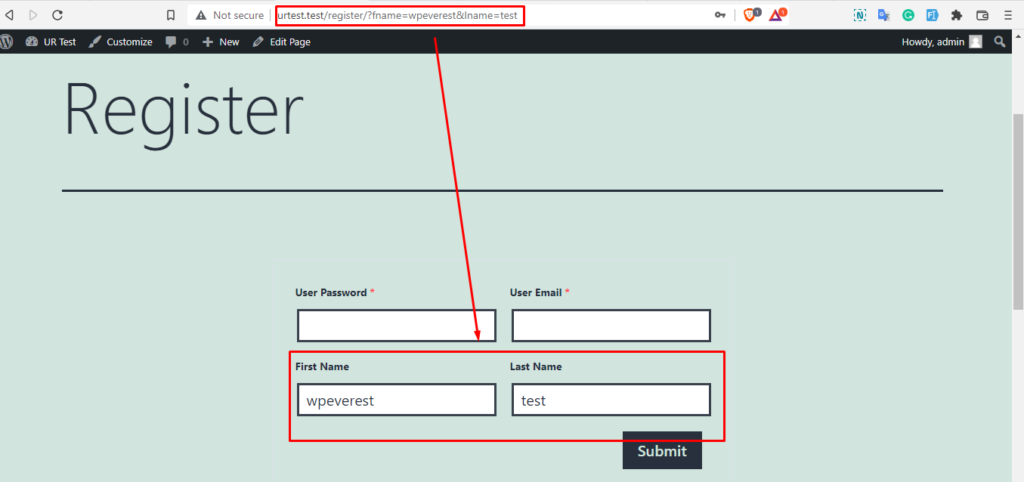
After doing the above steps, you can append the parameters to the page/posts URLs as in the example below.
http://example.com/page-slug/?parameter1=value1¶mete2=value2..
where parameter1 is the name of the parameter for the field and value1 is the required value for that field.
http://urtest.test/register/?fname=wpeverest&lname=test&...
Note: parameter name can be anything of your choice. Here, firstname field is written as 'fname'.Now, provide this URL to your users and the form will be auto-populated with the values of fields in the parameter.
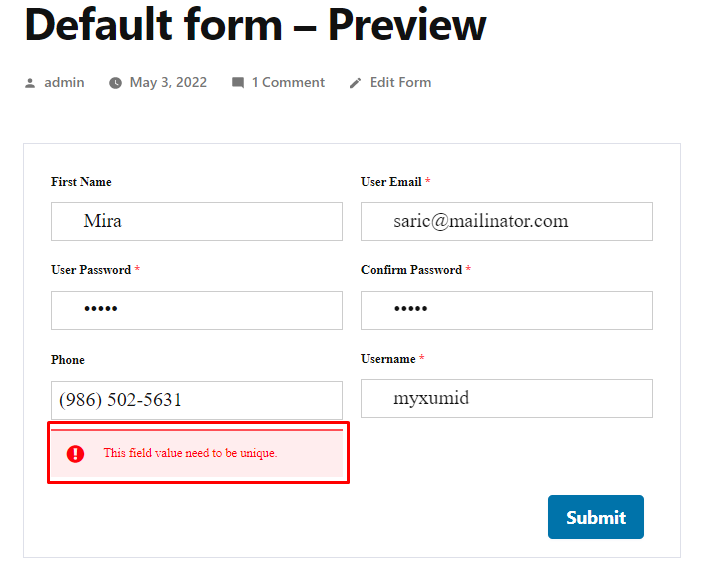
Validate as a unique field #
Four of the most useful fields can be validated as unique fields. This includes first name, last name, phone number, and input field.
In the example below, a phone number field is validated as a unique field.
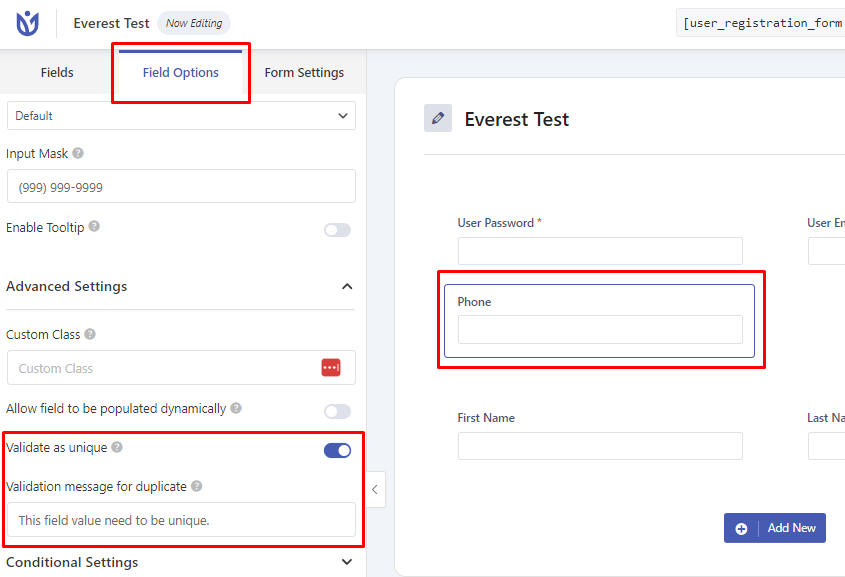
Validate as unique: Dropdown for Yes/No to validate as unique.
Validation message for the duplicate: Compose a message to be shown if the field is not unique.
If the field is duplicated, the following error message will be shown.
Form Field’s Tooltip #
You can add a tooltip on the form fields from the Field Options for each individual field. On the Field Options, find the option that says ‘Enable Tooltip’. Select ‘Yes’ and write the tooltip message.
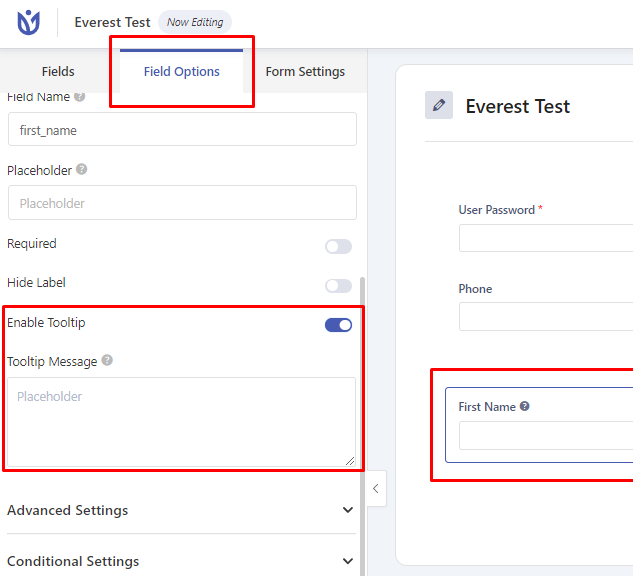
Once you have written the tooltip message, hit ‘Update form’ and you are good to go. The tooltip will appear as below:

Bulk Add Options for choice fields #

You can add options for the choice fields like select, radio, and checkbox in a bulk with the help of the User Registration Pro add-on. For this, add any one of the choice fields and on the Field Options > Options, you will find an option to Bulk Add items.
Write the required options and click on Add New Options. Please make sure that you write a new option in a new line.
This option is also available for the Select2 and MultiSelect2 fields on the Advanced Fields add-ons
Premium Global Settings #
Location: User Registration > Settings
Login Options #
Location: Settings > General > Login Options
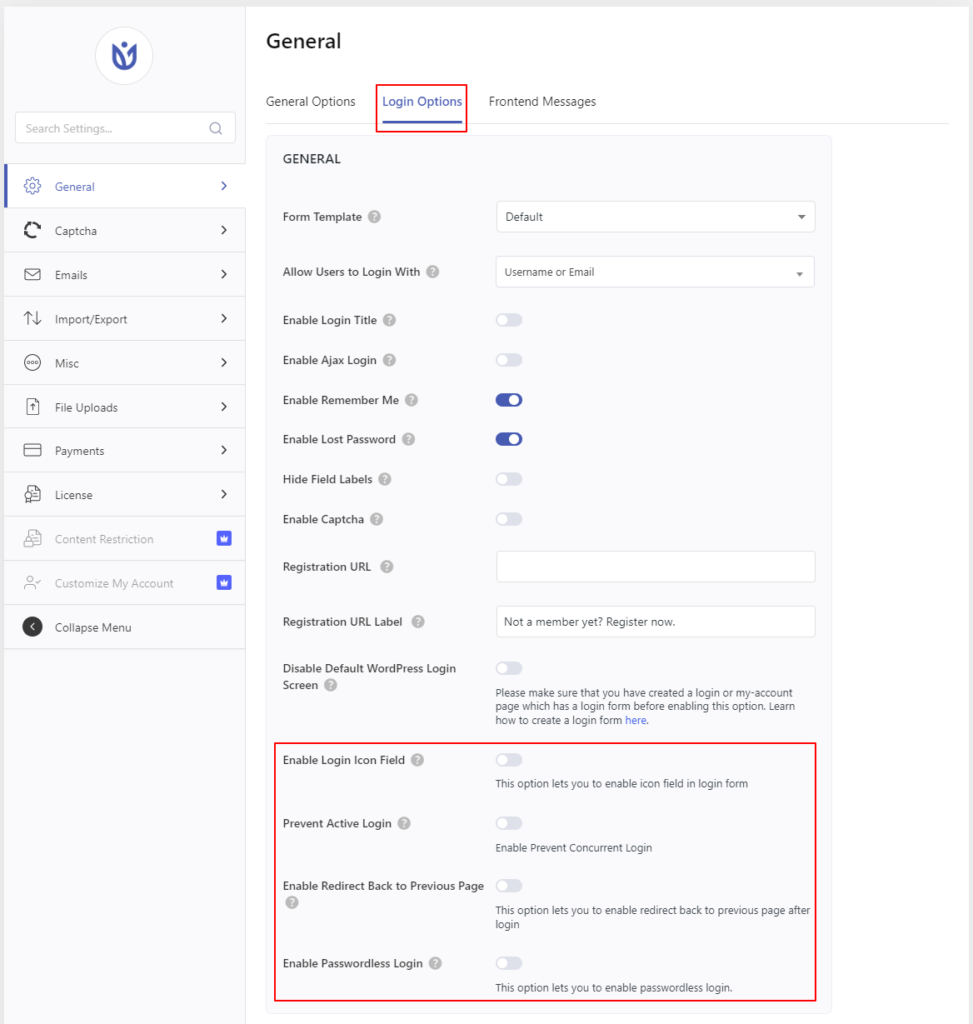
To check all the new features as shown in the above image, please go to User Registration > Settings > General > Login Options. These features are described in detail below:
Enable Login Icon Field: This feature has been shifted from the Extras add-on to Login Options in general settings. To know more about this feature, please click here.
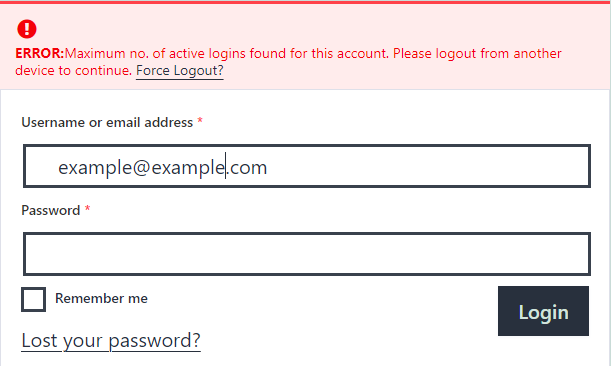
Prevent Active Login: This option lets you enable the simultaneous login made from one IP address.
Maximum Active Login: This option lets you select a total number of logins that can be done simultaneously from one IP address. If the number of logins is more than the number allocated in this option, an error message will be thrown and users will be forced to log out.
Enable Redirect Back to Previous Page: As the name suggests, this option redirects users to the previous page after logging in.
Enable Passwordless Login: Enabling this will send the users an email with a login URL(Magic link). The users can log in via this URL without the need to input their password.
Delete Account #
Location: Settings > General > General Options
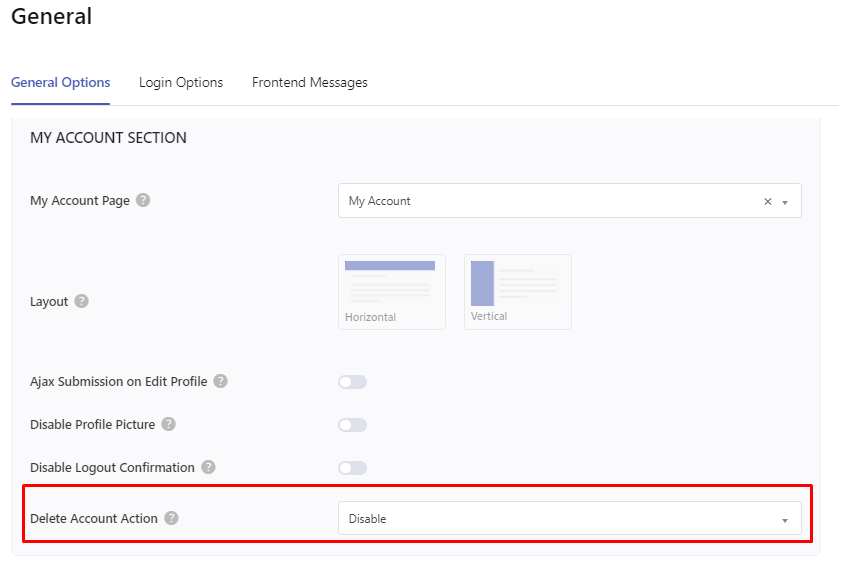
Delete Account is a new option that is available now, where you can allow the users to delete their own account from their respective My Account page. Once the account is deleted, users, as well as the admin, will be notified via email.
Admin can enable/disable the delete account feature for users. You can achieve these settings by following the instructions given below:
First of all, please go to User Registration >Settings > General > General Options. Scroll down to the ‘My Account’ section where you can find the settings to enable/disable the delete account feature.
Misc Settings #
Location: User Registration > Settings > Misc
Role-Based Redirection Global Settings #
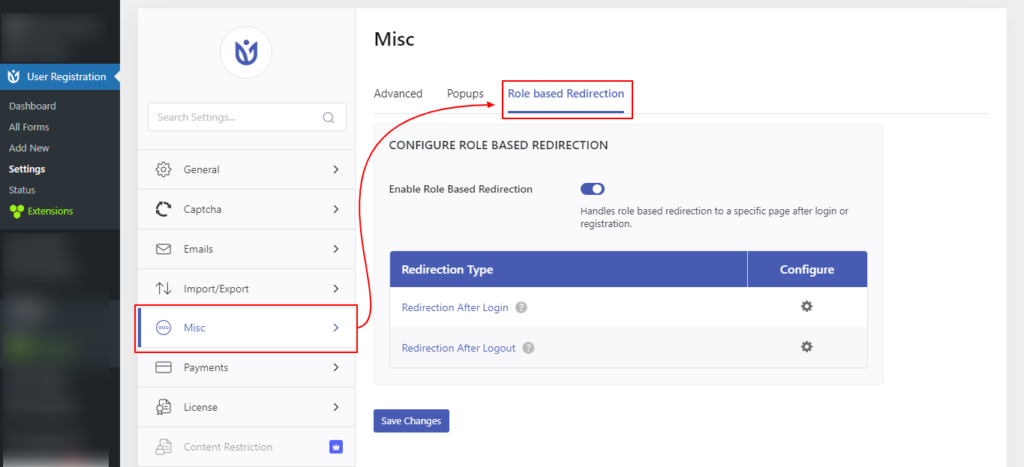
You can use this feature to redirect the users based on their roles after they login/logout. You can configure the Redirection Type from the Settings button given for each redirection.
Redirection After Login #

Configure this option by selecting the desired page you would want to redirect the user roles to after they login. The pages are listed in the drop-down menu.
Redirection After Logout #
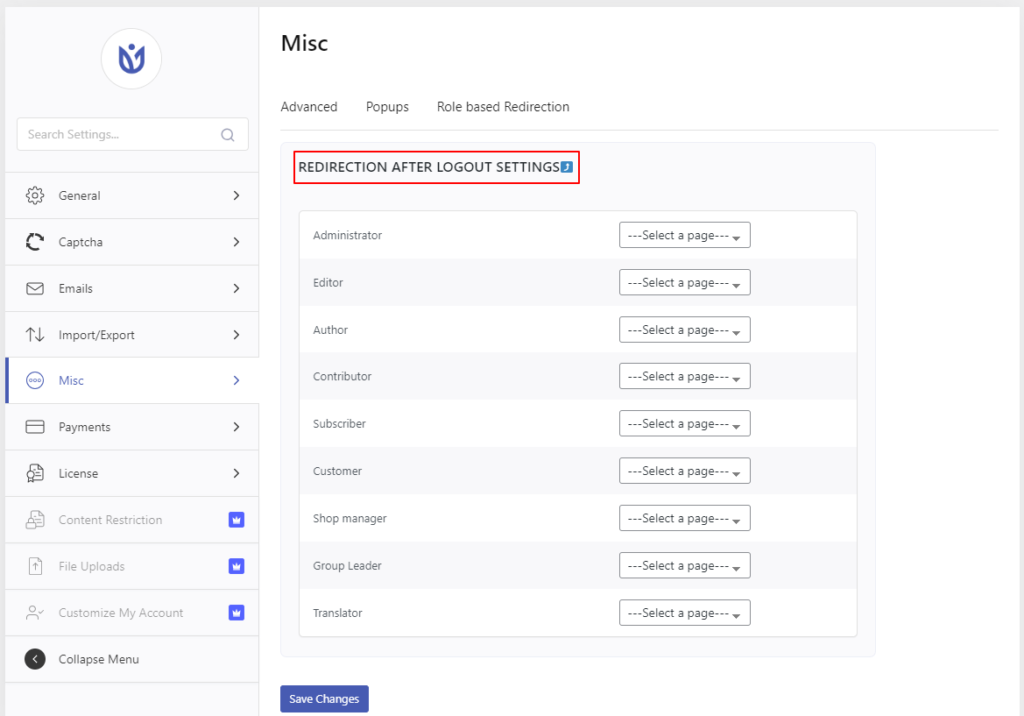
Configure this option by selecting the desired page you would want to redirect the user roles to after they logout. The pages are listed in the drop-down menu.
Post Submission(Send data to custom URL) #
Add your custom URL in the URL option and choose one of the three available methods(Post, Post(JSON) or GET). Save the settings. Your form’s data will now be sent to the given custom URL.
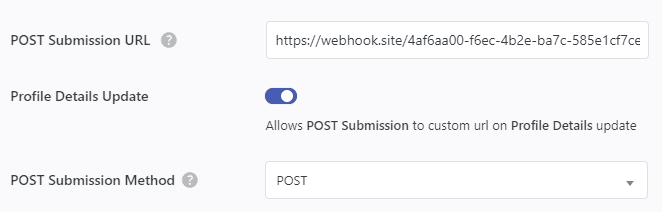
Only the newly registered user's data will be sent via this feature once it is enabled.
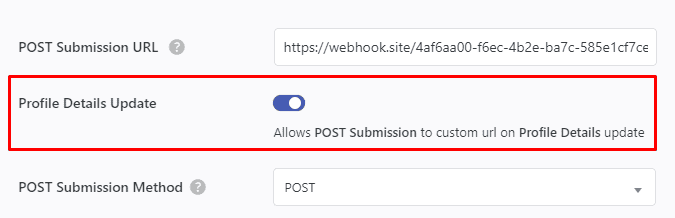
Send Data on Profile Details Change #
You can enable the Profile Details Update option to allow Post Submission to a custom URL when the users change their profile details.
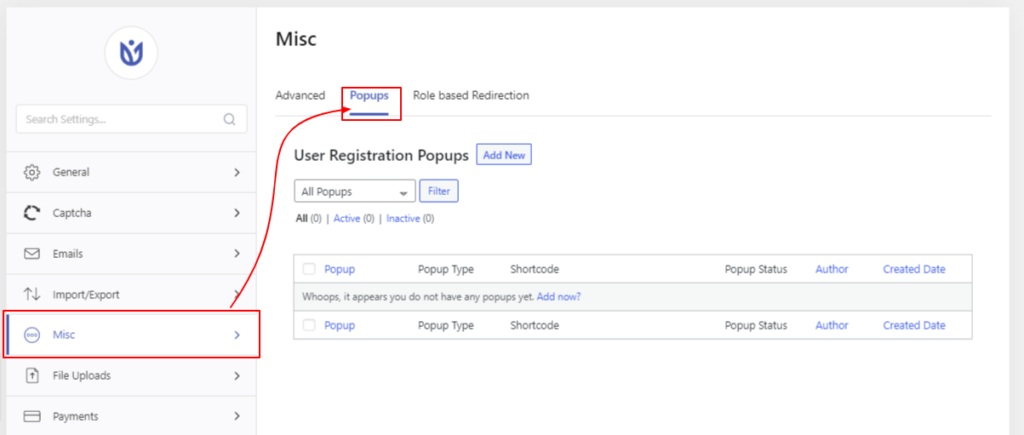
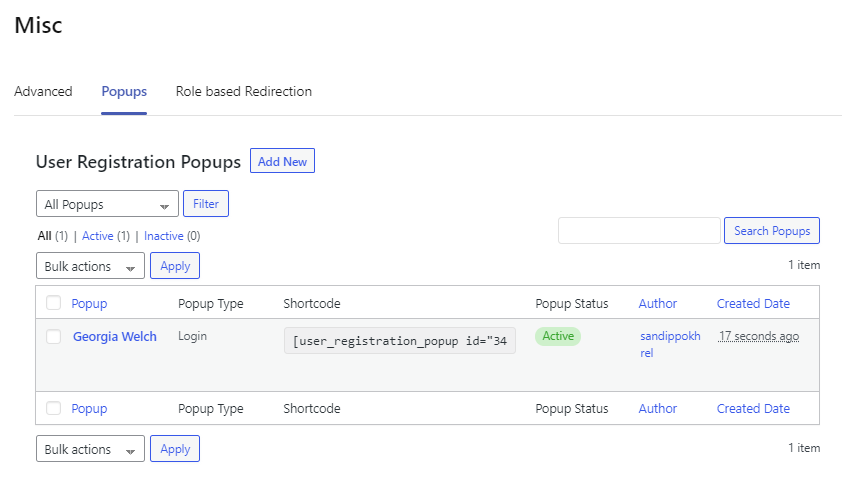
Login and Registration Popups #
To set up a Popup Login Form or a Popup Registration Form, Go to User Registration > Settings > Misc > Popups and you will see the Popups management section like this:
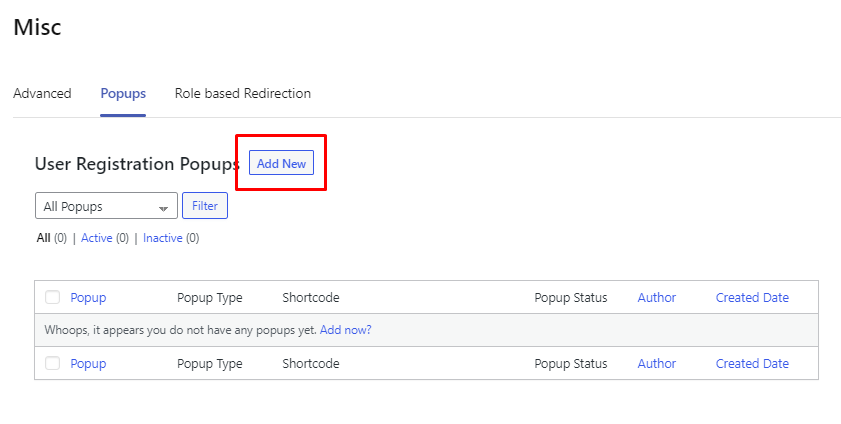
How To Create A Popup?
To create a new Popup, simply click on the Add New button here.
After you click on it, you will be presented with the screen below.
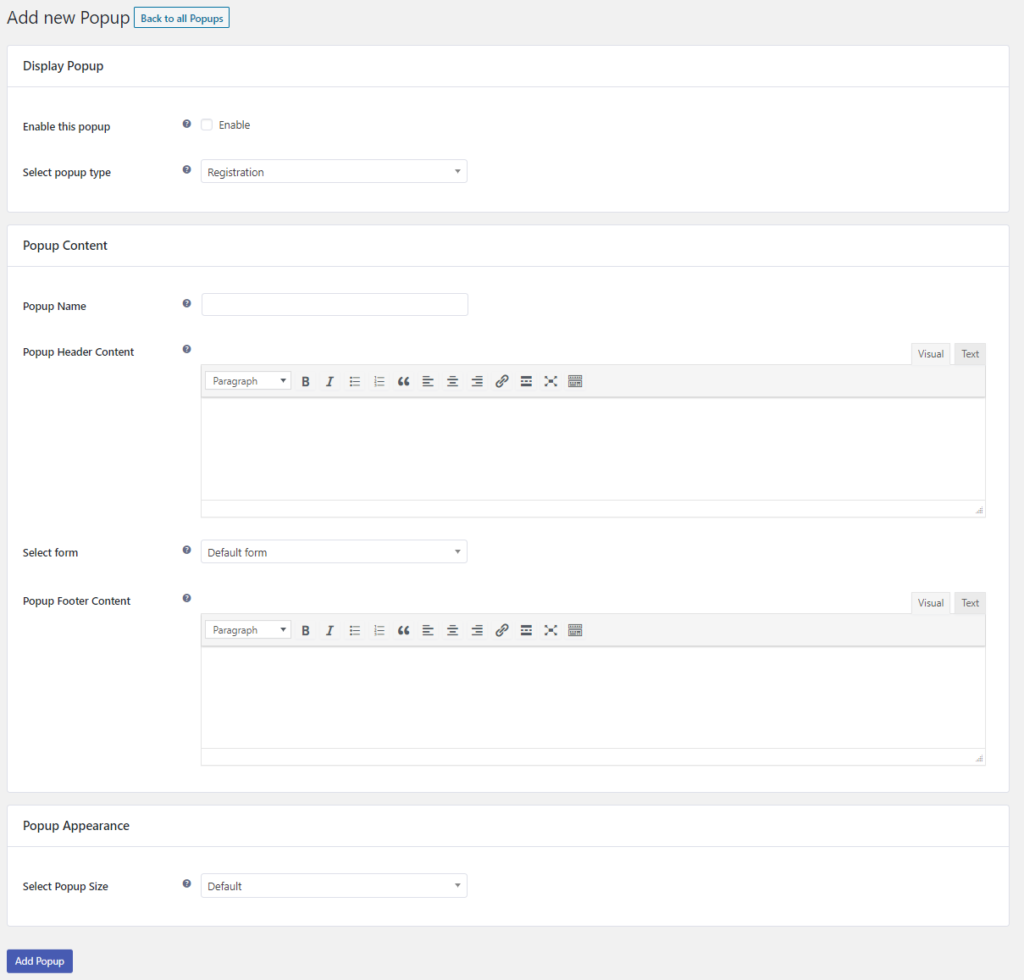
There are 3 main sections in this window.
1. Display Popup
2. Popup Content
3. Popup Appearance
Let’s talk about Display Popup first. It has two simple options.
—Enable This Popup: You can simply enable or disable the popup by ticking/un-ticking the checkbox.
—Select Popup Type: You can choose between Registration and Login which will let you decide what popup are you making.
We have Popup Content as the second section. This section is also not that confusing. Inside this section, we see:
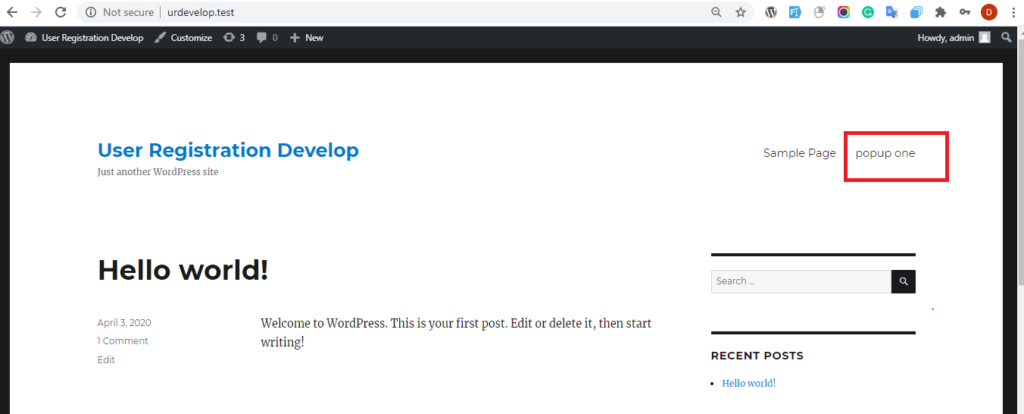
—Popup Name: In this input box, you can give a name to your popup. For example popup one
—Popup Header Content: In this editor section, you can write some content for the Header Section of your popup.
—Select Form: Here you can select the Registration Form that you want to display in the popup. The Registration forms will be shown in the dropdown input box.
Note: This option will not be seen if you select Login Popup as the Popup Type. It will only show for Registration Popup.
—Popup Footer Content: In this editor section, you can write some content for the Footer Section of your popup.
The third and last section is the Popup Appearance section. We have one option here:
—Select Popup Size: In this option, you can select what size you want to display the Popup in the frontend. You have 3 options to choose from, Default, Large, and Extra Large. You can choose any as per your design requirements.
Click on Add Popup and all the changes will be saved. You will then be redirected back where you can see all the popups that you created.
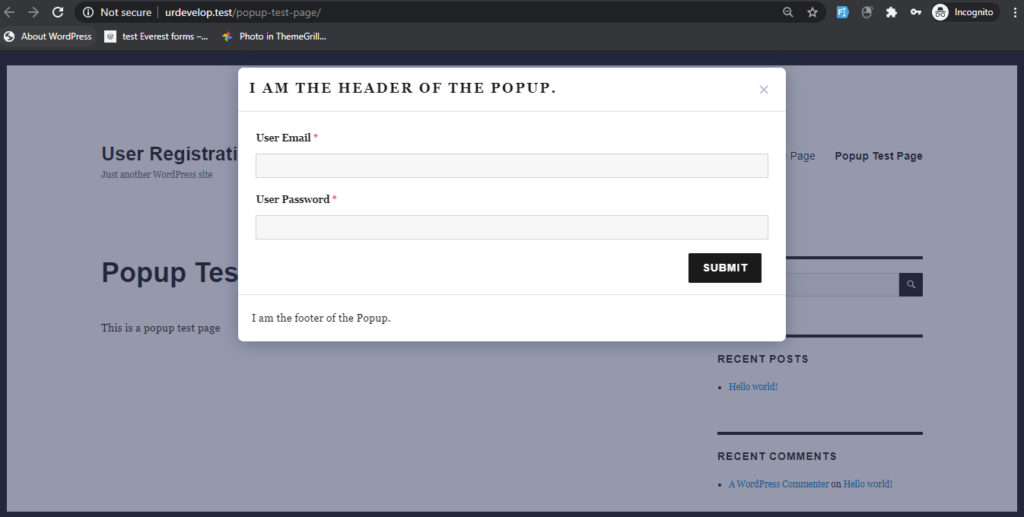
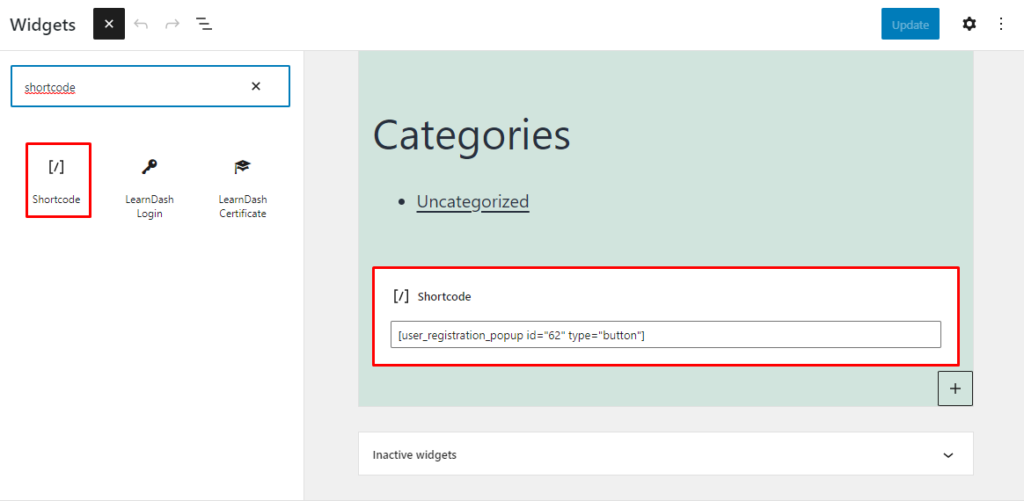
To use the popup, simply copy the shortcode and paste it into your page in a shortcode block.
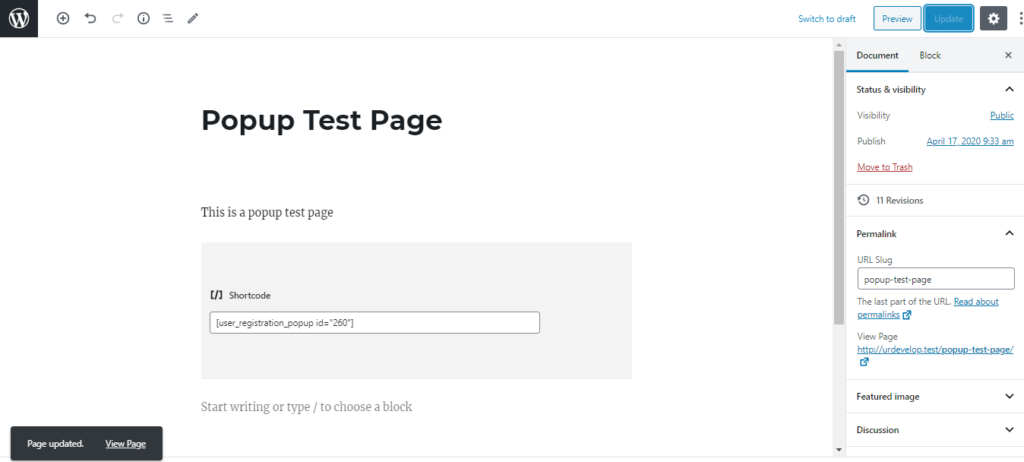
After that, when you visit that page, the popup will show up.
How To Add a Popup to the Menu? #
You can also add the Popup in the Menu Bar as a Menu Option. After you have created the Popup, you can simply go to Appearance > Menu and then add the popup to your Menu.
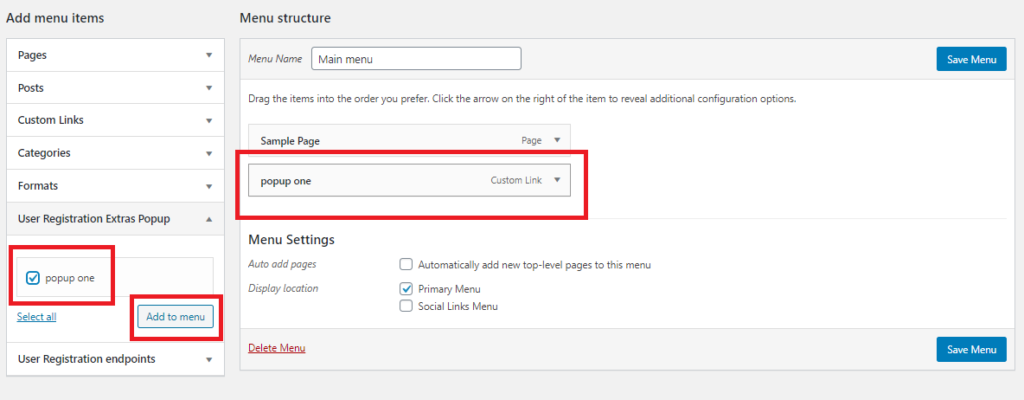
After you have added it, click on Save Menu and then visit your site. The Popup Link will show up in the Menu. When you click on it, the Popup will show up.
How To Add a Popup as a Button? #
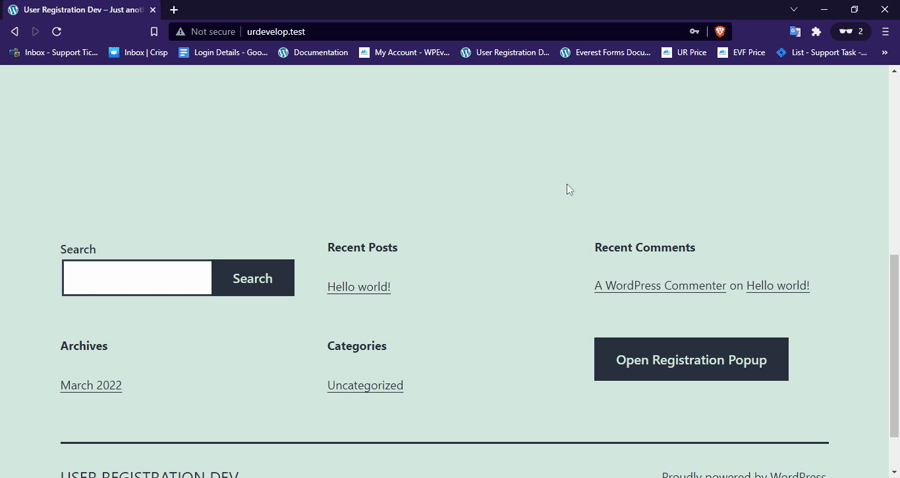
You can add the popup as a button such that when the button is clicked, the popup is shown. This gives you the flexibility to add the popup anywhere you would like to. For example, between the contents of a post, widgets, etc.
For this, you will have to add parameters to the existing shortcode. For example, adding type=”button” i.e [user_registration_popup id=”1″ type=”button”] will create a button with the registration form’s popup.
Here, we have added the shortcode on the footer widget area.
Result:
Note: You can also add a parameter button_text="Register Me" to change the text on the button.
Privacy Tab #
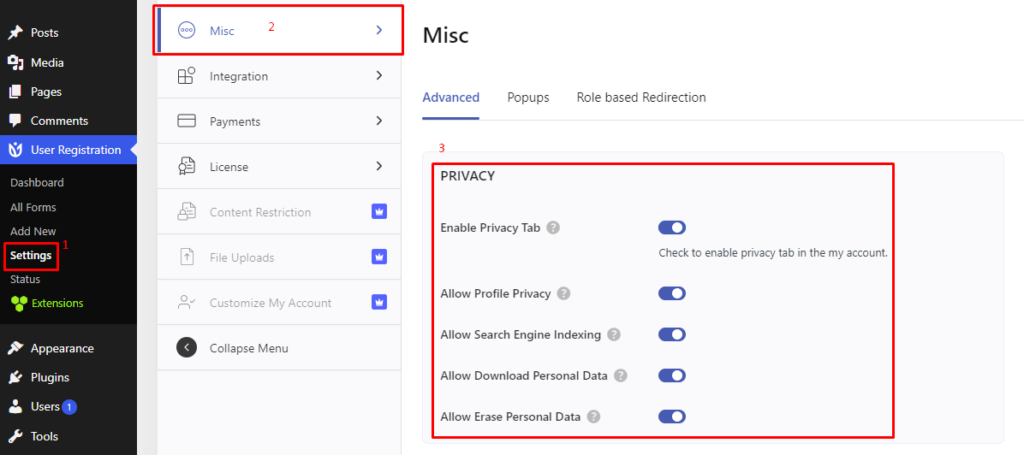
You can enable a Privacy tab by clicking the ‘Enable Privacy Tab’ option from the Misc Settings. You can enable profile privacy, search engine indexing, download personal data, and erase personal data. The tab will look like the following.
User Management #
Just like the default Users section of WordPress, User Registration Pro also provides its own section where the users registered via the User Registration forms can be viewed and managed.
Location: User Registration > Users
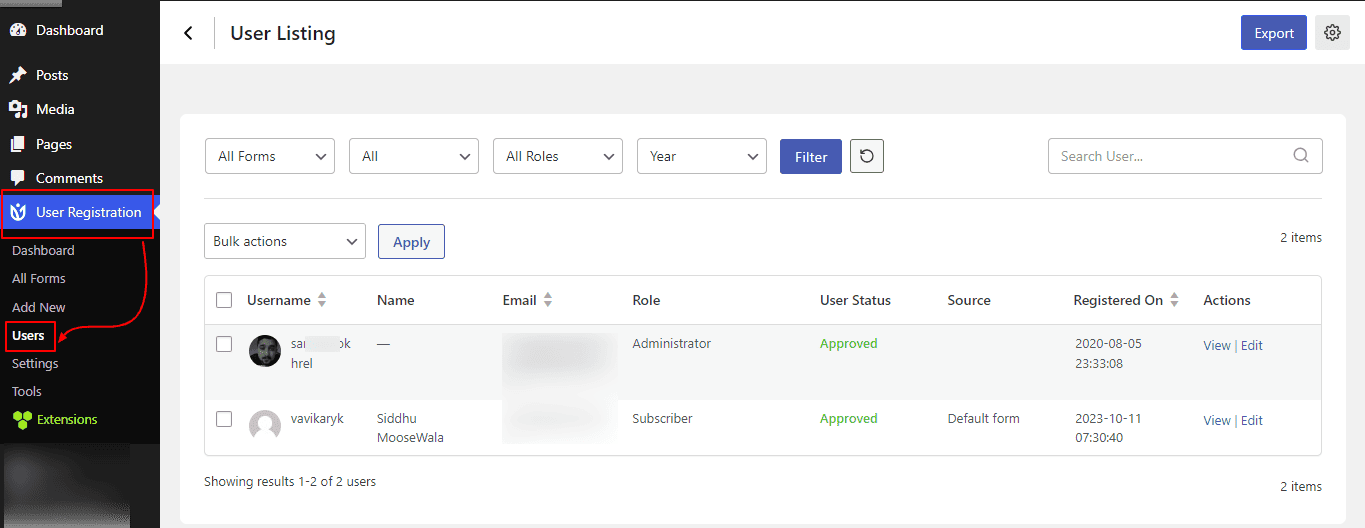
You can set a custom filter to check out the users and also can export the users from the top-right ‘Export‘ button.
User Information #
Click on the ‘View’ button to see various information related to the specific user.
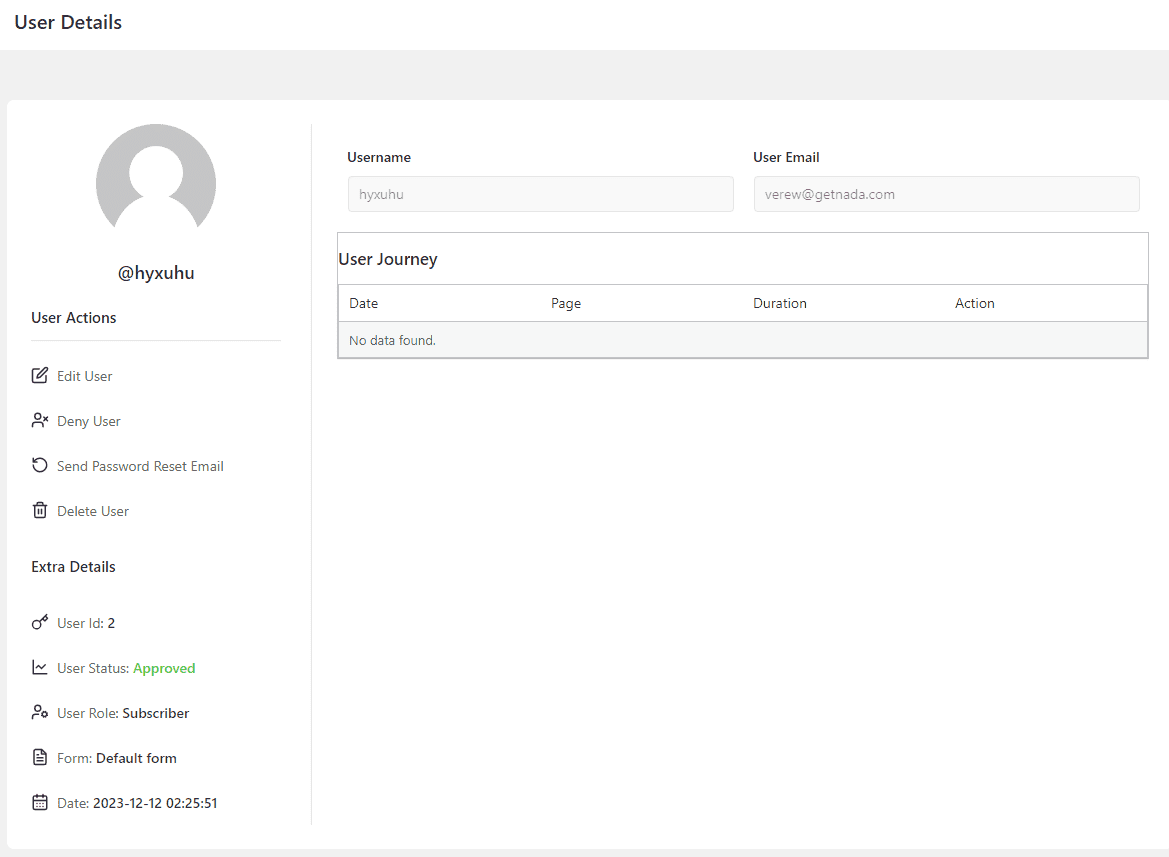
User Journey #
In the User Journey table, you can check the user’s journey throughout the website. It shows details like the pages the user visited and time spent on the pages.
Dashboard #
The Dashboard is a new option that is available now in the User Registration Plugin where you can see the statistics of your registration process associated with the registration form. It will show your data in numbers, percentages, and graphs. You will be able to see the data for entire form or for particular forms as per your choice in the selected time frame.
Go to User Registration > Dashboard and you will be presented with a clean and informative dashboard as in the screenshot below.
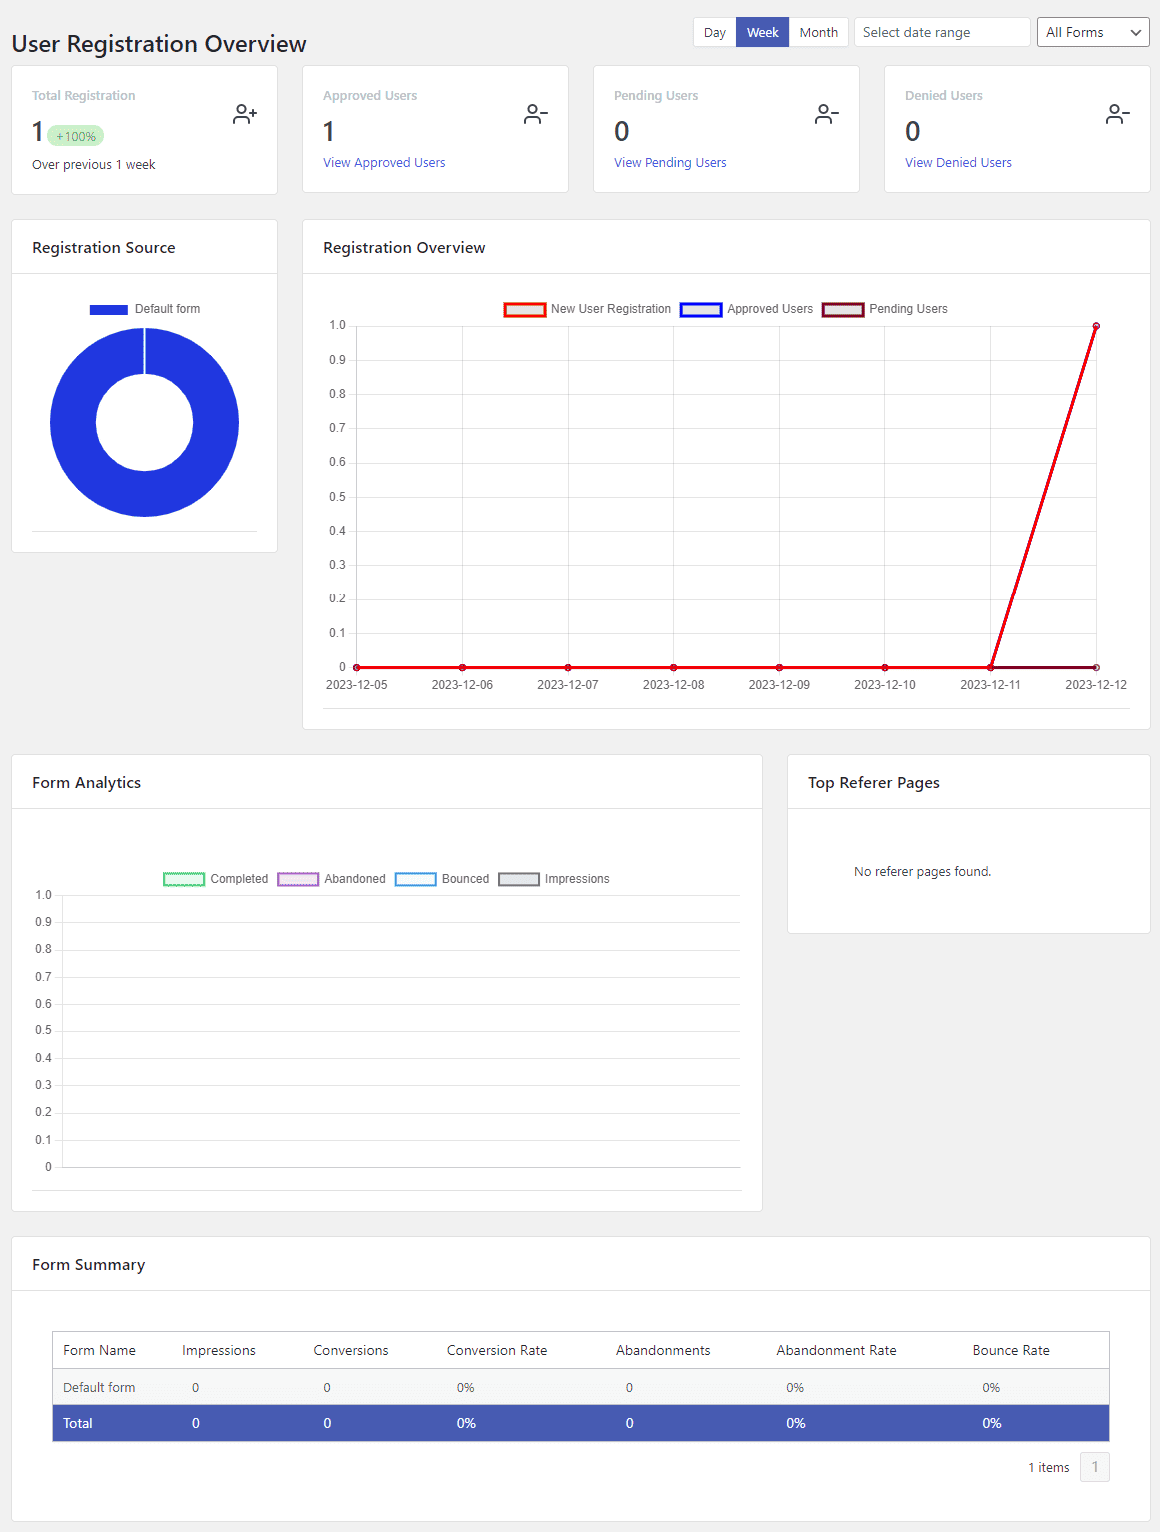
Let us check in detail about everything that’s in the Dashboard.
1. Day | Week | Month | Date Range: After you click on the dashboard option, you will be shown the data for all your registration forms made with the User Registration plugin and the data will be shown for the week. You can click on any option to see the data as per your requirement. You can click on Day to see today’s data. You can click on Month to see the data for the current month. You can click on the “Select Date Range” to select a starting date and an ending date. 
Overall, what it means is, that you can see the data of registration and graphs whenever you want.
2. Form Selection Dropdown: On the top right of the dashboard, you will see a dropdown option where you can select from different registration forms made with this plugin and see the data of that specific form.
By default, “All Forms” is selected so the collective data for all the forms are shown initially.

3. Total Registration | Approved Registration | Pending Registration | Denied Registration: In the Above Graph, you can see four sections that show the registration data in number and percentage. 
— Total Registrations: It will show you the count of the total number of registration that has been done with all the forms or a particular selected form. It Displays a percentage decrease or increases in comparison to previous data. for eg, If the month is selected, the increase or decrease percentage will be based on the current month vs the previous month.
— Approved Users: It will show you the count of the total number of approved users that have been approved after registering from all the forms or a particular selected form.
— Pending Users: It will show you the count of the total number of pending users that need approval after registering from all the forms or a particular selected form.
— Denied Users: It will show you the count of the total number of denied users whose registration has been denied after registering from all the forms or a particular selected form.
4. Registration Overview Graph: It will show you the Graphical Representation of the Numeric Data that you see above the graph. The shape of the graph changes as the data changes. 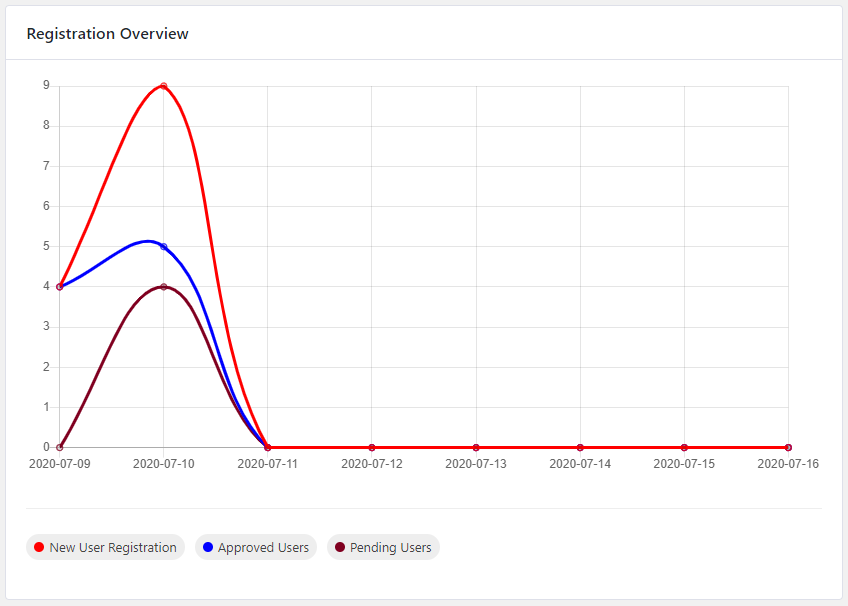
5. Registration Source: If you have selected All Forms in the dashboard then you will also see this Registration Source Chart. Its purpose is to show all the forms that you have and display the count of the number of registrations that happened with the particular form. 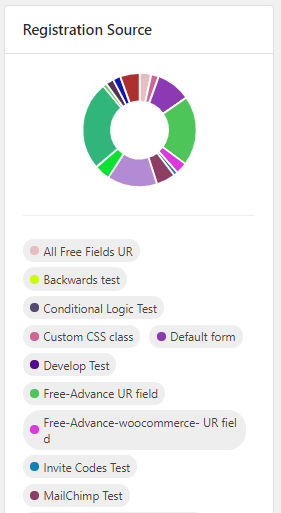
Note: This will not show up if you have selected a particular form on the dashboard.
Form Analytics #
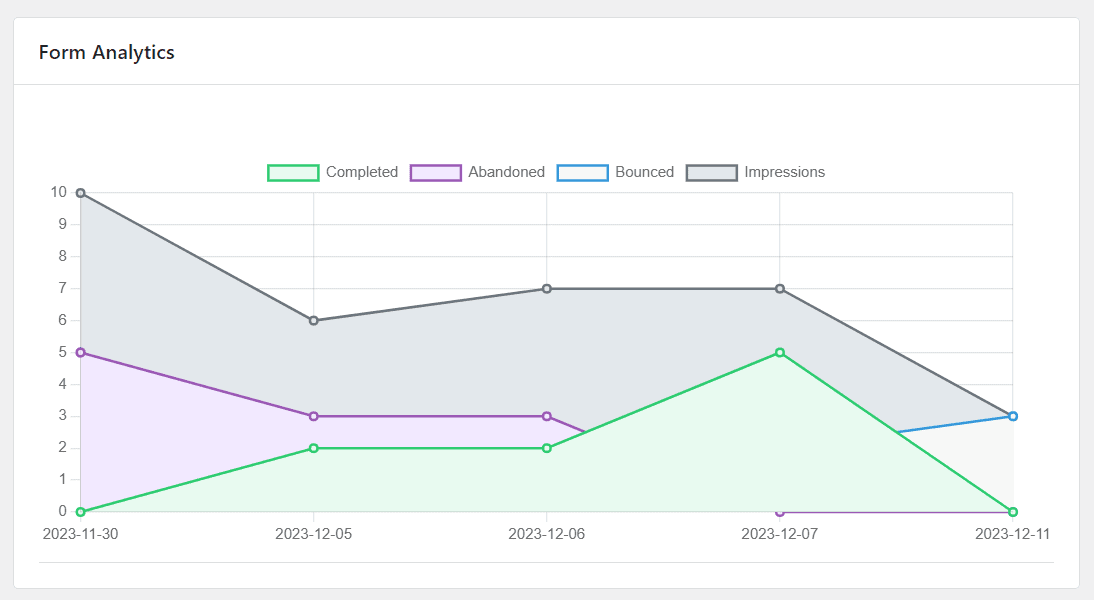
This graph shows the details about the form submissions that were completed, abandoned, bounced and impressions.
Top Referer Pages #
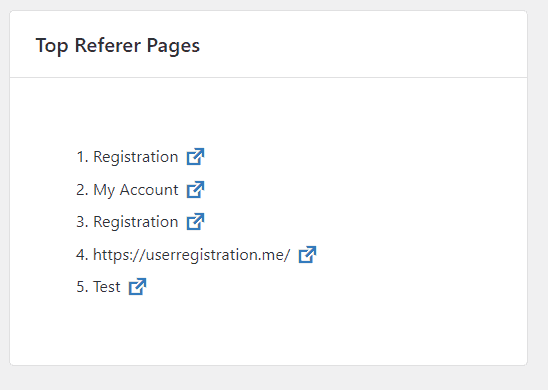
This shows the top most visited pages by the users on your site.
Form Summary #
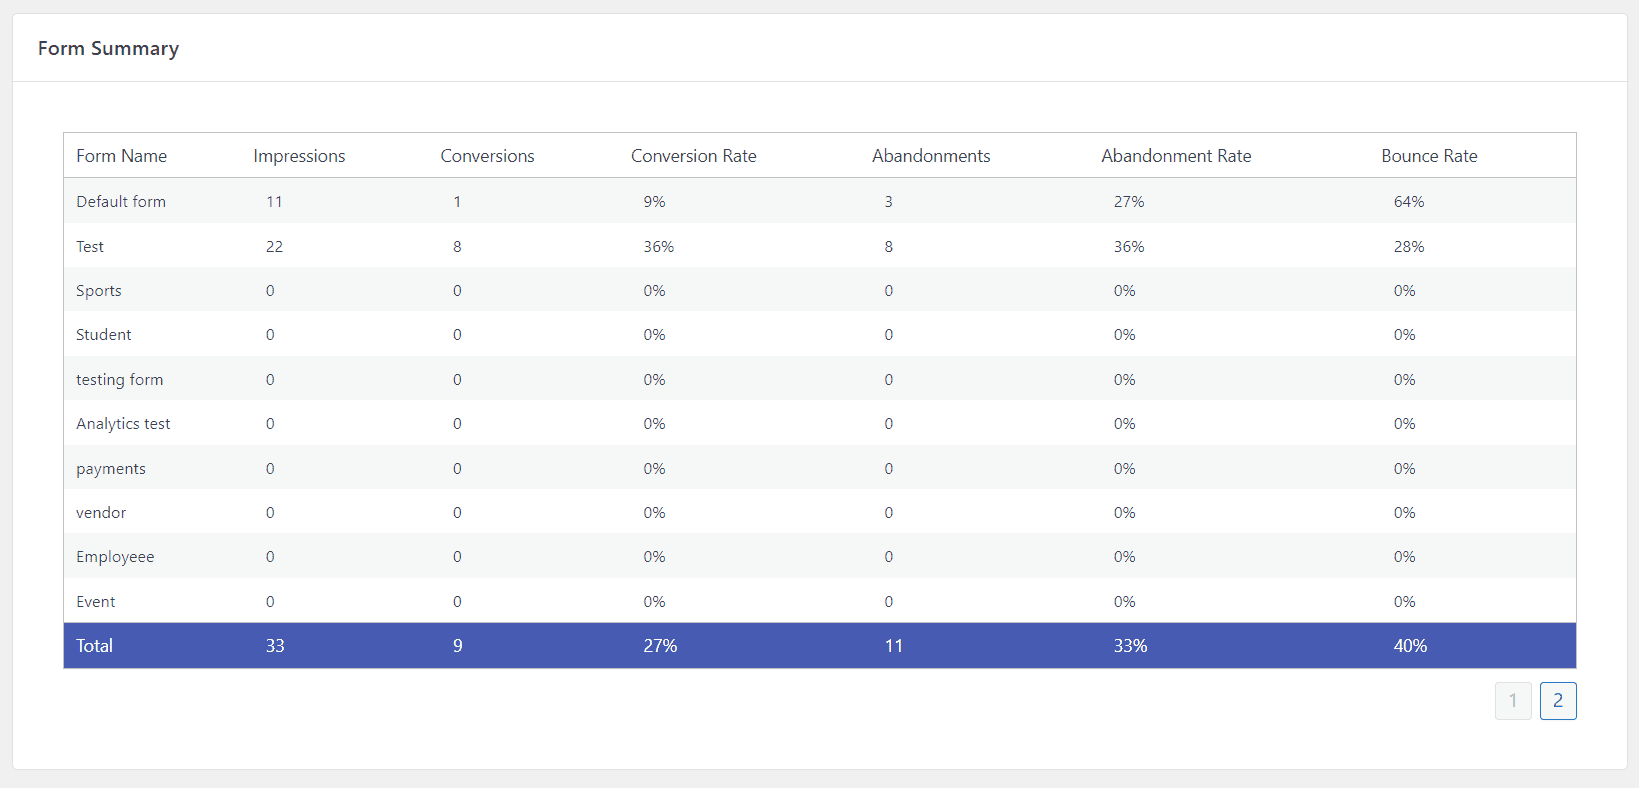
This section will show the summary of the user’s activity for all the available forms. It includes the following details.
- Impressions: Total number of times the form was referred by the users.
- Conversions: Total number of times the form was completely submitted.
- Conversion Rate: Rate of the complete submission.
- Abandonments: Total number of times the form was left behind during submission(without submitting).
- Abandonment Rate: Rate of the left-behind form submissions.
- Bounce Rate: Rate of the times the users didn’t start the form after landing on the form page.
Content Restriction #
Checkout detailed documentation on the Content Restriction feature from here.
Payments(PayPal) #
Checkout detailed documentation on the Payments feature from here.
Frontend Listing #
Checkout detailed documentation on the Frontend Restriction feature from here.
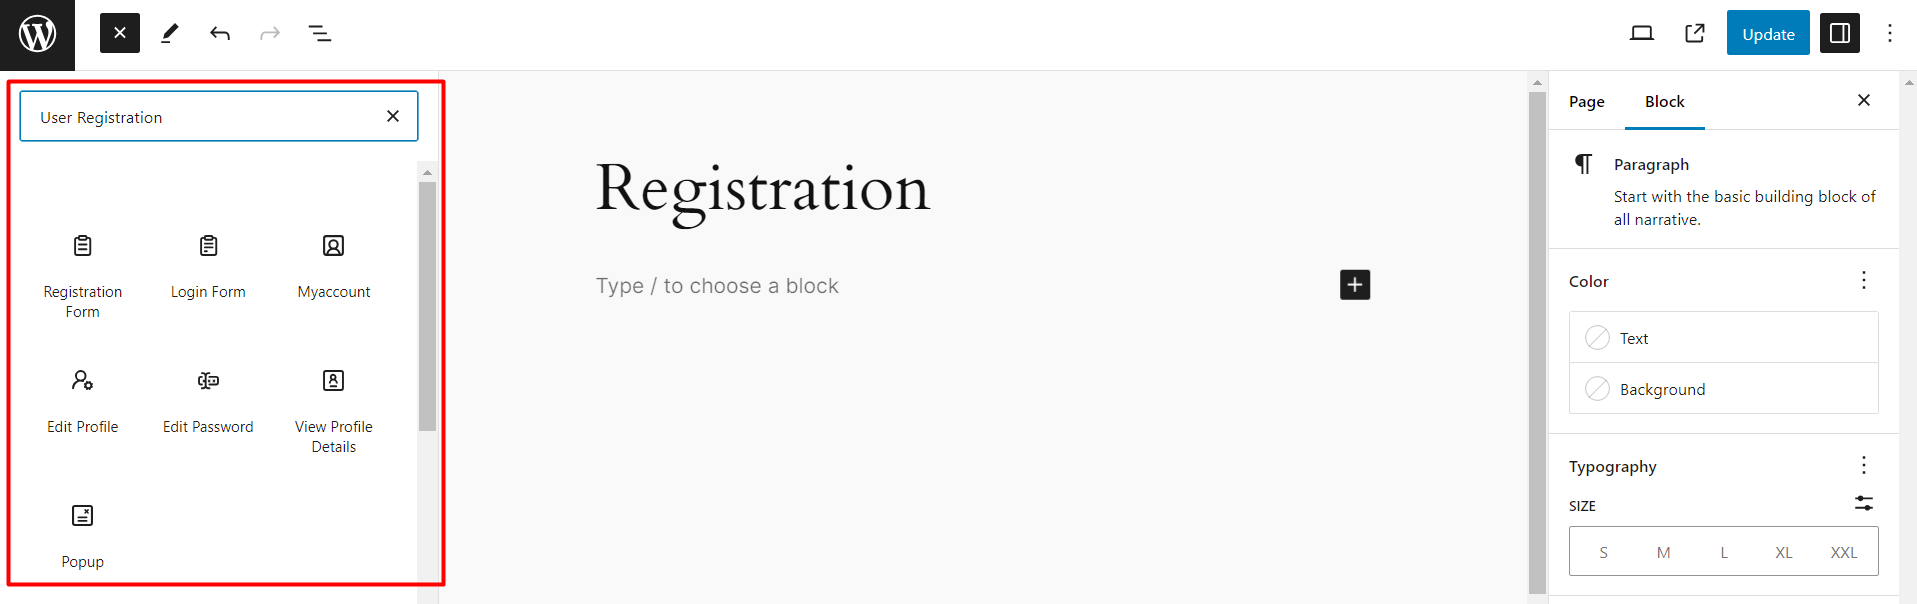
Advanced Gutenberg Blocks #
When creating a page for User Registration, you can choose among the available advanced Gutenberg blocks. Just go to Pages > Add New. On the blocks section, click on + and search for ‘User Registration’. You will find all of the available blocks for the User Registration plugin.