Kit
ProAutomatically sync new member registrations with Kit (ConvertKit) email lists to build your audience and run targeted campaigns without manual data entry.
Last updated on Jul 15, 2026
Would you like to automatically add new members to your Kit email lists when they register on your site? User Registration & Membership allows you to sync registration data directly with Kit (formerly ConvertKit), so you can build your email list and run targeted campaigns without manual work.
This tutorial will show you how to connect your Kit account to User Registration forms and automatically subscribe new users to your email lists.
Requirements: Connecting Kit requires the ConvertKit addon, available with Personal plan or higher. You'll also need an active Kit account with API credentials.
Getting Your Kit API Credentials
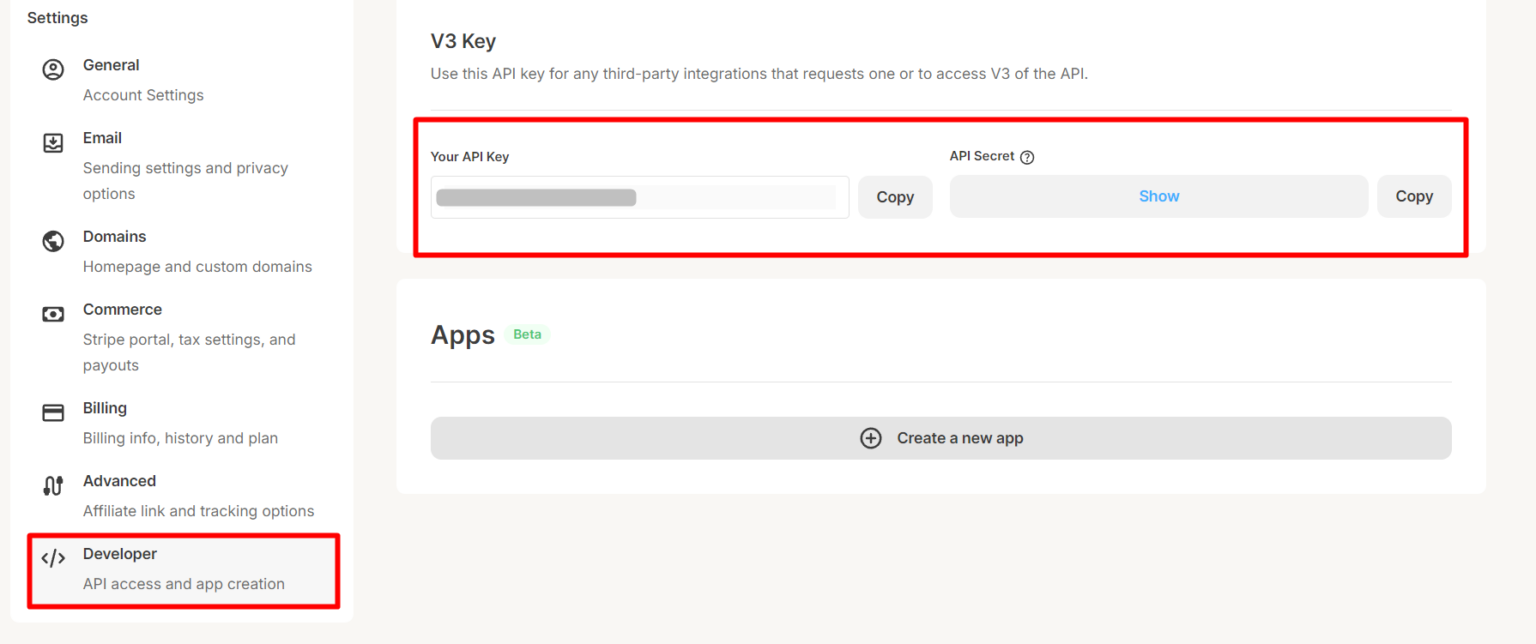
Before connecting Kit to your registration forms, you'll need to get your API Key and API Secret from your Kit account.
To get your API credentials, log in to your Kit account and click your Account Name in the top right corner. Then, go to Settings > Developer > API Keys.
Here, you'll see your API Key and API Secret. Copy both — you'll need them in the next step.
Installing and Activating the ConvertKit Addon
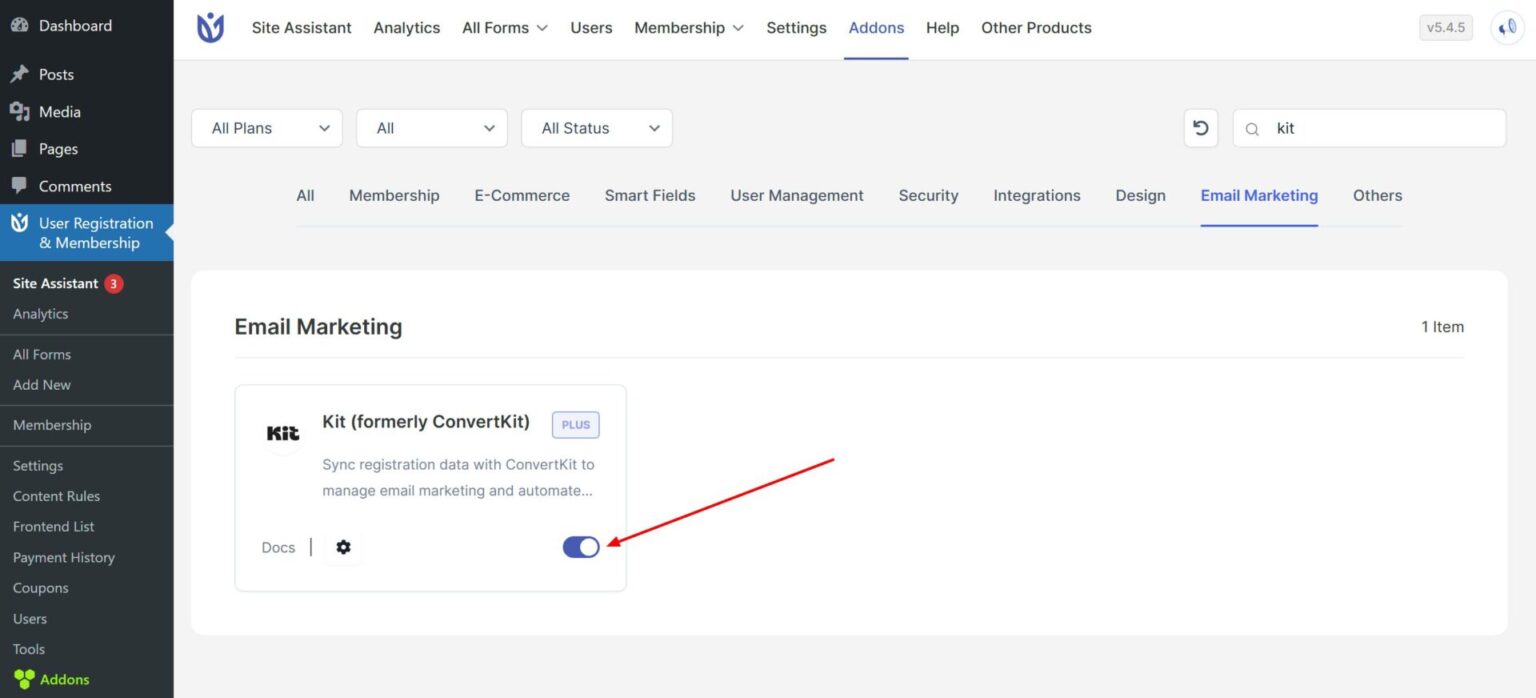
Once you have your API credentials, go ahead and install the ConvertKit addon.
From your WordPress dashboard, navigate to User Registration & Membership > Addons. Search for "Kit" and toggle the switch to activate the addon.
If you purchased User Registration Premium, you can also download the ConvertKit addon from your WPEverest account page and upload it via Plugins > Add New > Upload Plugin.
Connecting Your Kit Account
Now that the addon is active, you can connect your Kit account to User Registration.
From the WordPress dashboard, go to User Registration > Settings > Integration > ConvertKit.

Enter your API Key and API Secret that you copied earlier. You can also add an Account Name — this can be anything you choose to help you identify the connection.
Then, click Connect to link your Kit account.
Once connected, you'll be able to select Kit forms and tags when configuring individual registration forms.
Mapping Form Fields to Kit
With your Kit account connected, you can now map your registration form fields to Kit subscriber fields.
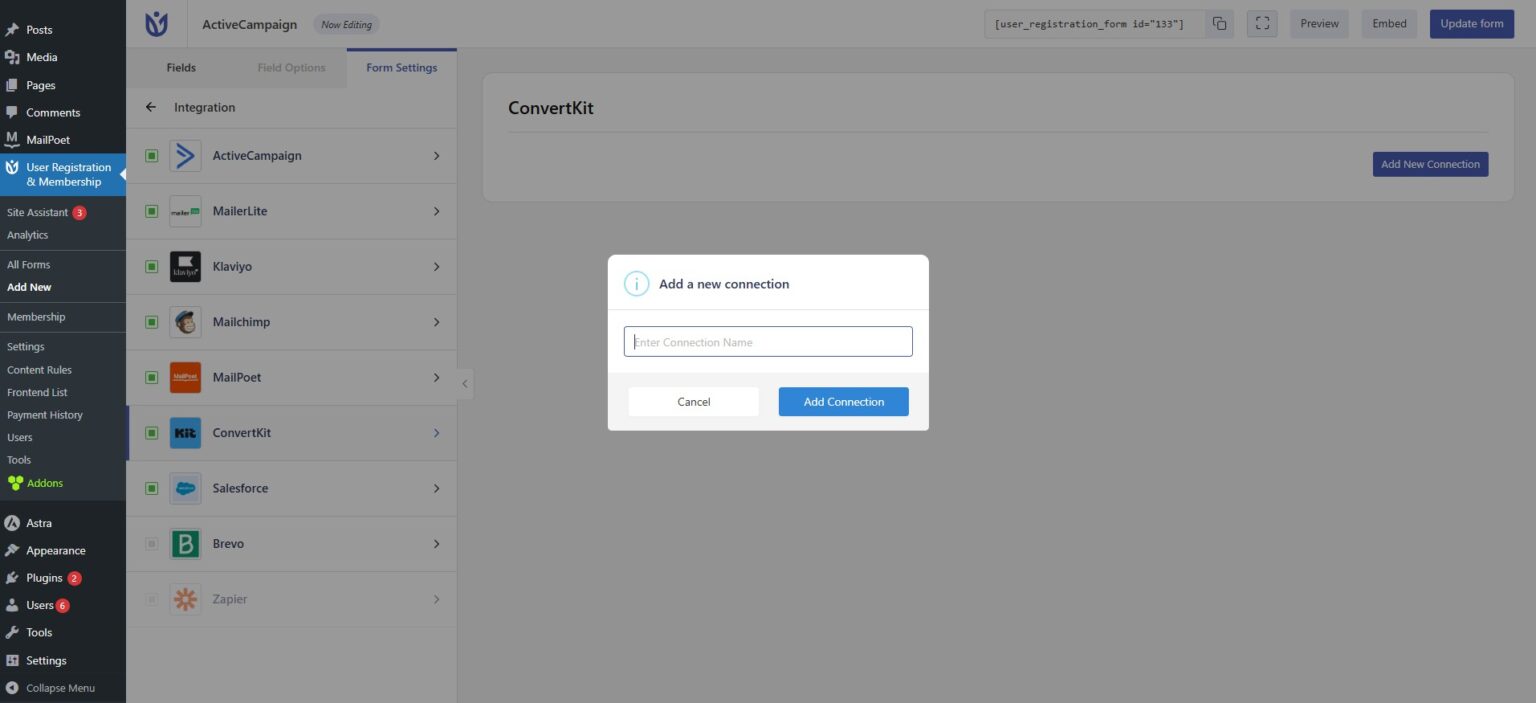
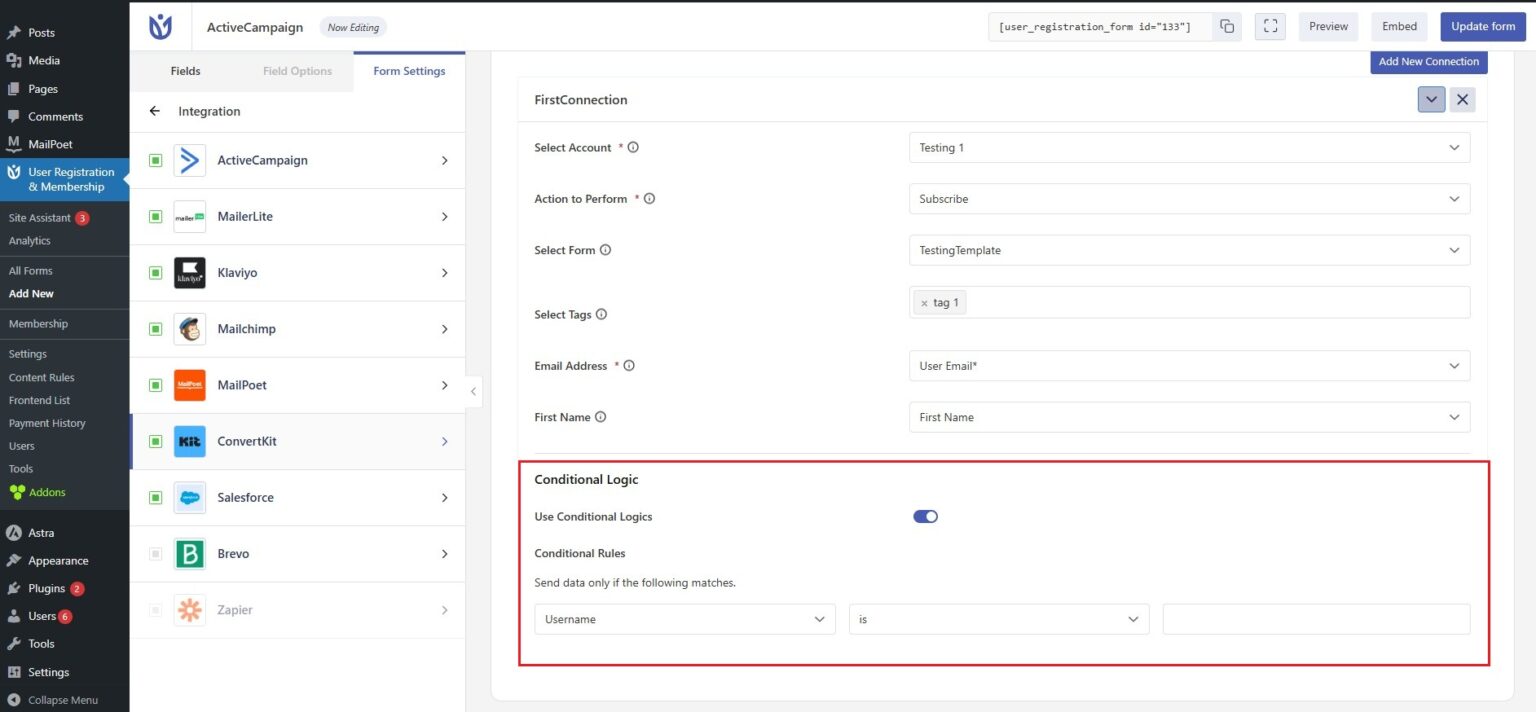
Go to User Registration & Membership > All Forms and click Edit on the form you want to connect. Navigate to Form Settings > Integration > ConvertKit and click Add Connection.
Give your connection a name (this is for internal reference only) and click Add Connection.
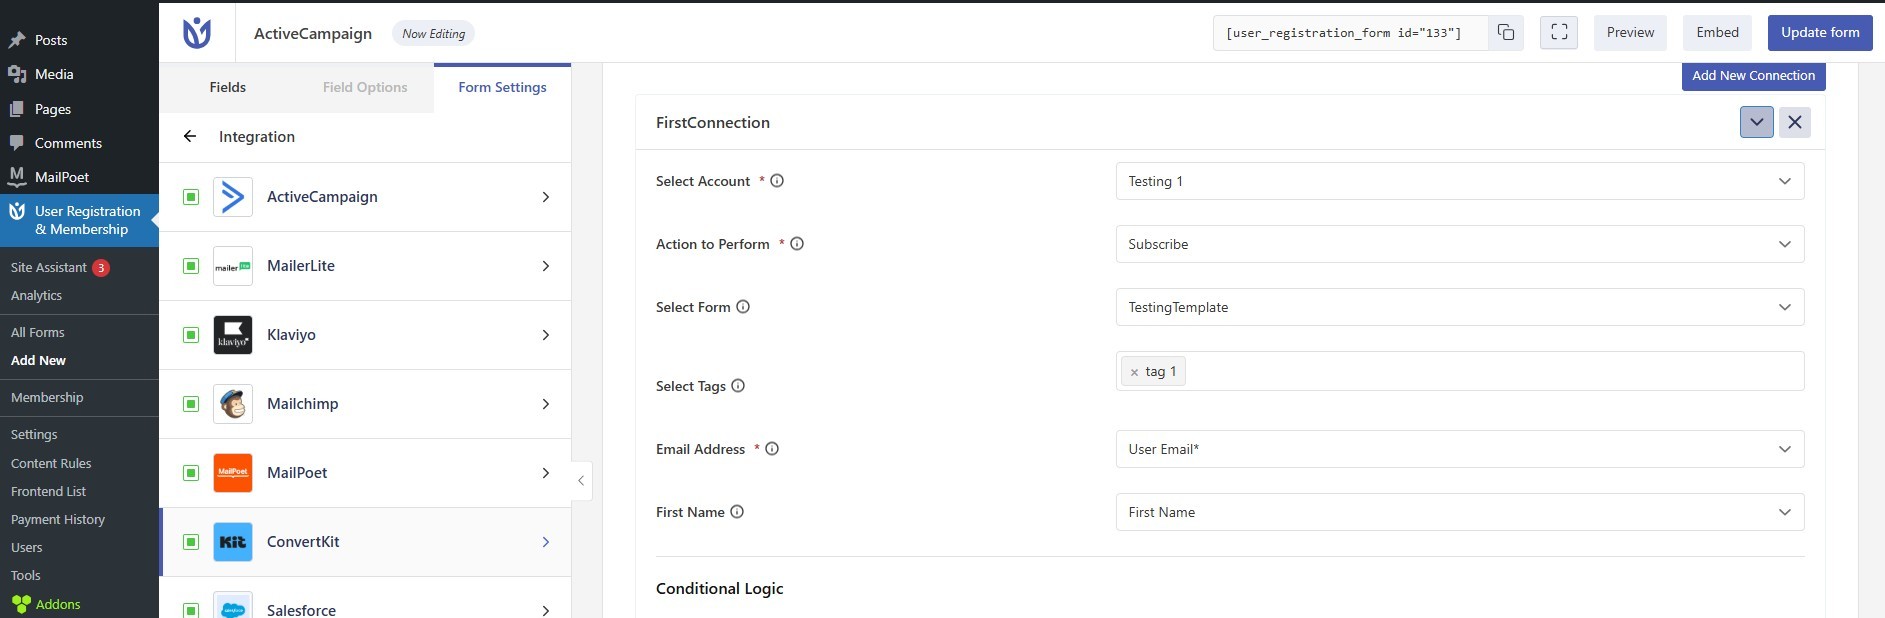
Here, you'll configure how registration data is sent to Kit:
Action to Perform: Choose Subscribe to add contacts to your mailing list, or Unsubscribe to remove contacts from your list. When you select Subscribe, you'll need to map the Email field — this is required. When you select Unsubscribe, contacts are removed from your Kit list without deleting their site account information.
Select Form: Choose which Kit form to link to your User Registration form. This determines which Kit list receives new subscribers.
Select Tags: Choose tags from your Kit dashboard to segment subscribers for targeted campaigns. Tags help you organize contacts based on their interests or behavior.
Email Field Mapping: This is required when using the Subscribe action. Select which registration form field contains the user's email address.
First Name Field Mapping: Optionally map the user's first name to personalize your Kit emails.
Using Conditional Logic for Audience Segmentation
If you'd like to send registration data to Kit only when certain conditions are met, you can enable conditional logic.
Toggle on Use Conditional Logic and configure rules based on form field values. For example, you could subscribe users to different Kit forms based on their interests, membership level, or other selections they make during registration.
Conditional logic evaluates form values in real-time, allowing sophisticated audience segmentation without manual work.
Testing Your Kit Integration
Before going live, we recommend testing your Kit connection by submitting a test registration.
Fill out your registration form and submit it. Then, check your Kit account to confirm the new subscriber appears in the correct form with the appropriate tags.
If the subscriber doesn't appear, double-check that your API credentials are correct and that the Email field mapping is configured properly.