
Installation #
- First, you need to purchase the User Registration Premium to get the User Registration Pro plugin/add-on.
- After the successful purchase, you will get the plugin zip file under your WPEverest account page.
- Now, you can download the plugin zip file from there.
- Through your WordPress Dashboard, visit Plugins -> Add New -> Upload and then choose the downloaded zip file and then install and activate it.
- Now you are ready to use this add-on for your site.
Classic/Default Method #
Full Content Restriction #
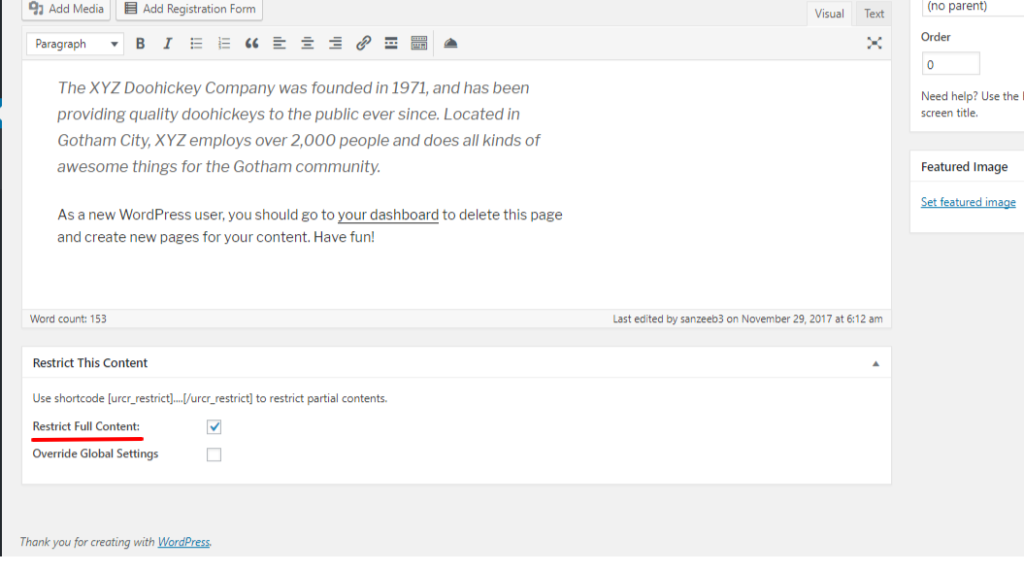
You can now restrict the posts or pages. To restrict go to the page and check to restrict full contents in the meta box:
Now, this page is restricted. Who can see the posts/pages depends on the global settings. Go to user registration->Settings->Content Restriction
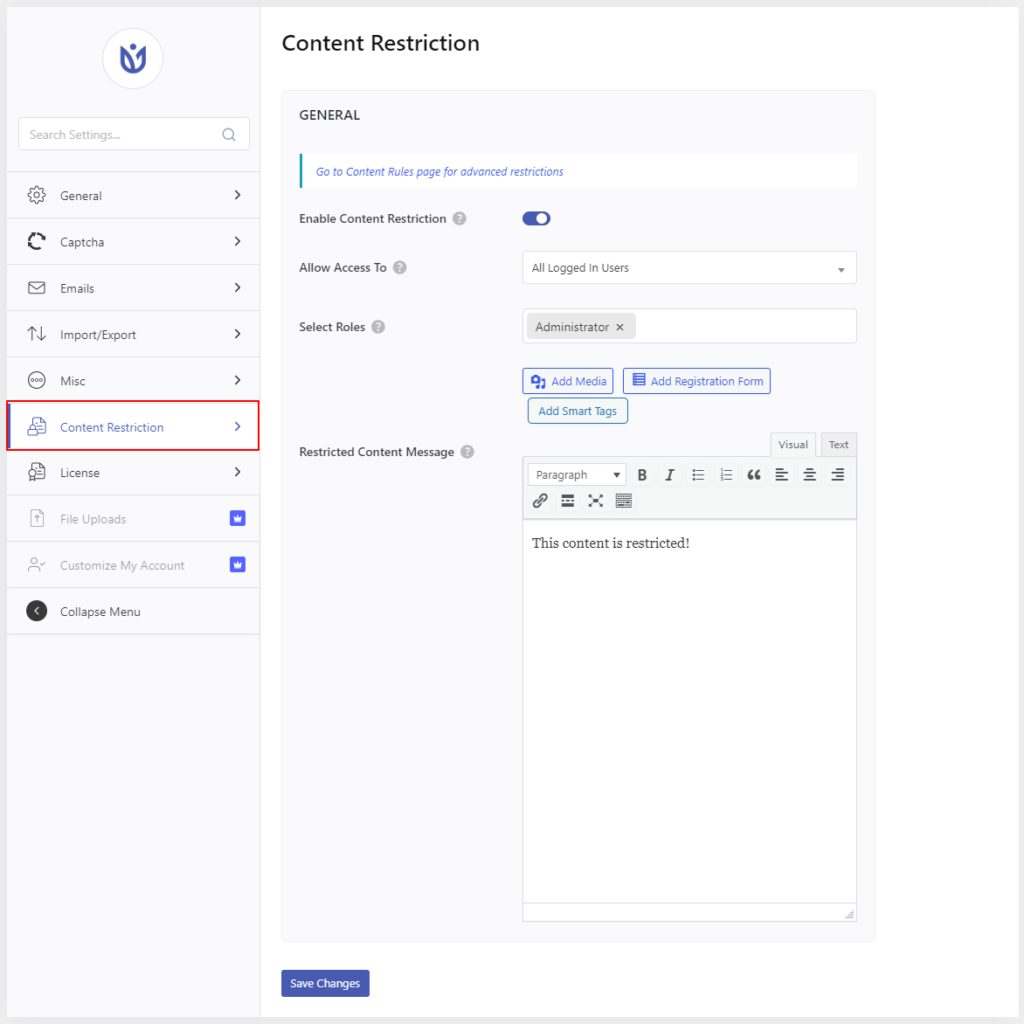
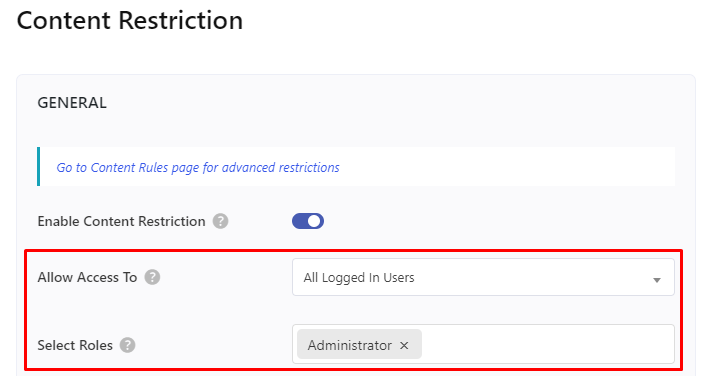
Allow access to options in the settings allows you to choose an option to who can see the restricted contents. The default is all logged in users. You can change it to allow access to only specific roles.
However, you can override the global settings for specific pages/posts from the meta.
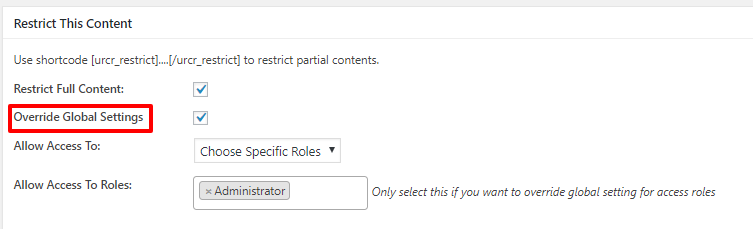
Now this page/post is accessible to the only administrators whatever the setting in the global is.
Partial Content Restriction #
You can also restrict the partial contents of the pages or posts. Use the shortcode [urcr_restrict]...[/urcr_restrict].
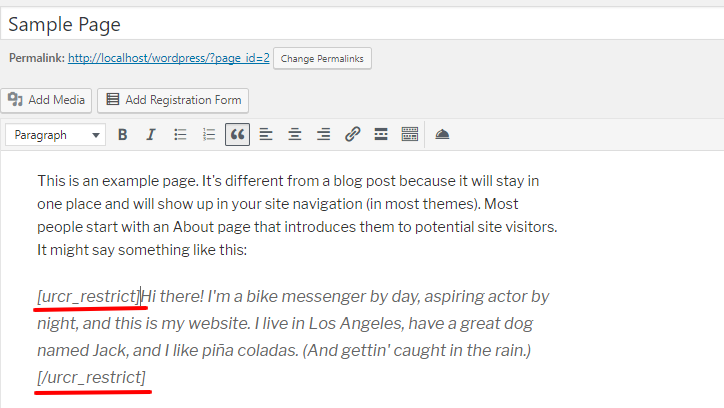
This will restrict the paragraph under the shortcode. Who can see these contents depends on the global settings similar to full contents.
To override global settings to specific posts/pages. You can pass the parameter access_role to the shortcode. When you pass parameters, the settings in global does not matter.
Examples:
[urcr_restrict access_role ="administrator"] will allow access to the only administrators.[urcr_restrict access_role ="guest"] will allow access to only non-logged in users.
[urcr_restrict access_role ="administrator,contributor"] will allow access to administrators and contributors.
To allow access to all logged-in users: Pass argument access_role with a value all_logged_in_users.
e.g. [urcr_restrict access_role ="all_logged_in_users"]
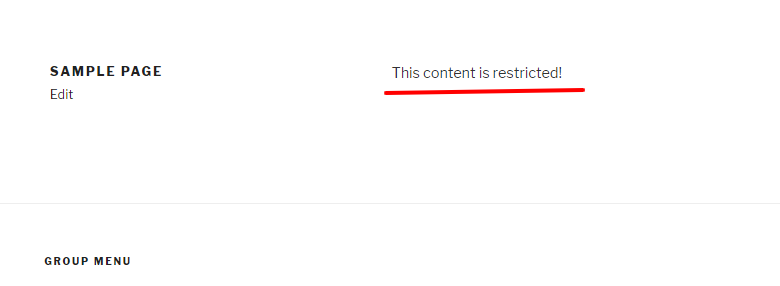
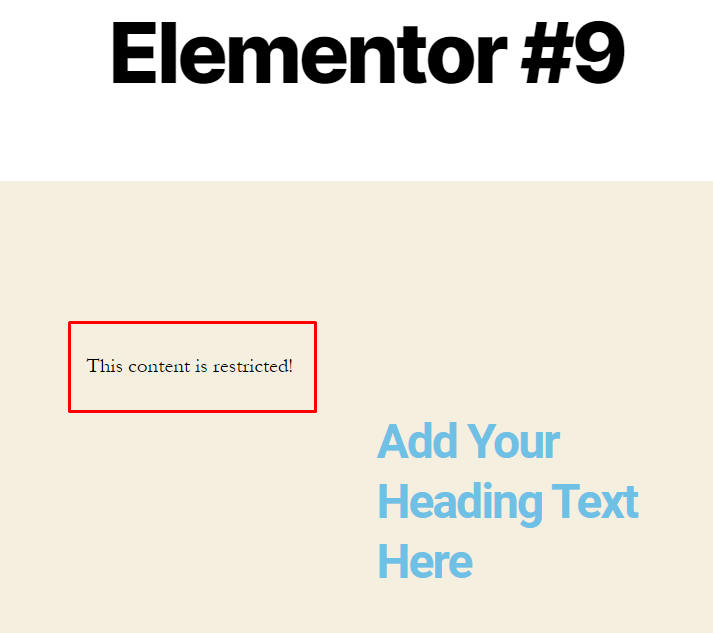
Message in the settings allows you to write the message instead of the restricted contents.
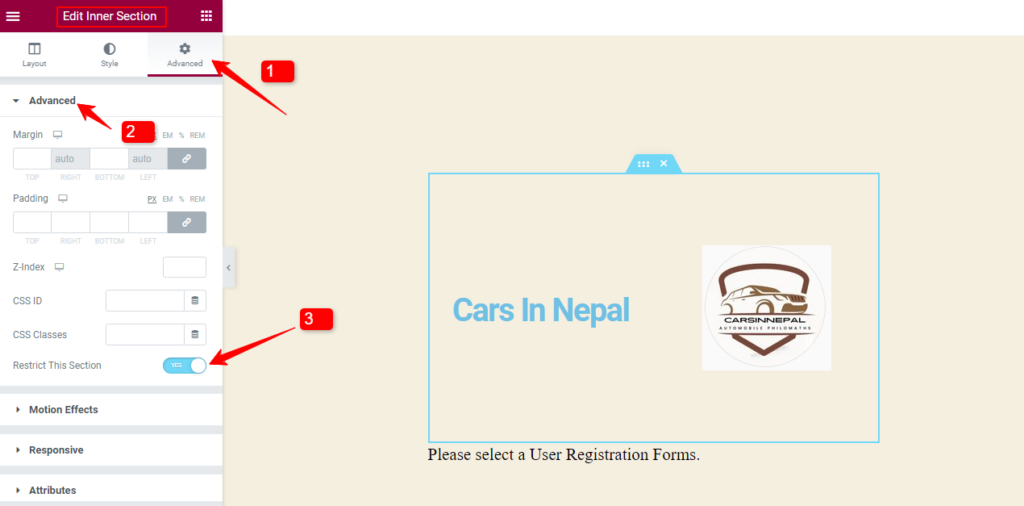
Partial Restriction for Elementor sections #
You can restrict the sections of the Elementor partially from the section’s advanced settings. Go to Edit Section > Advanced and on the Advance tab, you will find the option to restrict that section.
Frontend
Advanced Method: #
Setup and Configuration: #
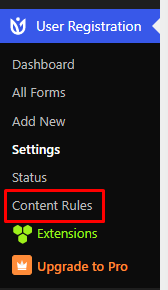
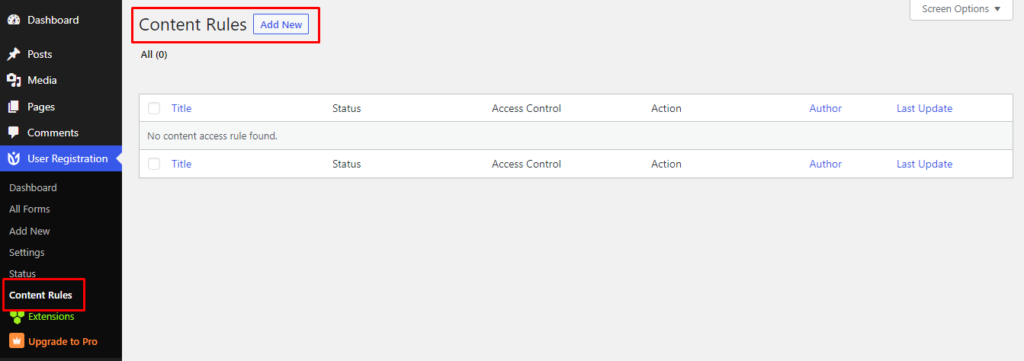
Go to the access rules page by clicking on the sub-menu Content Rules.
After you click on it, you will see the Content Rules window where you can add content access rules. You can set rules using conditions and logic, select what content to restrict, and also define what to do when someone tries to access the restricted content. You will see everything explained below in a step-wise manner.
Adding a New Rule: #
Click on the Add New button to add a new rule.
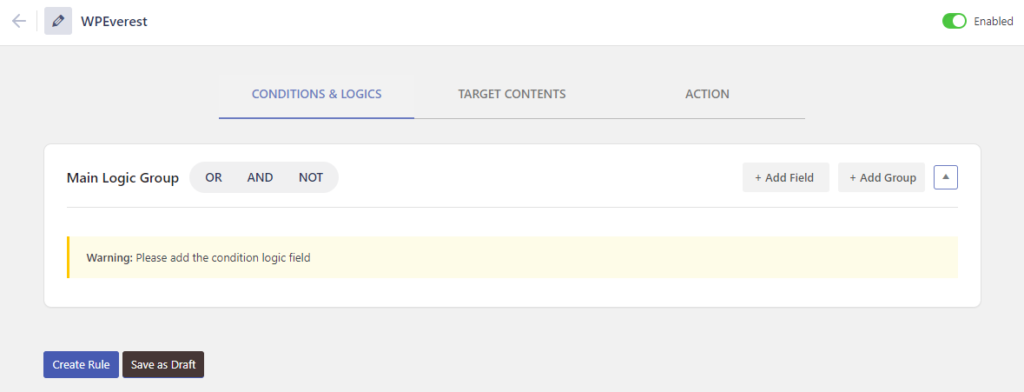
After clicking on Add New, you will see a window as shown below:

Give a name to the rule and choose whether you want to create an access rule or a restrict rule. Access rules provide access as per the condition you will set and the restrict rules will restrict the content. Then, click on Continue.
How to define the conditions? #
After you click on Add New, you will see that you are in the Conditions & Logics Tab by default and a Main Logic Group Section appears by default inside the Conditions & Logics Tab. You have the option to Add Fields where you can choose from various fields and set values to them and Add Groups where you can add a group inside which you can again add different fields or sub-groups.
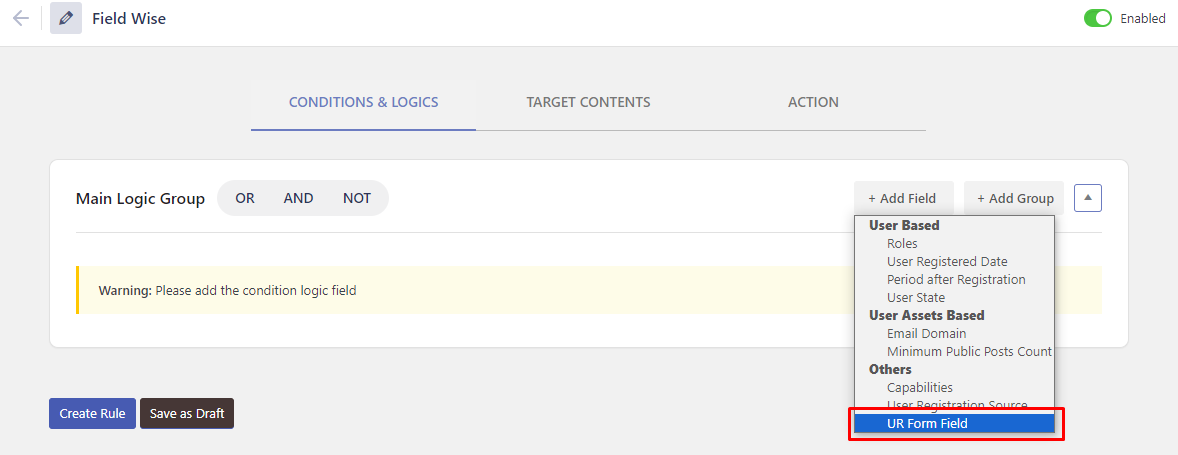
Adding Fields #
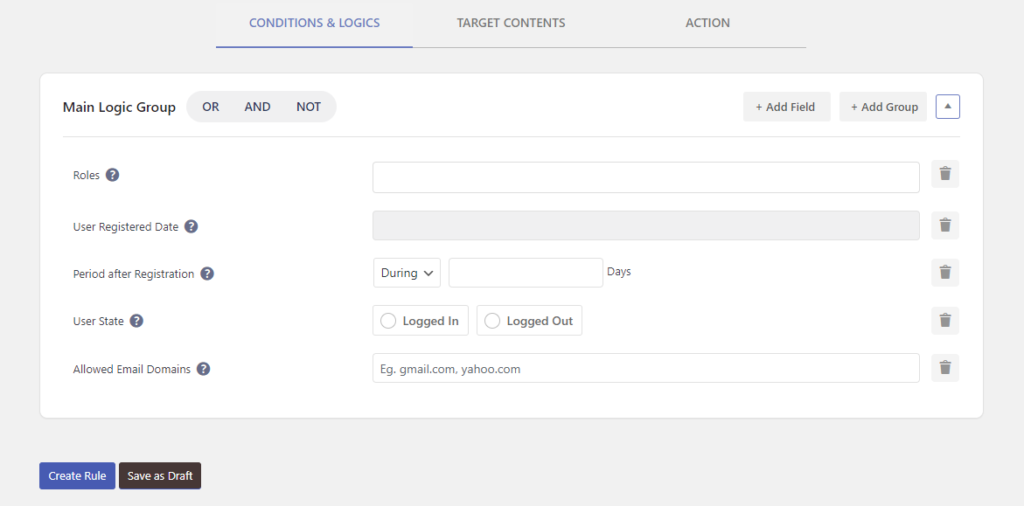
Click on the Add Field button and you will see a dropdown with a list of options where you can choose between various fields to set up a condition.
You can select those from the list that you feel are necessary. For the demonstration purpose, I have selected some of them to let you know the purpose.
To view the content following rules must be followed:
User Based:
1. Roles: Users must have any one of the selected roles.
2. User Registered Date: Users must be registered within the selected date range.
3. Period After Registration: You can set the number of days during or after which the user is given access to the content.
4. User State: You can define whether the logged in or logged out users are able to access the content.
User Asset Based:
1. Email Domain: Specify particular email domains so that users with the specified email domain can only view the restricted content. You can specify multiple email domains separating them with comma. Like, gmail.com, hotmail.com, wpeverest.com, etc.
2. Minimum Public Post Count: The content visiting user must have minimum specified posts on your site as public.
Others:
1. Capabilities: The content-visiting users must have all the listed capabilities to access the content.
2. User Registration Source: Users must be registered from any of the defined sources to visit the content.
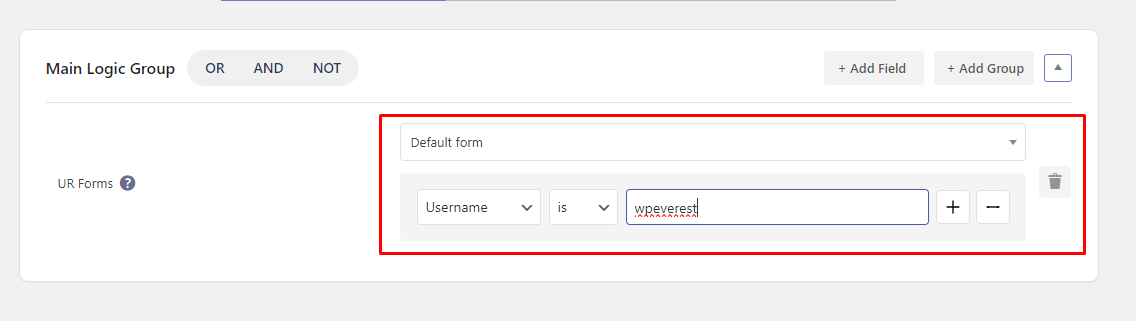
3. UR Form Fields: This field lets you choose the form field from any of the available User Registration forms. You can set a conditional logic so that the restriction/access happens when the form field value matches the condition.
Adding Groups:
Click on the Add Group button and you will see a sub-group appear inside the main logic section. Sub-Group can contain fields or other another sub-group of their own. You can consider the sub-group like any other field to avoid any confusion while setting up the rule.

In the above screenshot, you can see that I have added two fields(Roles and User State) and a group inside the Main Logic Section. I have added the fields by clicking on Add Fields and added the group by Clicking on Add Group of the Main Logic group.
You can also see that I have added a field(Allowed Email Domains) inside the Sub Logic Group. You can add fields inside the sub logic group by clicking the Add Fields button of Sub Logic Group. You can also add a group inside Sub Logic Group by clicking on the Add Group button of Sub Logic Group.
Main Logic Group Operators:
You can see the option to set OR | AND | NOT right next to the Group name.
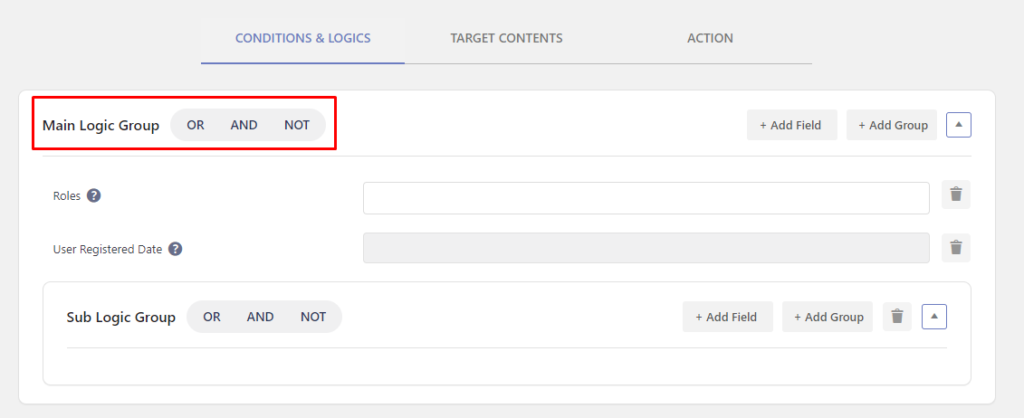
These three logical operators perform the selected operation on the fields and groups inside the Main Login Group. For Example, see the above screenshot.
– If you selected OR, then the user visiting the page will only be able to see the restricted content if the condition specified in either Roles, or User State or Sub Logic Group is true.
– If you selected AND, then the user visiting the page will only be able to see the restricted content if the condition specified in Roles, User State, and Sub Logic Group is true. All three conditions must be met i.e all three must be true.
– If you selected NOT, then the user visiting the page will only be able to see the restricted content if the condition specified in Roles, User State, and Sub Logic Group is not true. All three conditions must not be met i.e all three must be false.
Note: Similar functionality is available for the Sub-Logic Group Operators but it works for the fields/groups inside it.
Deleting the Fields/Groups:
To delete a field or a group, simply click on the bin icon at the rightmost part of the field or group and it will remove the element.
- Target Contents: Here you can specify the contents that you want to restrict. It could be Pages, Posts, Taxonomies, or Post Types.
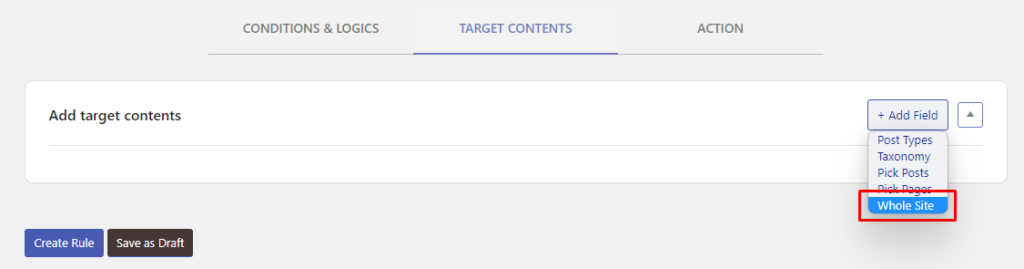
How to select the content for restriction? #
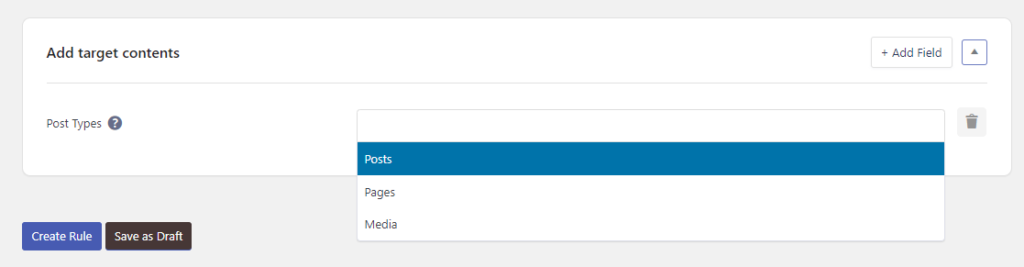
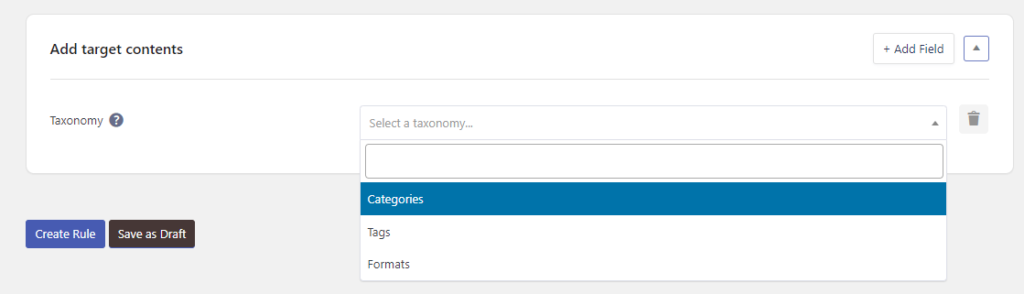
After you have set up the rules to access the contents in the Conditions & Logics Tab, you will need to specify the contents to be restricted. To do so, click on the Target Contents Tab and then click on the Add Fields button inside the Target Contents Tab. You will see the following options.
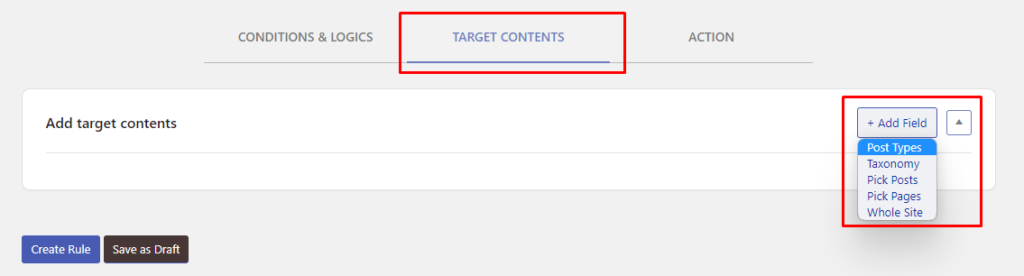
You can select those from the list that you want to restrict. For the demonstration purpose, I have selected some of them to let you know the purpose.
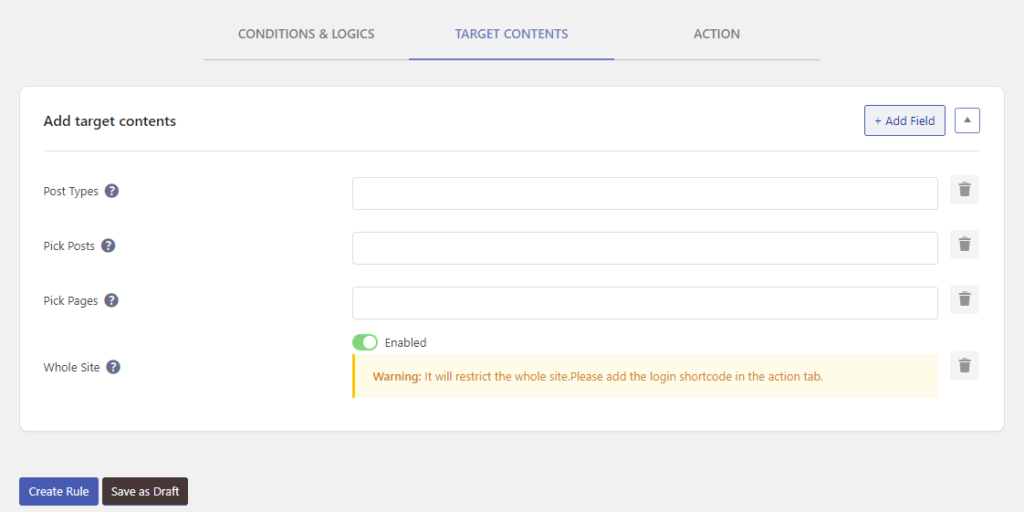
You will need to specify the contents for the options that you have selected to restrict.
Post Types: Select the Post type that you want to restrict. All available post types will show up on the list and you can choose the ones you want to restrict. When using the WooCommerce plugin, you can select the ‘Product’ post type to restrict or provide access to the users from/to the Products.
Taxonomy: Select the taxonomy that you want to restrict. All available taxonomies will show up on the list and you can choose the ones you want to restrict. If you use the WooCommerce plugin, you can select the product categories that you would like to restrict.
Pick Posts: You can select one or many posts from your site to apply restrictions.
Pick Pages: You can select one or many pages from your site to apply restrictions.
Whole Site: You can restrict all of the content on your site if you select this target.
Restrict Whole Site #
For restricting the whole site, go to Target Contents, click on Add Fields and select ‘Whole Site’.
After this, the users that match the condition will be given access to the whole site and others will be restricted.
Restricting whole site for logged out users will also restrict them from viewing the login and registration forms which isn't convenient. If you restrict whole site for the logged out customers, you will then have to either render the login form shortcode or select 'Show Message' option for the Action section. While showing the message, you can add the registration and login form shortcodes so that the logged out users can either login or register to your site.
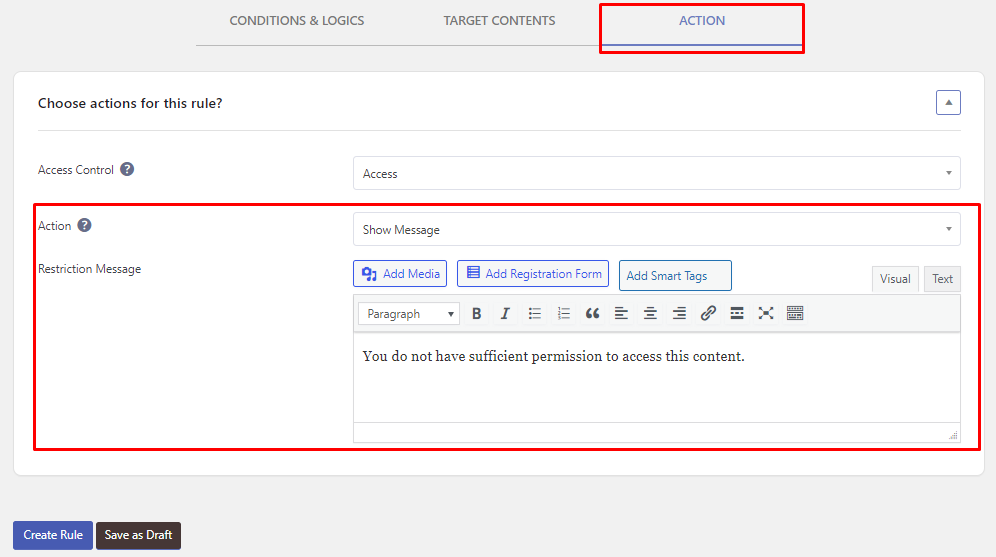
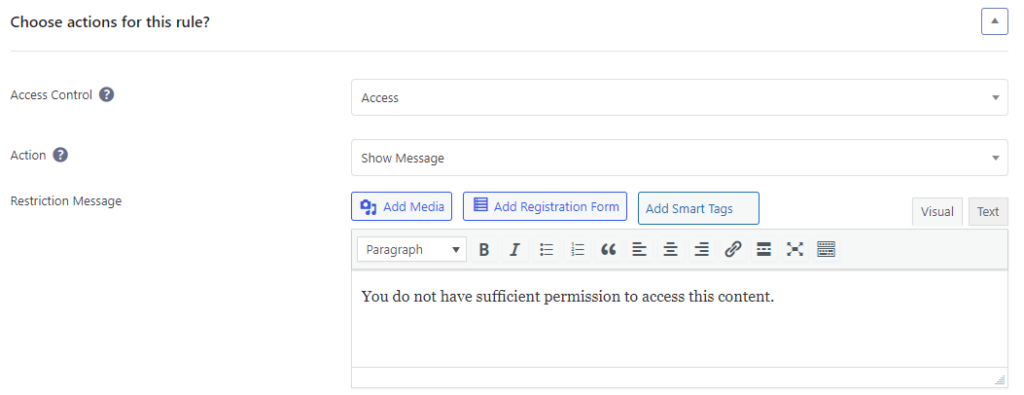
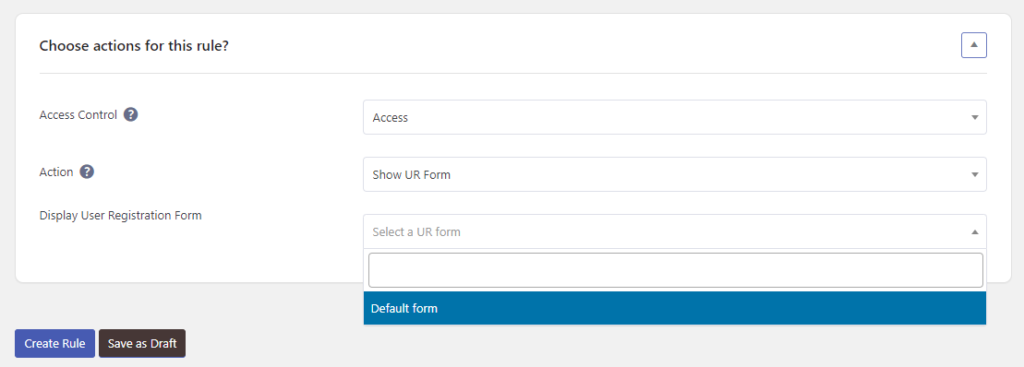
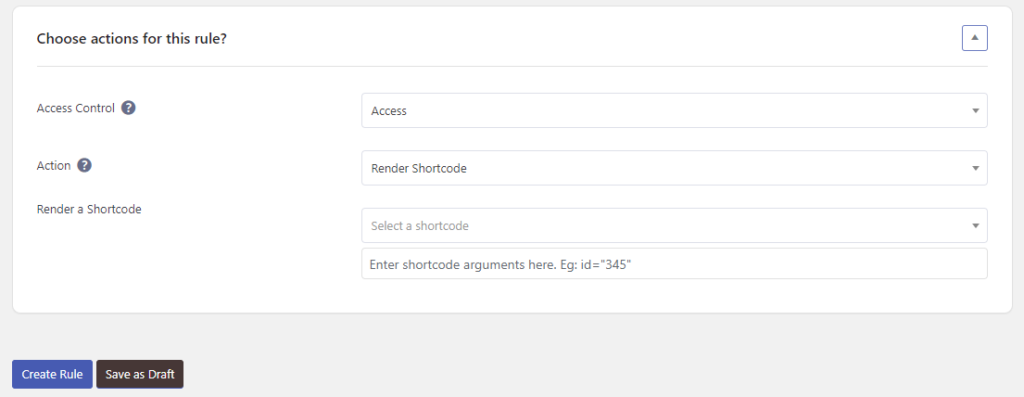
How to set up Actions for restricted content? #
After you have selected the contents for restriction in the Target Contents Tab, you will need to specify the actions that will be taken when a user who is not eligible to visit the content tries to see/access the content. To do so, click on the Actions Tab and then select an action from the list of available actions. You will see the following options.
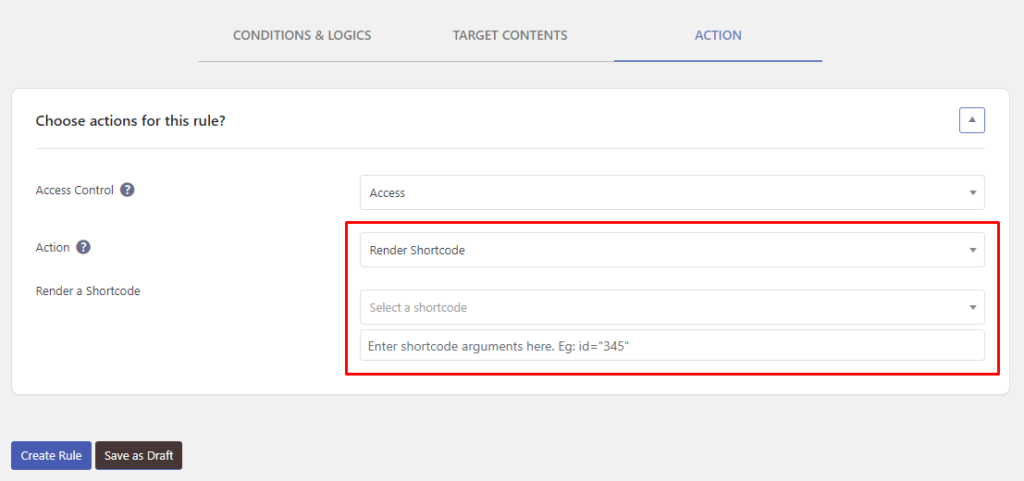
Here is the description of each of them:
1. Show Message: After you select this option, you will be able to show a custom message to the users if they try to access the restricted content. You can add a link or show a formatted message using HTML to your users.
2. Redirect: After you select this option, you will be able to redirect non-eligible users to a custom URL that you will need to specify in the URL input section that will appear after selecting this option.

3. Redirect to a Local Page: After you select this option, you will be able to redirect non-eligible users to a page within the website. You can select a page from the dropdown section. The dropdown will show all the pages of your website.

4. Show UR Form: After you select this option, you will be able to show a User Registration Form to non-eligible users. You will need to select the form from the dropdown that will appear after selecting this option.
5. Render Shortcode: After you select this option, you will be able to show the different contents to non-eligible users using the shortcode from the available shortcode list. You can also specify the extra attribute of the shortcode in the input there.
Finally, you will set up the advanced content restriction on your site.
Note: The previous way of restricting content hasn’t been removed or changed so the rules you set before should work just fine even if you’re using this feature. However, please keep in mind that the new method takes precedence over restricting the same contents. For example, let’s say you restricted a post using the old method. Then, you created a new Access Rule to restrict the same post. In this case, the access rule will restrict the content, however, if it doesn’t perform restriction then the old way of restricting starts running.


