Installation #
- First, purchase the User Registration – Advanced Fields add-on.
- After the process succeeds, you will get the add-on zip file under your WPEverest account page.
- Now, you can download the add-on zip file from there.
- After you log into your WordPress Dashboard, go to Plugins > Add New and click Upload Plugin button available there and choose the file you’ve downloaded and click Install Now button. Make sure to install the user-registration and WooCommerce plugins too.
- This will install the add-on. Now, you’ve to activate the addon from the Install plugin list.
- Now you are ready to use this add-on for your site.
Now you will be able to add extra fields in your form.
Advanced Fields #
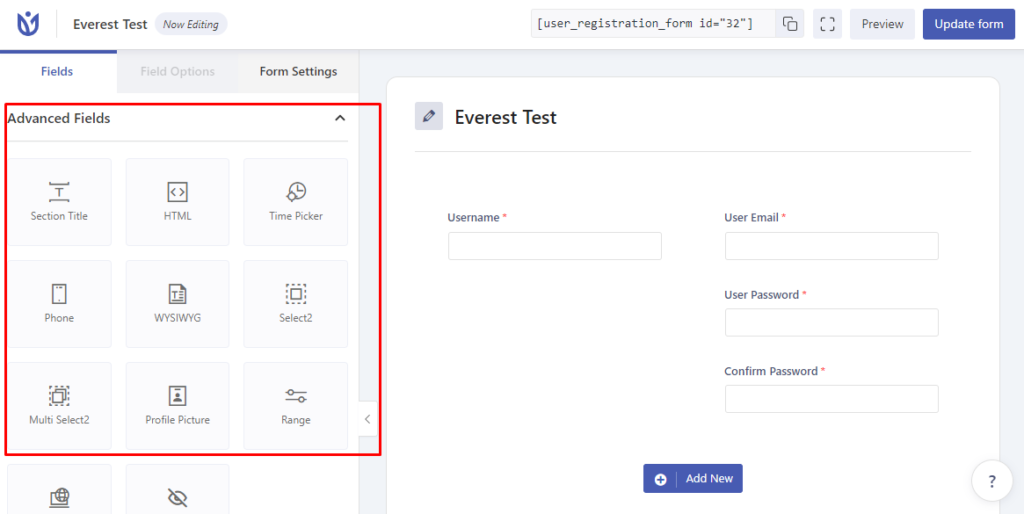
After you install and activate the User Registration – Advanced Fields add-on, you will get the following fields to use in your registration form.

Section Title: #

This field allows you to add a heading or divide certain fields. On the Fields Options, you can easily change the Label to add the section title on your form.
Time Picker: #

With this field, you can add time to the registration field, so that users could be able to enter time during registration. In the Field Options, you will find the settings for label, description, advanced settings, and more.
- Default to current time: Check this option to set the current time as default.
- Enable Min Max time: Check this option to set the Minimum and Maximum time.
HTML: #

HTML field allows you to enter the HTML and code contents to display in the frontend. In the Field Options, you can change the Field Label to your liking and add the HTML code of your desire.

Phone: #

This field allows users to enter phone numbers specifically. On the Field Options, there are the settings for Label, Description, Field Name, Required and Hide Label. Also, the main settings for the Phone field are the Select Format setting. There are two choices for the Format: Default and Smart.
When you select the Format as Default, you can see the Input Mask option too where you can enter a custom input mask.

When you select the Format as Smart, it displays the country flag with validation and you don’t need to enter an Input Mask.
WYSIWYG: #

This field allow users to enter the formatted text and contents wherever necessary. It allows users to submit content without having to use custom code or the use of HTML.
Select2: #

The Advanced Fields add-on allows you to insert the Select2 field to your registration forms. Select2 is a jQuery based replacement for select boxes. It supports searching infinite scrolling of results. In the Field Options, you can change the Field Label, Description, and add the Multiple choice options.
Multi Select2: #

The Multi Select2 form field allows users to select multiple options and all of these choices will be displayed in the form field in the frontend. Just like the Select2 field, it supports searching infinite scrolling of results. In the Field Options, you can change the Field Label, and Description, and add the Multiple choice options.
From version 1.9.4 We have come up with the “Choice limit” feature where you can enter the minimum number of choices that can be selected.

And now, you can add a choice to select all the option from the advance settings of the MultiSelect2 which will help users to select all the options if necessary.
Profile Picture: #

Add this field to allow users to submit their profile picture.
Get to know more about the Profile Picture field.
Range(Slider) #

The range is a field that is available now in the “Advanced Fields” add-on, where you can add a field called Range, to display a beautiful user-friendly bar slider in the front-end of the form, where users can select a value from the provided data by dragging the Handle.
Looking for instruction on how to configure the range (slider) field?


