
Content Restriction Overview
Control who can access specific content on your site through membership-based rules, with advanced Custom Rules available in the PRO version.
Last updated on Jul 14, 2026
The Content Restriction feature lets you control who can access specific content on your site based on memberships, user data, and flexible rule conditions.
How you manage content access depends on your plan:
Free version – Content restriction only through membership Access settings
PRO version – Dedicated Content Rules interface with Membership Rules and Custom Rules
Content Restriction in the Free Version
In the free version, there is no Content Rules dashboard. All content access is managed per membership plan.
Configure Membership Access
Go to User Registration & Membership → Memberships
Click Edit on the membership plan you want to configure
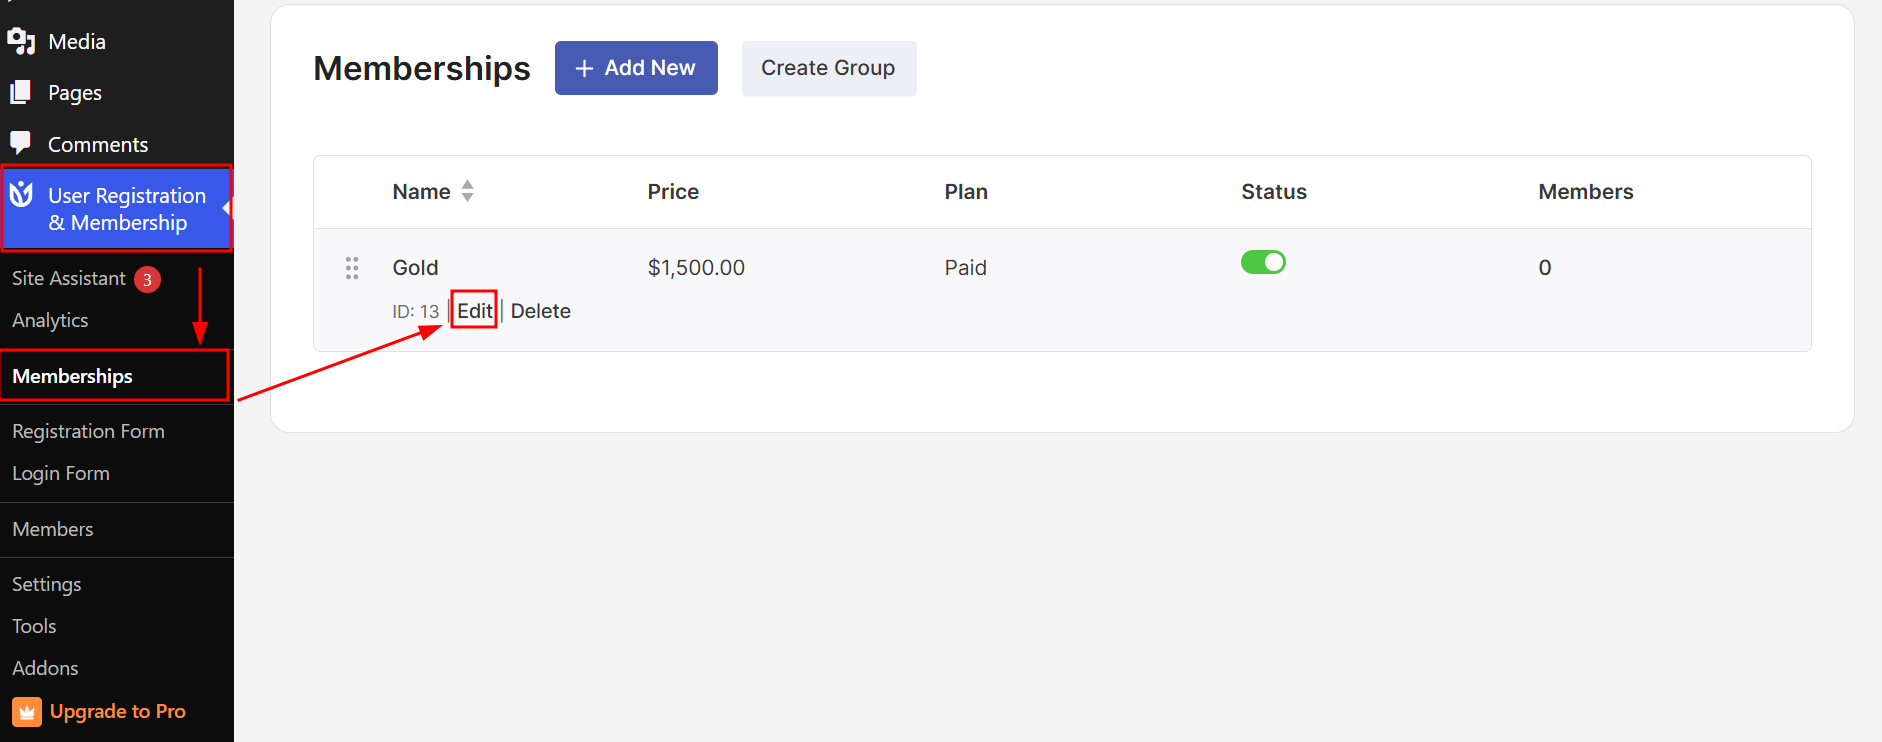
Click the Access tab at the top
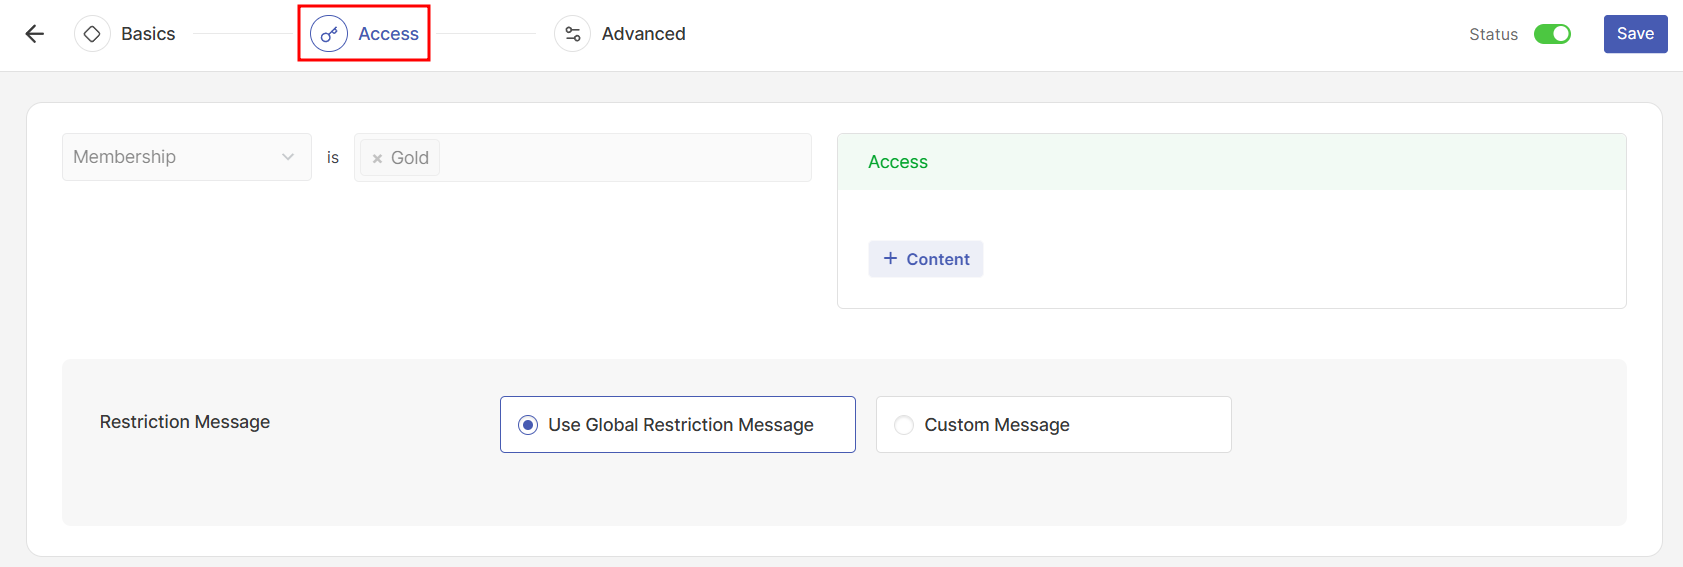
This is the only place where free users can define which content a membership can access.
Membership Access Section
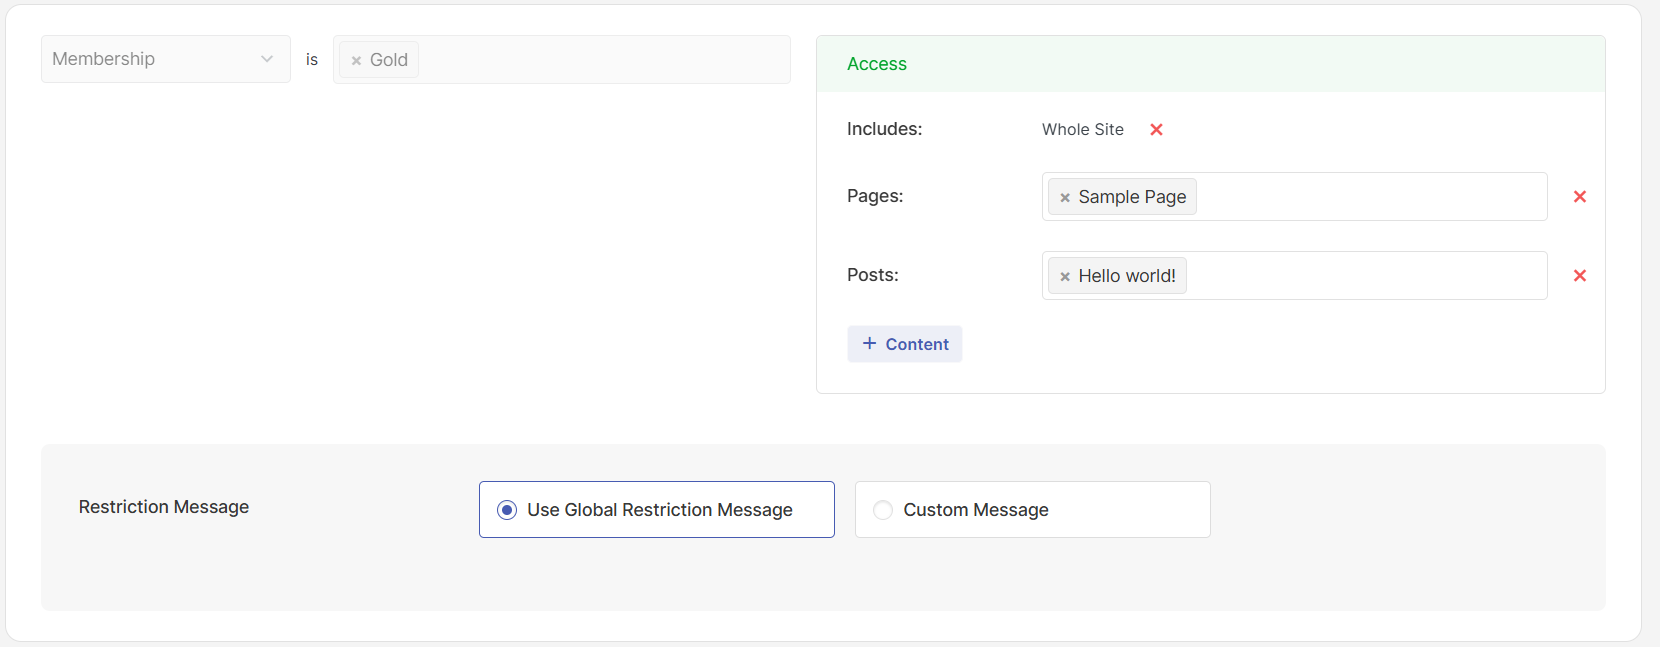
The Access section inside a membership defines what content members of that plan can view. From here, you can control access to:
Basic Content Restriction: Provide access to individual pages, posts, or the whole site.
The entire site
Selected pages
Specific posts
Advanced Content Restriction (PRO Only)
Custom post types
Menu items
Supported taxonomies (such as categories and tags)
Custom URI
File Downloads (available when the File Downloads add-on is enabled)
Content Drip (available when the Content Drip Addon add-on is enabled)
These access settings are automatically applied when a user has an active membership for that plan.
How This Works Internally
Although free users configure access from the Membership Access screen, these rules are internally treated as membership content rules.
In the PRO version, these same rules become visible under the Content Rules > Membership Rules tab.
Content Rules in User Registration & Membership PRO
The PRO version introduces a dedicated Content Rules interface for centralized content management.
With Content Rules, you can:
View and manage membership-based access rules in one place
Create custom content restriction rules using advanced conditions
Apply access control to pages, posts, files, taxonomies, and more
However, the Content Rules menu is not enabled by default.
Content Rules are available only in the PRO version and must be enabled manually.
Enable Content Restriction Addon (Required)
The Content Rules menu is not enabled by default, even in PRO.
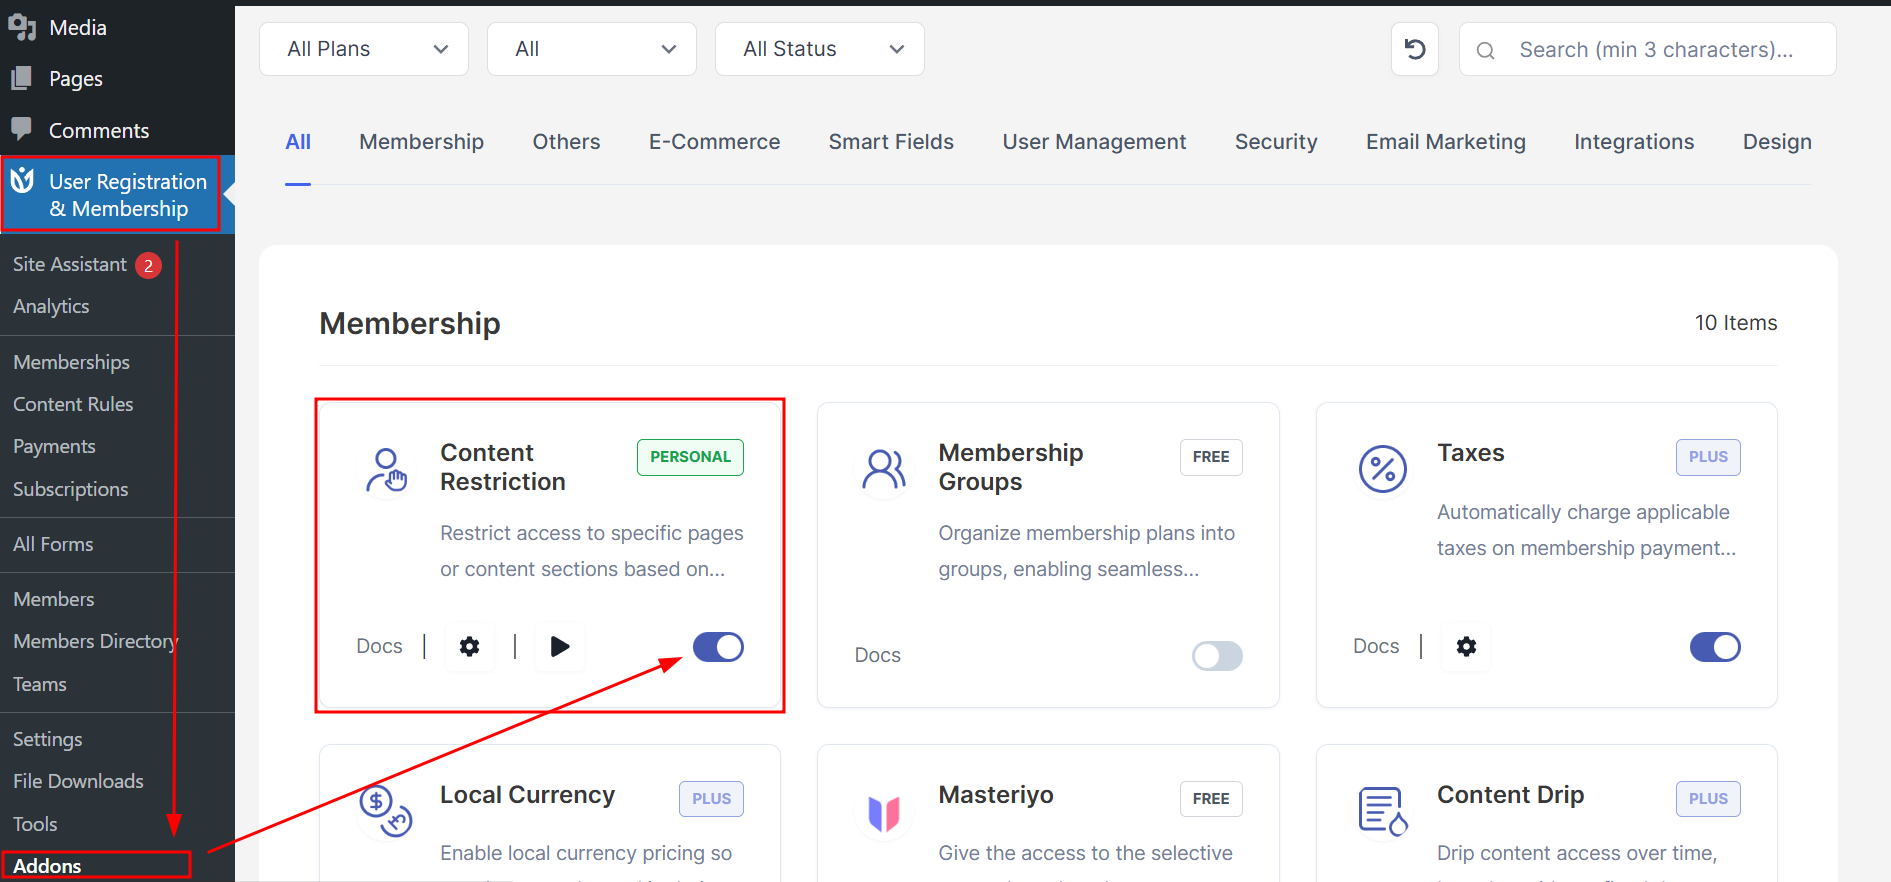
Go to User Registration & Membership > Addons
Locate Content Restriction
Toggle the addon to activate.
Content Rules Overview (PRO)
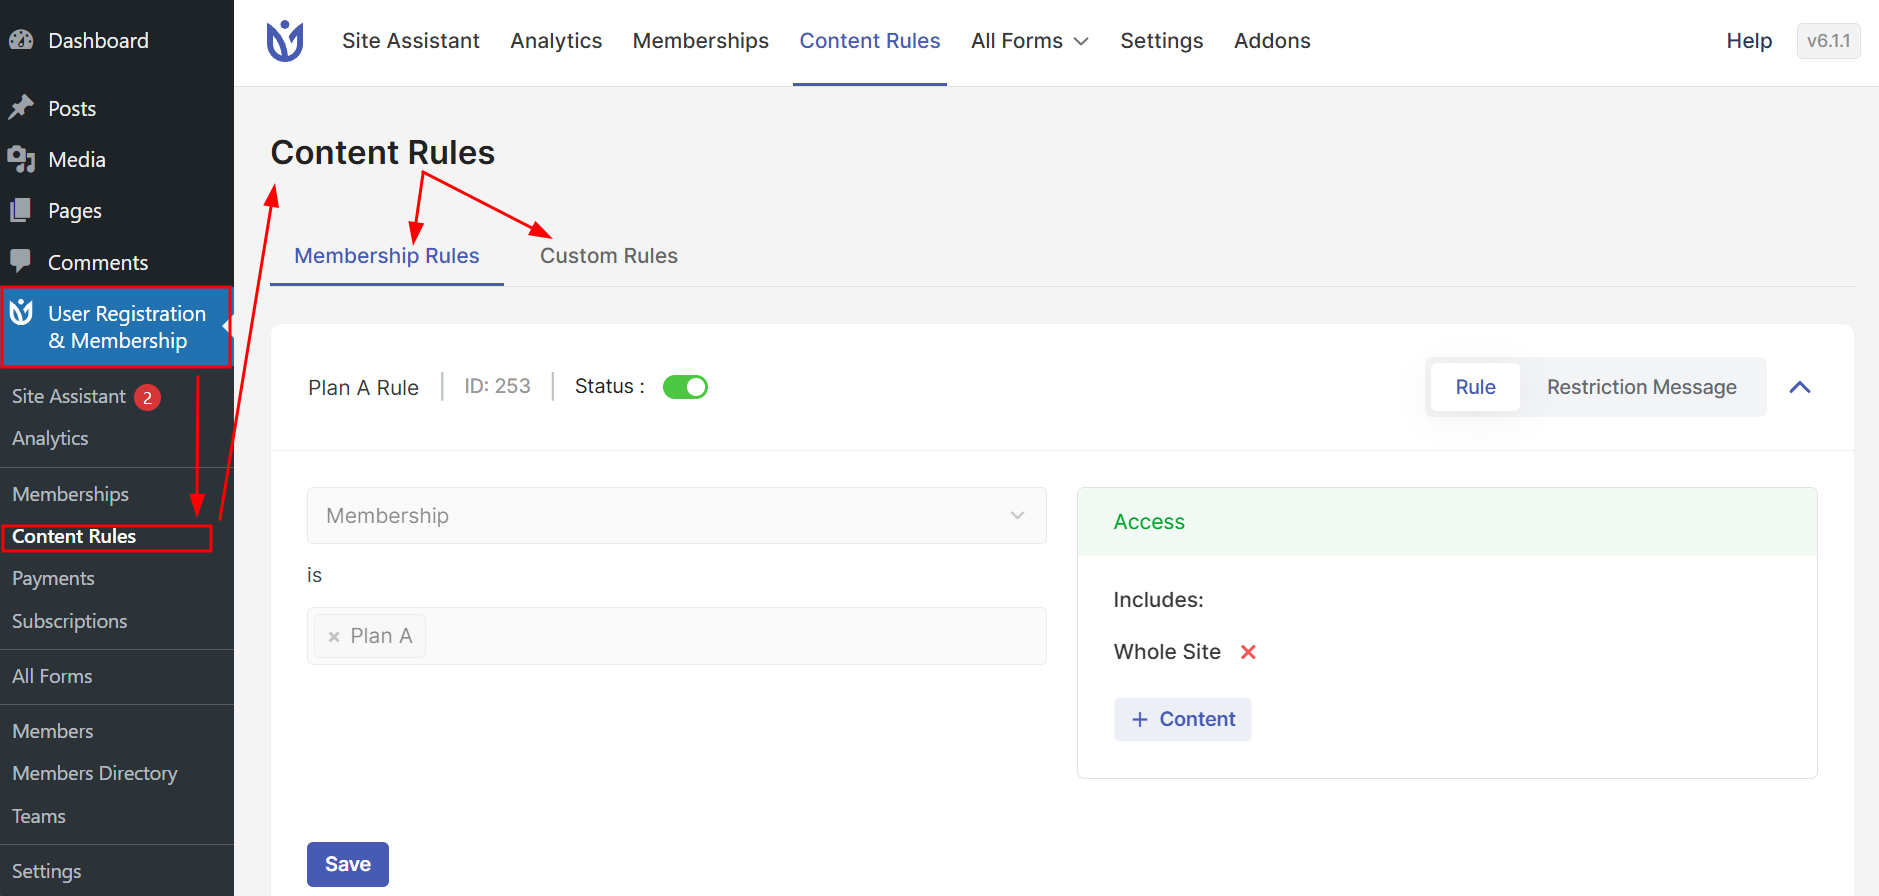
Once activated, a new submenu appears at: User Registration & Membership > Content Rules
The Content Rules screen includes two tabs:
Membership Rule: Rules that come from membership Access settings.
Custom Rules: Additional, flexible rules you create manually (PRO-only).
Membership Rules Tab (PRO)
The Membership Rules tab shows all content access rules created from memberships.
This is a centralized view of membership access.
Each rule corresponds to a Membership Access rule.
Editing a Membership Rule updates that membership’s access configuration.
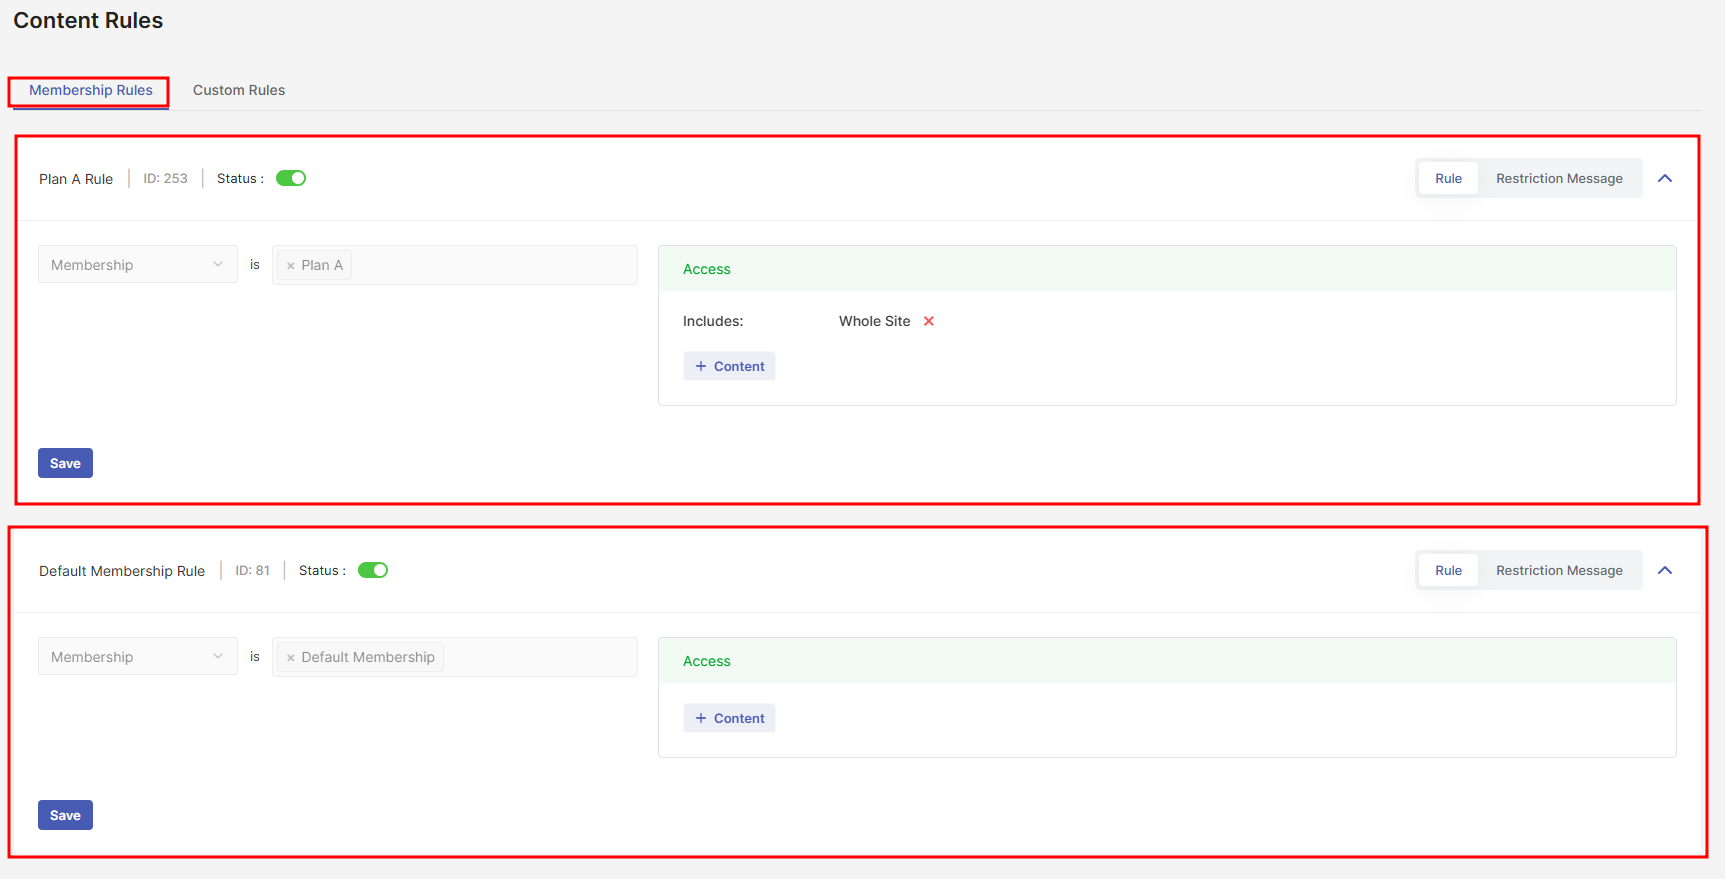
Each Membership Rule in the Membership Rules tab is divided into two main parts:
Rule
Restriction Message
These sections work together to define who gets access, what they can access, and what non-members see when access is restricted.
Membership Access and Membership Rules represent the same rules, viewed from different entry points.
Rule
The Rule section controls the actual access logic and is further divided into:
Condition
The Condition defines which membership plan the rule applies to.
Membership Rules always use Membership-based conditions
The condition is automatically set based on the membership plan
Non-membership conditions (roles, dates, fields, etc.) are not available here
You cannot create new rules directly from this tab. Only one Membership Rule is permitted per membership plan.
Access
The Access section defines what content is accessible when the membership condition is met.
From here, you can grant access to:
Whole site
Selected pages
Specific posts
Custom post types
Menu items
Taxonomies
Files
Custom URI
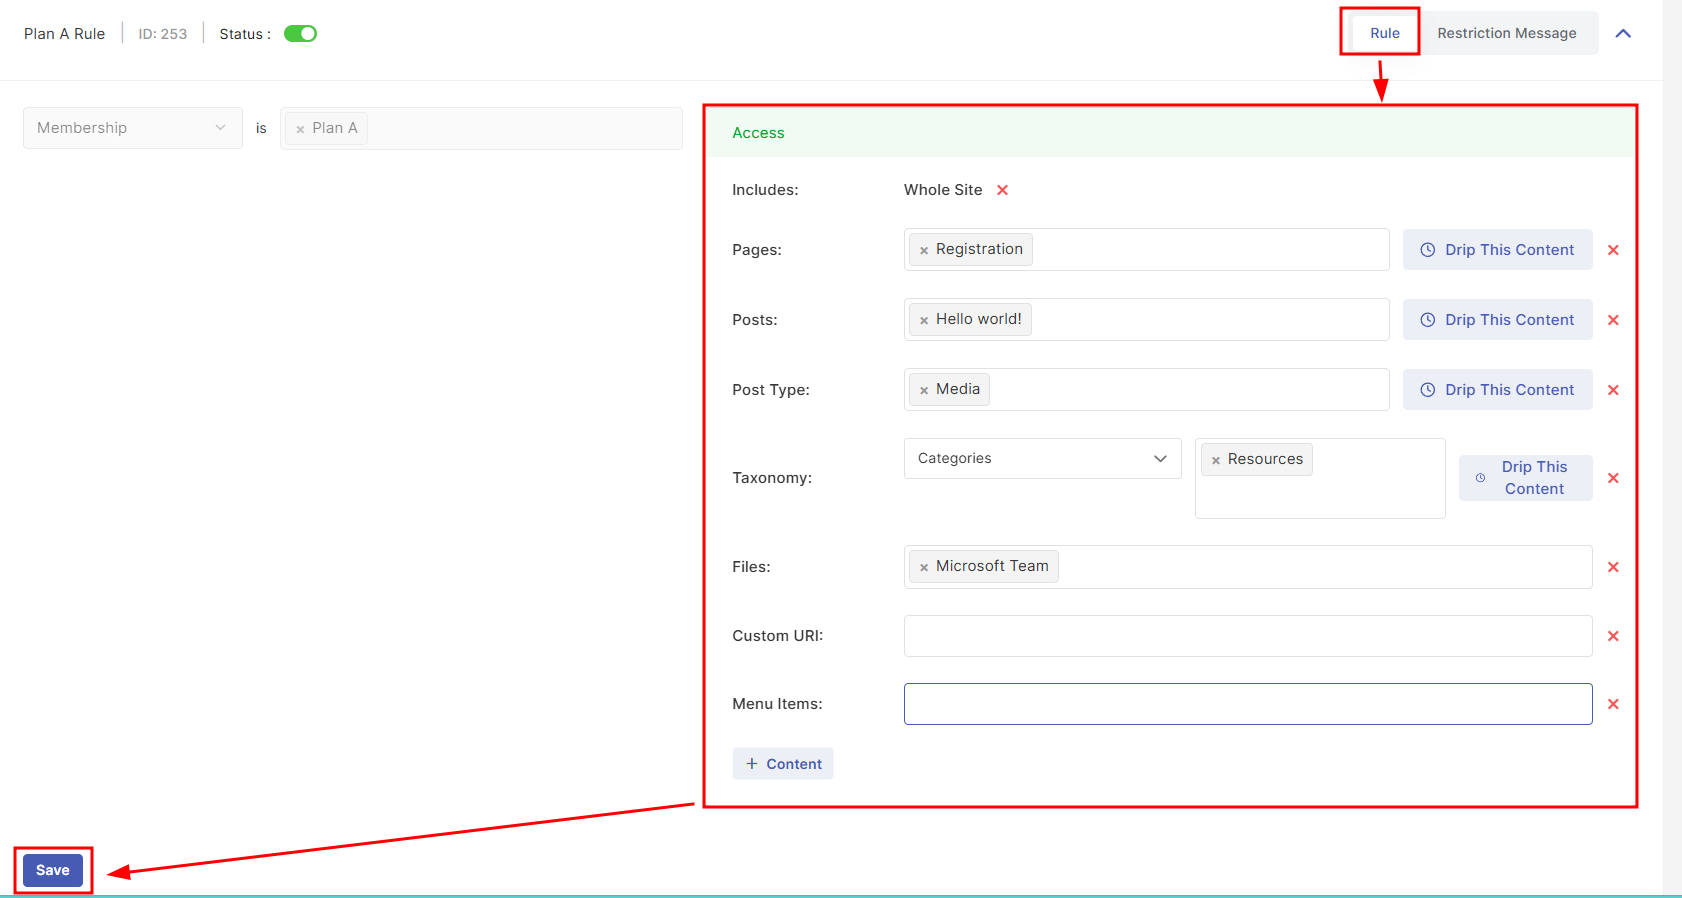
These access settings are identical to what you configure from Memberships > Individual Plan > Access.
Any change made here is reflected in the membership’s Access settings, and vice versa.
Restriction Message
The Restriction Message section controls what non-members see when they try to access protected content.
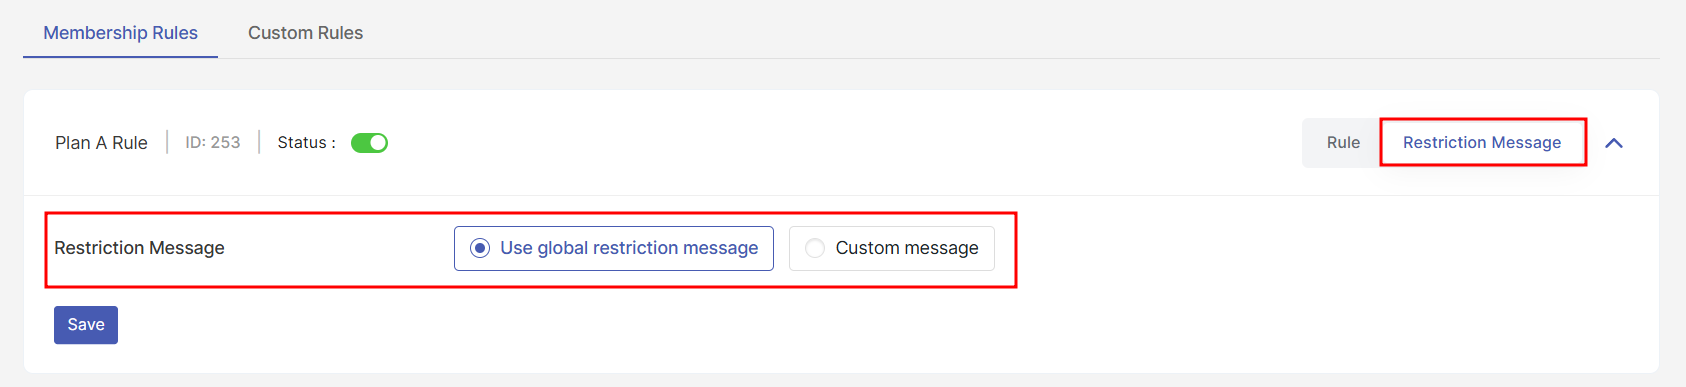
This message is shown when:
A user does not have the required membership to access the page or resource.
How it works:
Each membership rule can have its own custom restriction message
If left empty, the Global Restriction Message is used
If both are empty, a fallback message is displayed automatically
The Custom Message editor supports:
Smart tags for Login and Sign Up buttons
Formatting and links
Images and branding via Add Media
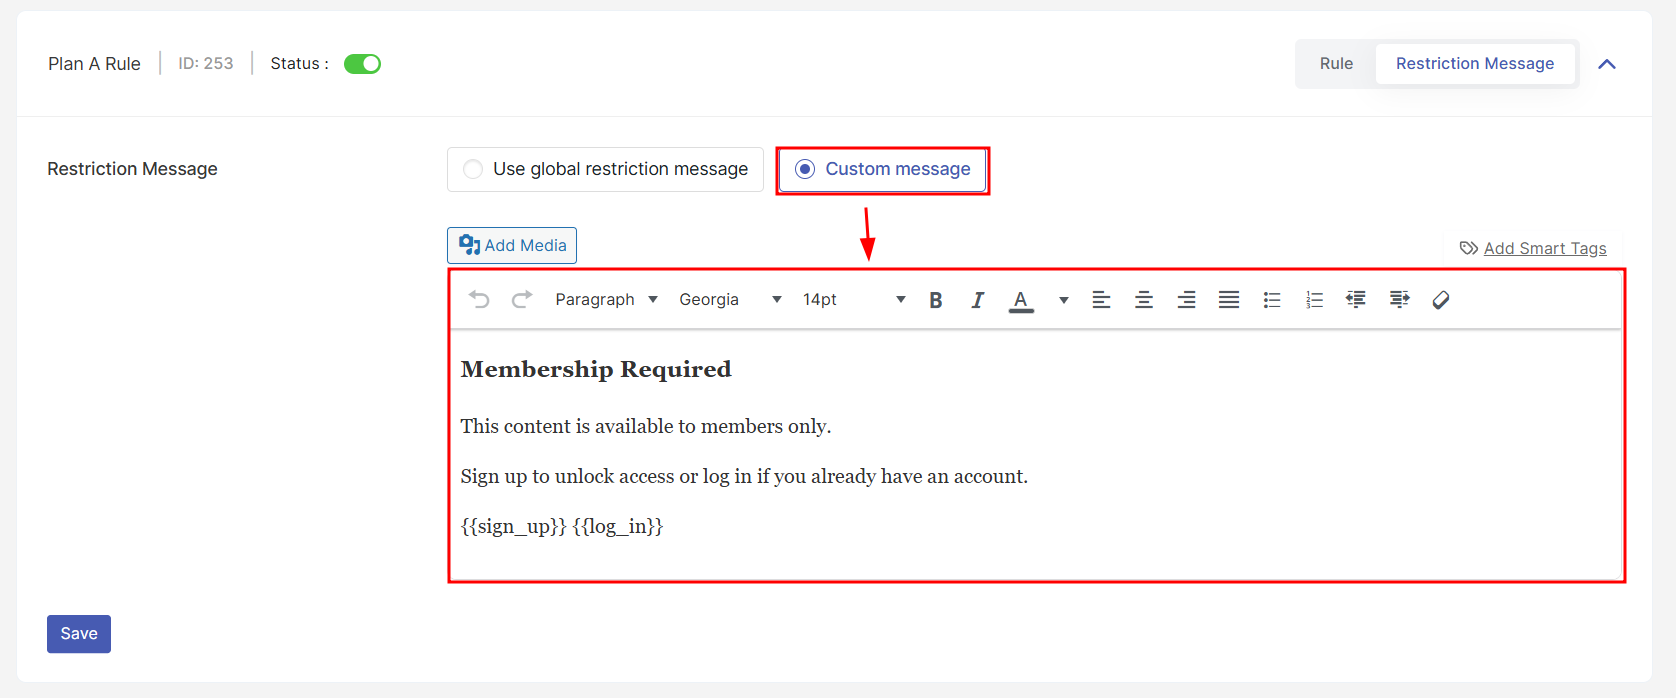
This allows you to tailor messaging per membership while still keeping a consistent site-wide default.
Custom Rules (PRO Only)
The Custom Rules tab lets you create standalone content restriction rules that are not tied to a specific membership. It allows you to restrict content using flexible conditions, actions, and logic.
Each rule has two main areas:
Rules tab (default):
Conditions – who the rule applies to
Access – which content is affected
Settings tab:
Action – what happens when access is blocked
Restriction Message – what to show if the action is “Show Message.”
Advanced Logic – how multiple conditions are evaluated (Custom Rules only)
Create a Custom Rule
Go to Content Rules > Custom Rules
Click Add Rule
Enter a rule name and click Continue.
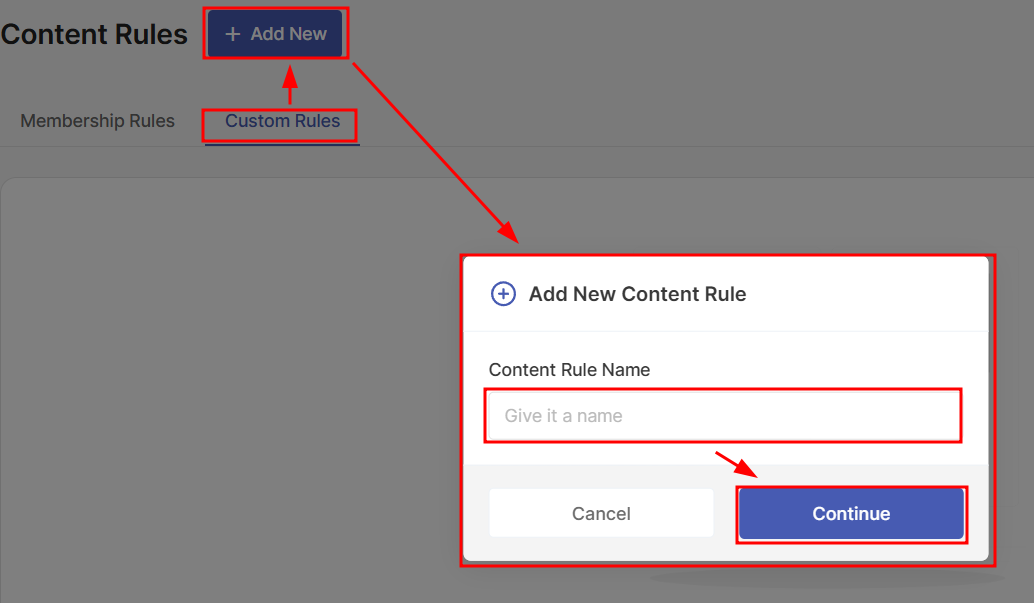
When you open or create any rule (especially in Custom Rules), the Rules tab is selected by default.
This tab has two key sections:
Condition
Access
Conditions in Custom Rules
Conditions define who the rule applies to. You can add one or more conditions and, for Custom Rules, later refine how they interact via Advanced Logic.

Custom Rules support conditions such as:
Logged-In State
This condition applies the rule based on whether the user is authenticated.
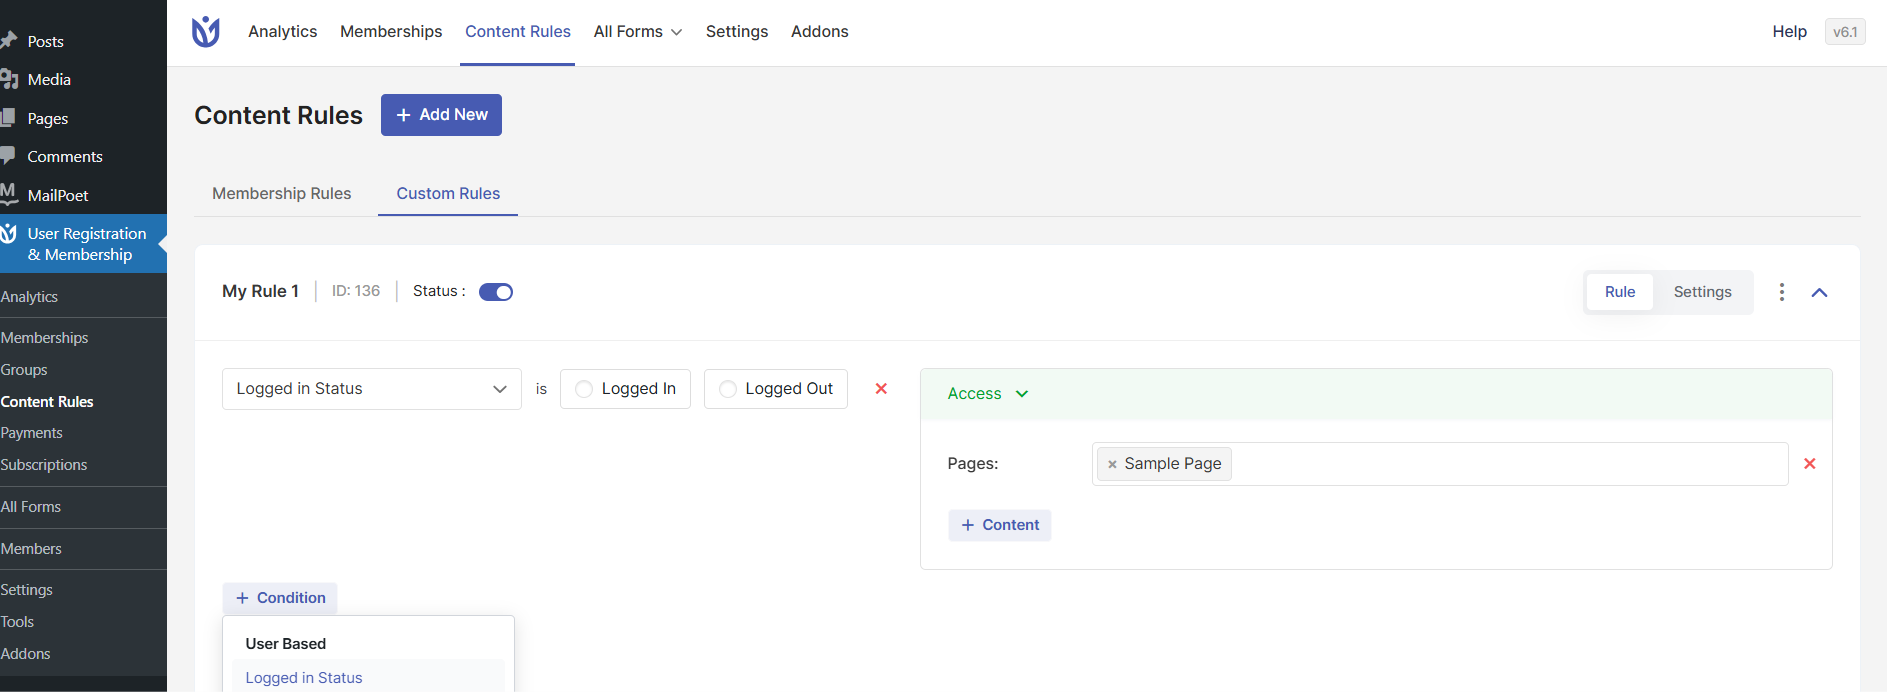
Options:
Logged In
Logged Out
Use this when:
You want to block content from visitors who are not logged in
You want to show different behavior for guests and registered users
You want to redirect logged-out users to a login or sign-up page
This condition is evaluated before membership or role checks.
User Role
This condition applies the rule based on the user’s WordPress role.
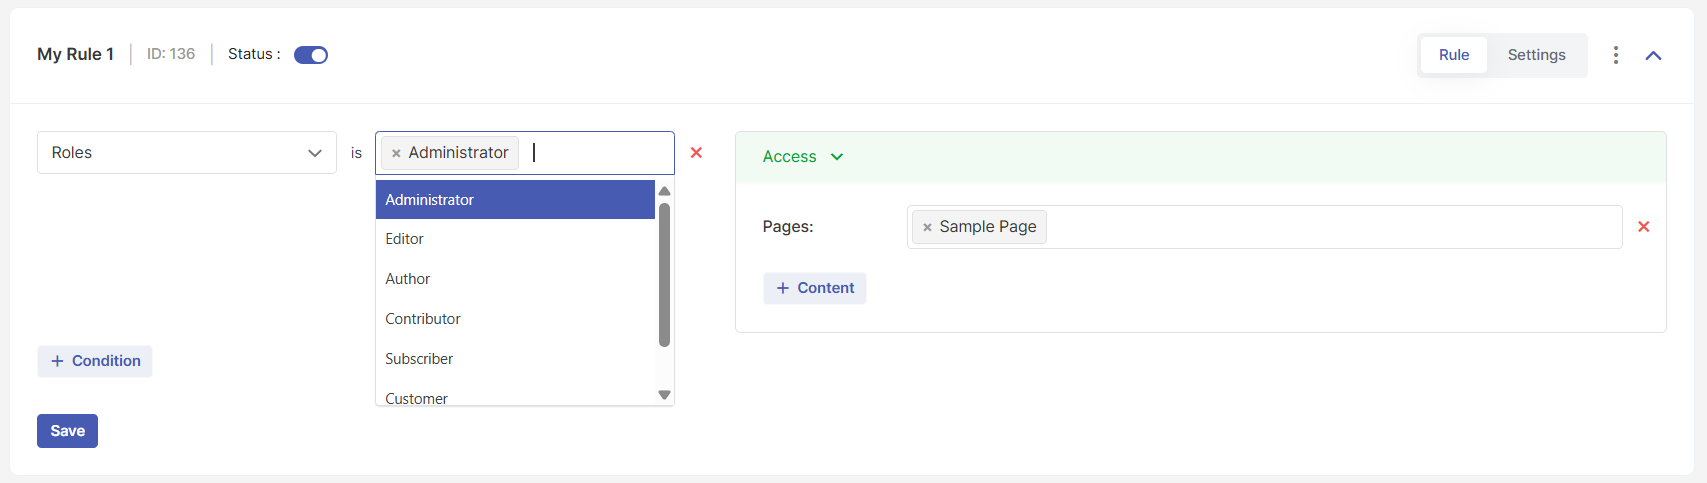
Examples:
Subscriber
Contributor
Author
Editor
Administrator
Any custom role added by plugins or themes
Use this when:
Access should depend on WordPress roles rather than memberships
You want to exclude administrators or editors from restrictions
You are managing internal or editorial access
This condition checks the user’s current role, not their membership.
User Registration Date
This condition applies the rule based on when the user registered.
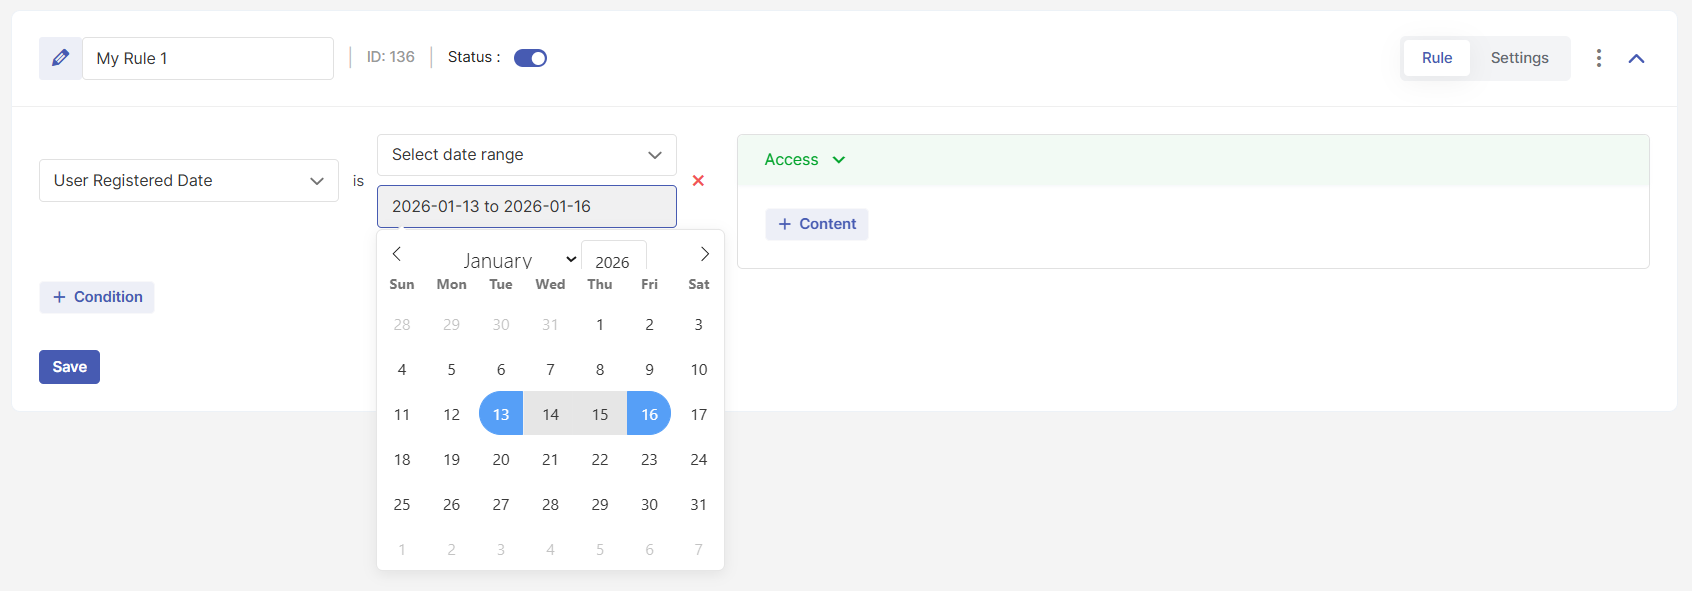
You can target:
A specific date
A date range
Use this when:
Access should be limited to users who joined during a specific period
You want to run time-bound campaigns or early-access programs
You need different rules for old vs new users
This condition is evaluated using the user’s original registration timestamp.
Period After Registration
This condition applies the rule based on the number of days before or after a user registered.
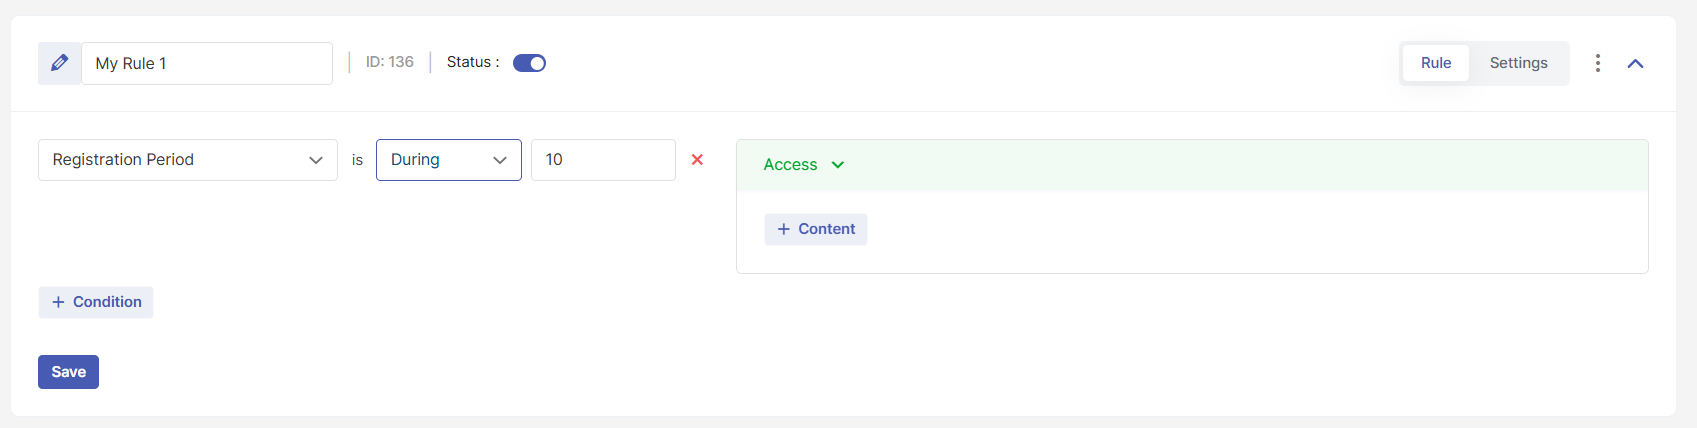
Examples:
More than 7 days after registration
Less than 3 days after registration
Use this when:
You want to delay access for new users
You want to create trial-like or onboarding restrictions
Access should unlock gradually based on account age
This condition is dynamic and updates automatically as time passes.
Email Domain
This condition applies the rule based on the email domain used during registration.
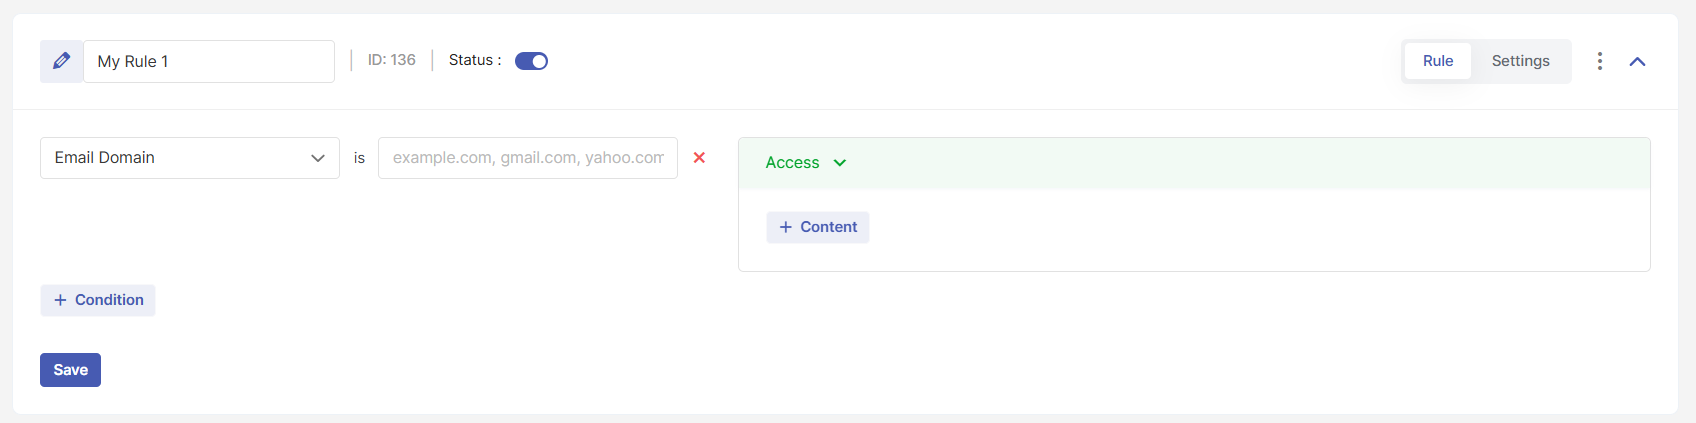
Examples:
gmail.com
company.com
edu
Use this when:
Access should be limited to users from specific organizations
You want internal or partner-only content
You want to restrict access based on business email domains
Only the domain portion of the email address is evaluated.
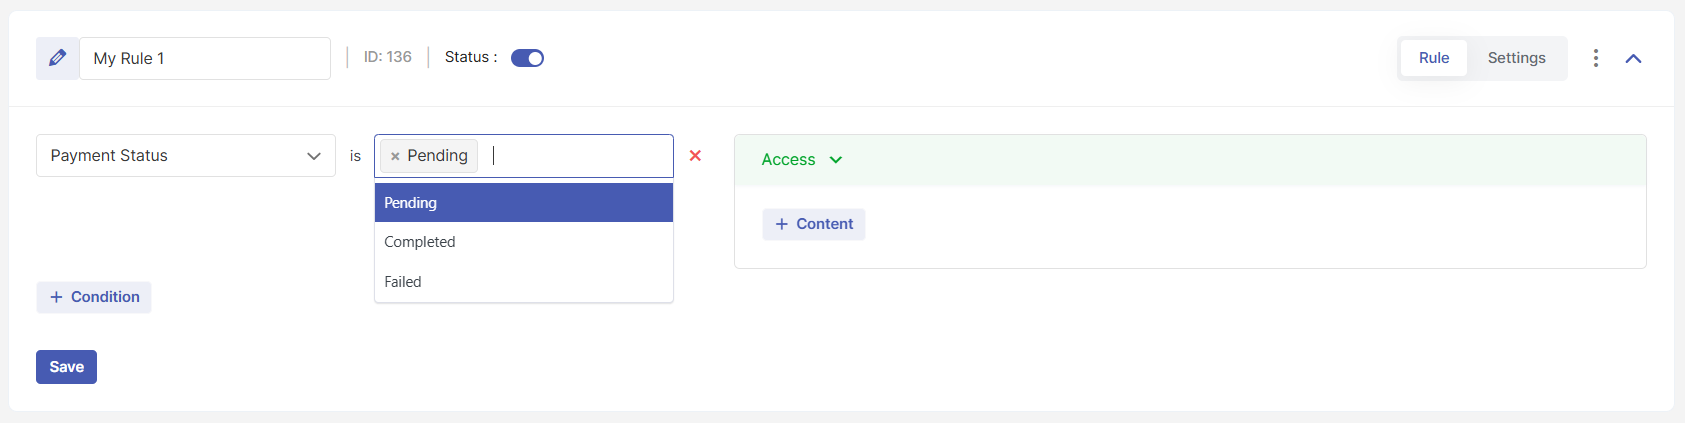
Payment Status
This condition applies the rule based on the user’s payment state.
Examples:
Completed
Pending
Failed
Refunded
Use this when:
Access should depend on successful payment
You want to block users with failed or refunded payments
Content should unlock only after payment completion
This allows you to restrict content based on payment state without tying it directly to a membership plan.
Capabilities
This condition applies the rule based on WordPress capabilities assigned to the user.
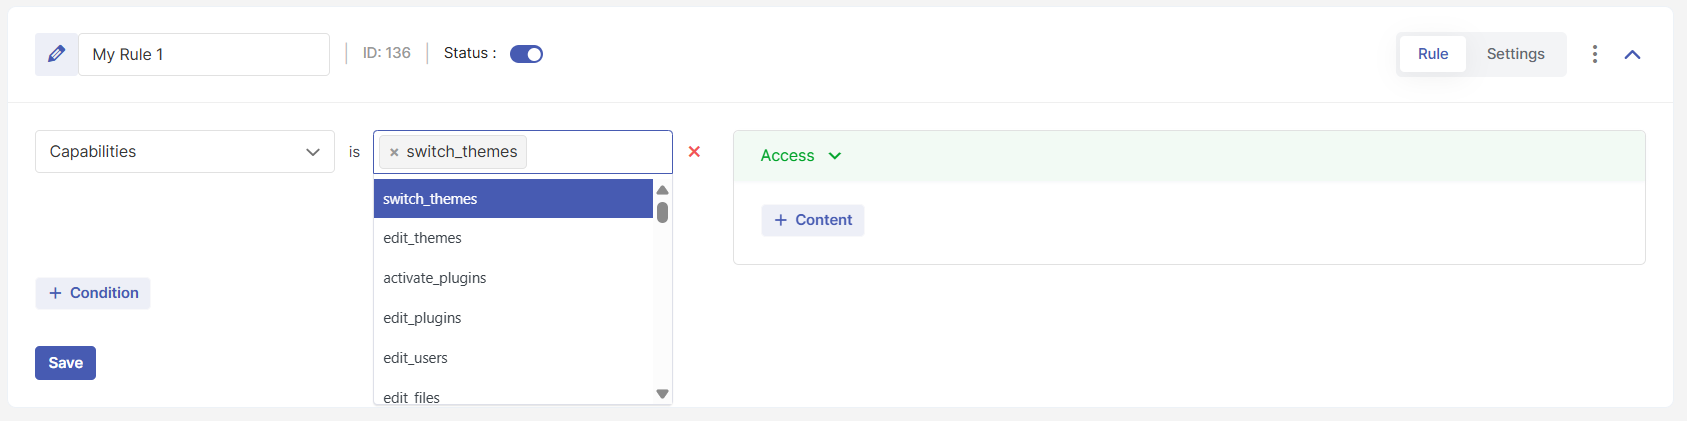
Examples:
edit_posts
publish_posts
manage_options
Use this when:
You need fine-grained control beyond roles
You are working with custom roles and permissions
Access should depend on specific permissions
Capabilities provide more precision than roles but require familiarity with WordPress permissions.
Registration Source
This condition applies the rule based on how the user registered.
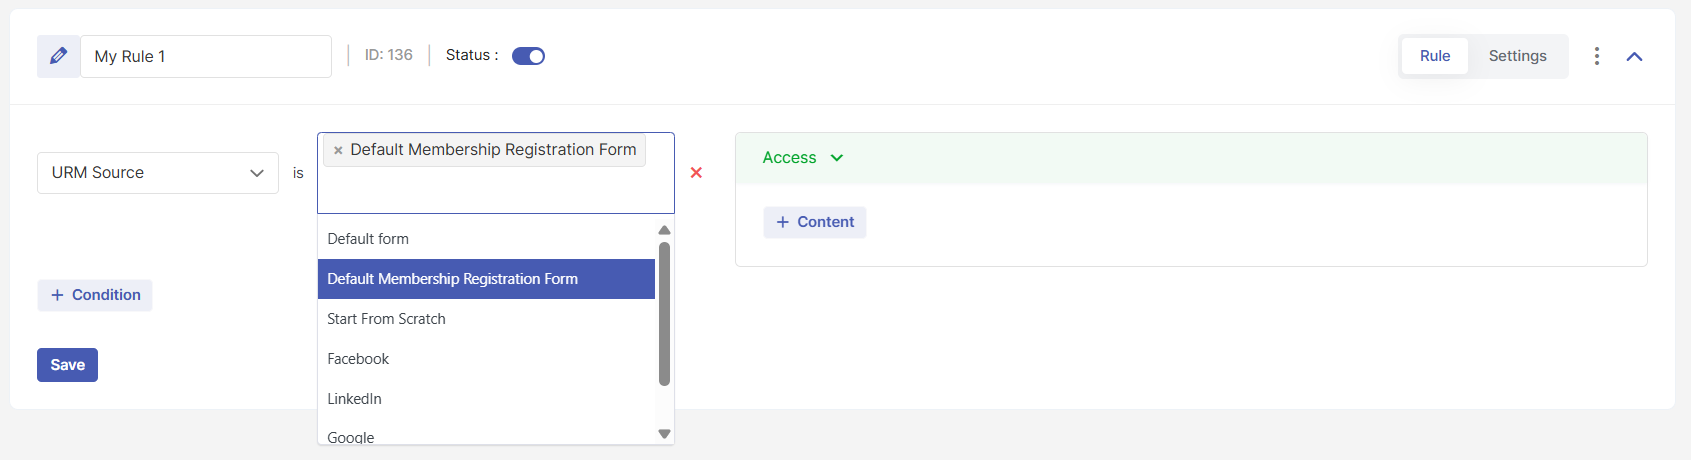
Examples include:
Specific User Registration forms
Social login methods (via Social Connect add-ons)
Use this when:
Different registration forms serve different user types
Social users should have different access rules
You want form-specific access logic
This condition helps segment users based on signup intent.
URM Field
This condition applies the rule based on values submitted in custom registration form fields.
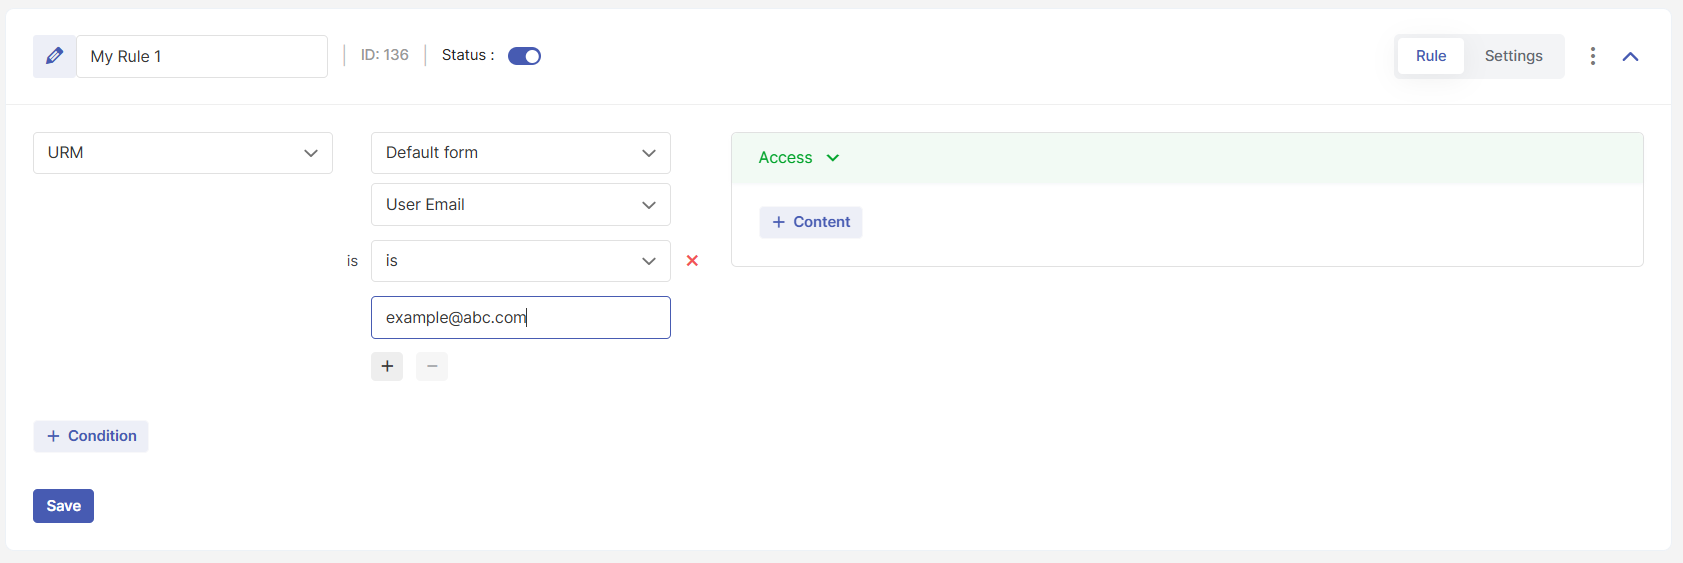
Examples:
Country
Company name
Account type
Custom dropdown or checkbox values
Use this when:
Access should depend on user-provided data
You want location-based or preference-based access
Memberships are not granular enough for your logic
The rule evaluates the stored field value, not the field label.
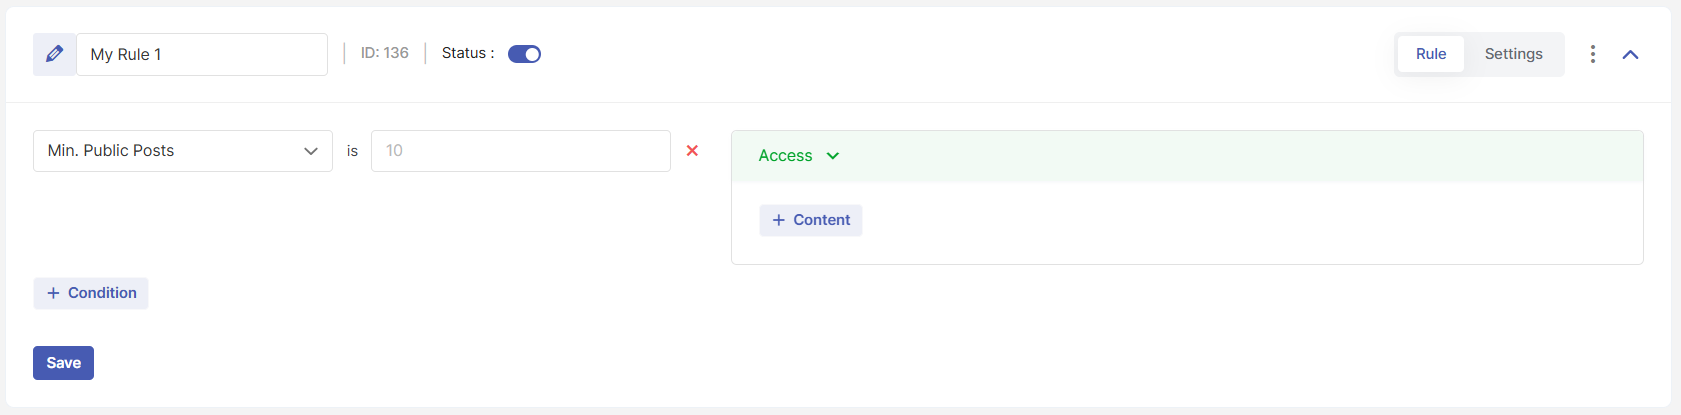
Minimum Public Posts
This condition applies the rule based on how many public posts a user has published.
Examples:
At least 5 posts
At least 10 posts
Use this when:
Access should reward participation or activity
You want contributor-based unlocks
Content should be available only to active users
Only public posts are counted.
Access in Custom Rules
Access defines what content is affected when the conditions match. Custom Rules use the same Access selector as Membership Rules, ensuring consistency
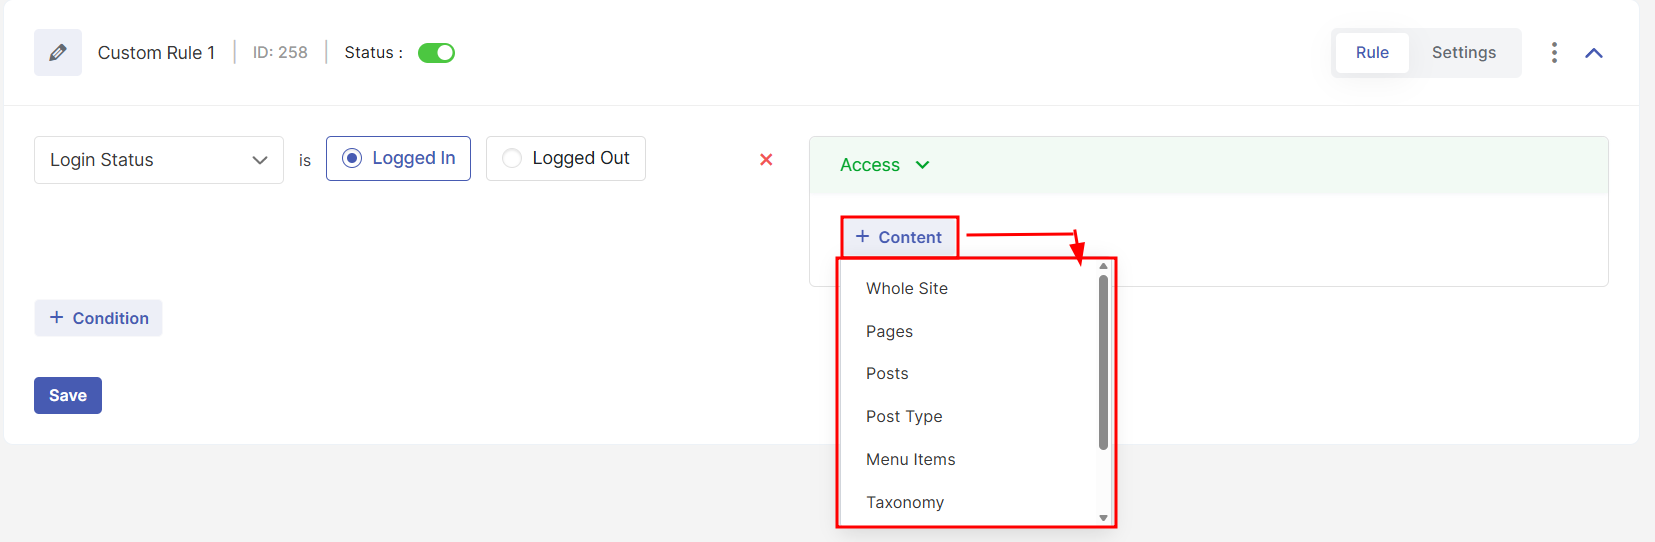
Once you define Conditions and Access, switch to the Settings tab to control what happens when the rule matches.
Actions
The Action determines what happens when a user attempts to access protected content but does not meet the rule conditions.
By default, Show Message is selected. But you can change the action depending on how you want to guide users.
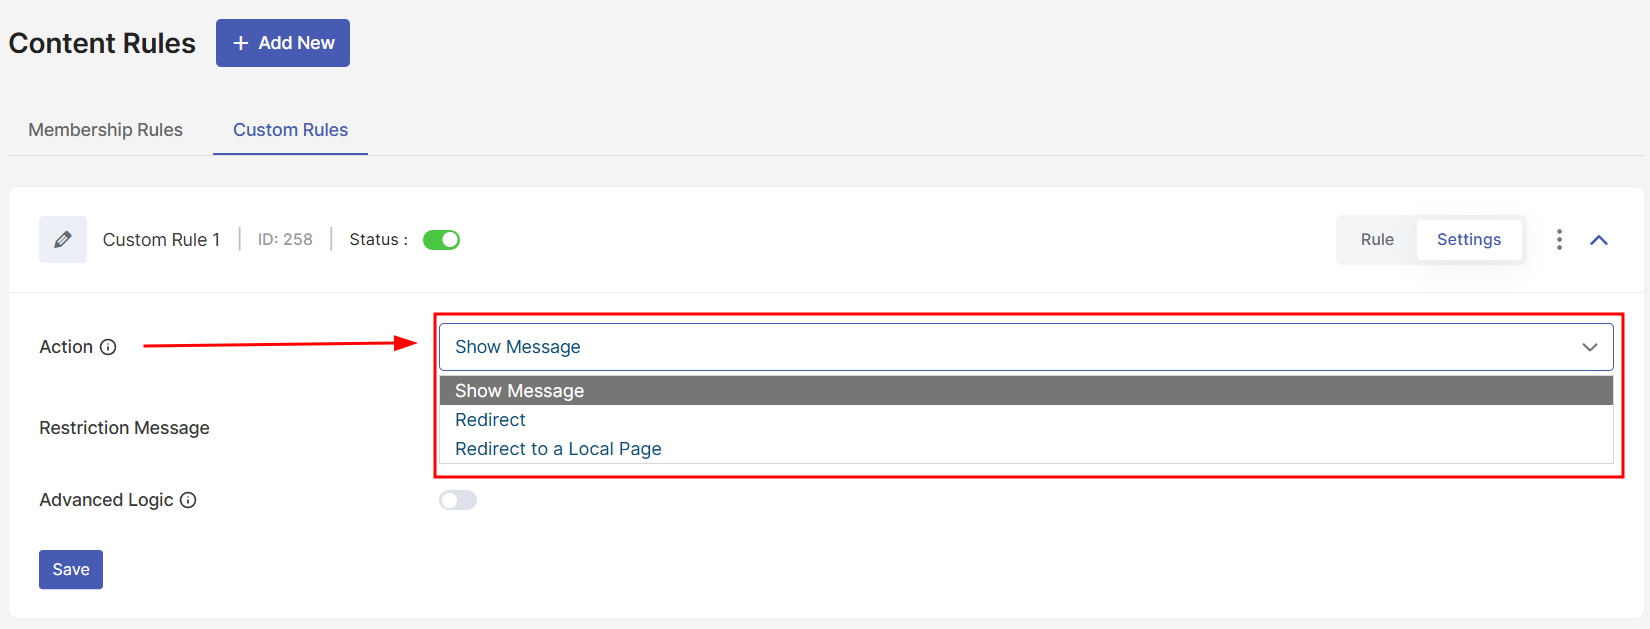
Show Message (Default)
This action displays a restriction message directly on the page where access is blocked. It is the most commonly used option and works well when you want to:
Explain membership or access requirements
Inform users why the content is restricted
Encourage them to log in or sign up
The actual message shown to users is configured under Restriction Message.
Restriction Message
The Restriction Message section decides what text is shown when the Action is set to Show Message.
You have two modes:
Global Message
Custom Message
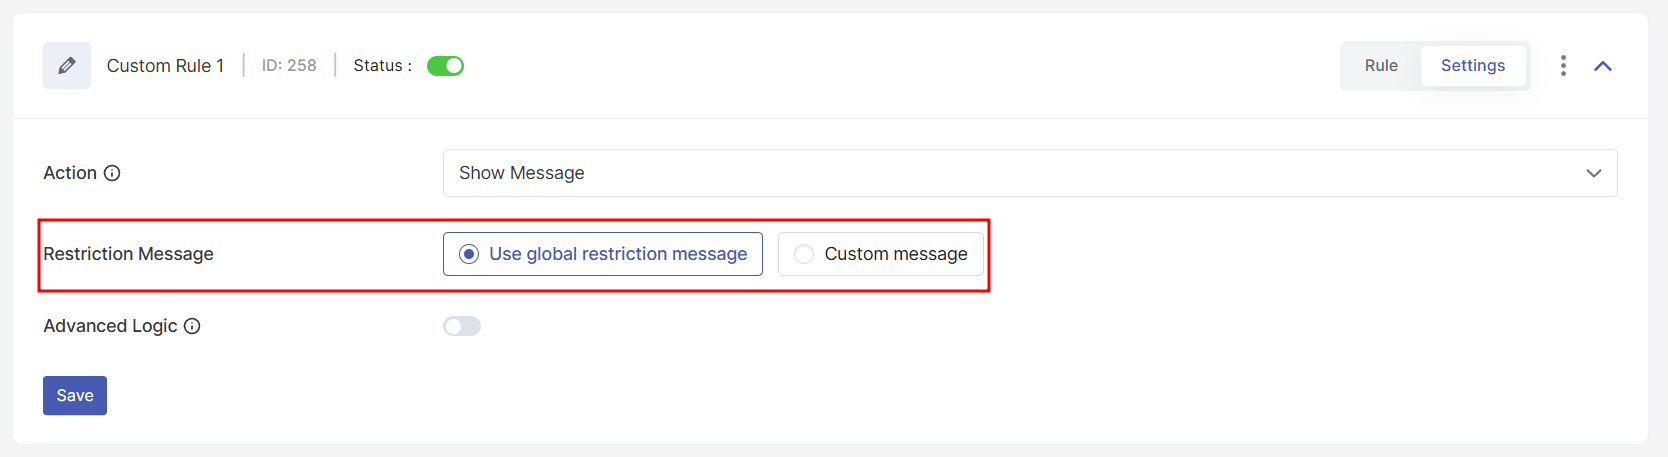
Global Message
The Global restriction message is a shared message used by multiple rules.
It is configured from:
User Registration & Membership > Settings > Membership > Content Rules
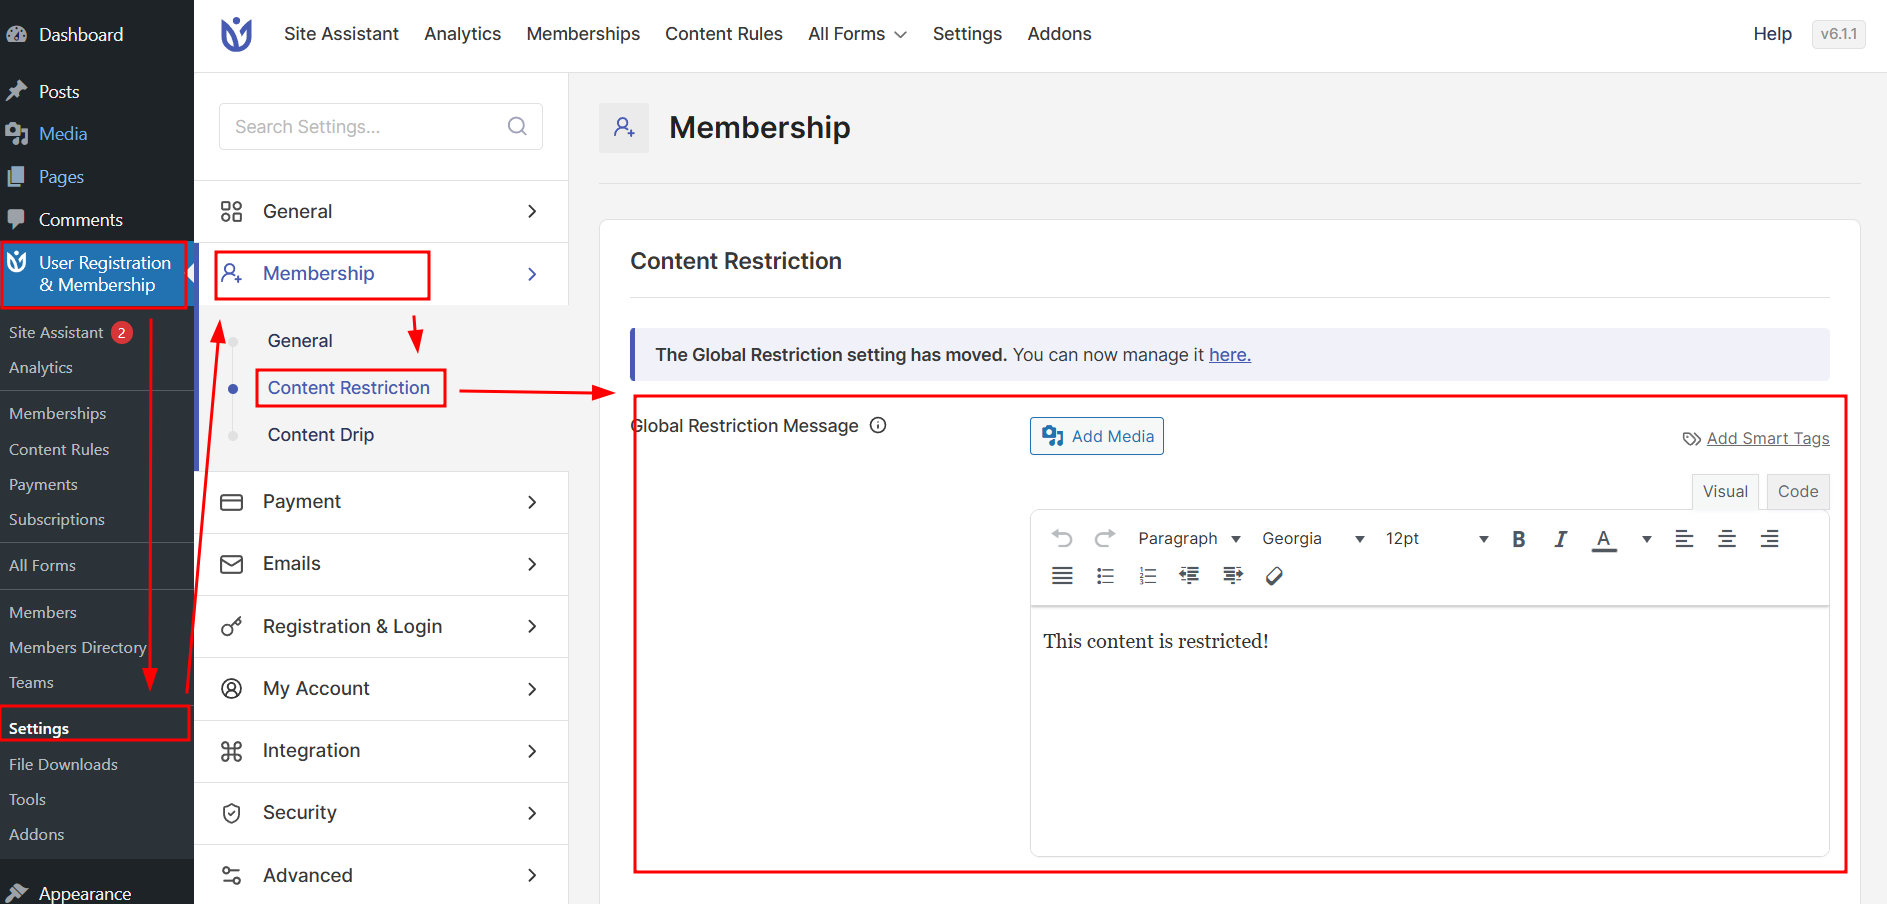
You might use this to show a generic message like:
“This content is for members only. Please log in or upgrade your membership to access it.”
Choose Global Message in a rule when:
You want consistent messaging across your site
You don’t need rule-specific wording
If a rule is set to use the Global Message, it will always pull from that central setting.
Custom Message
A Custom Message lets you override the global message for this specific rule.
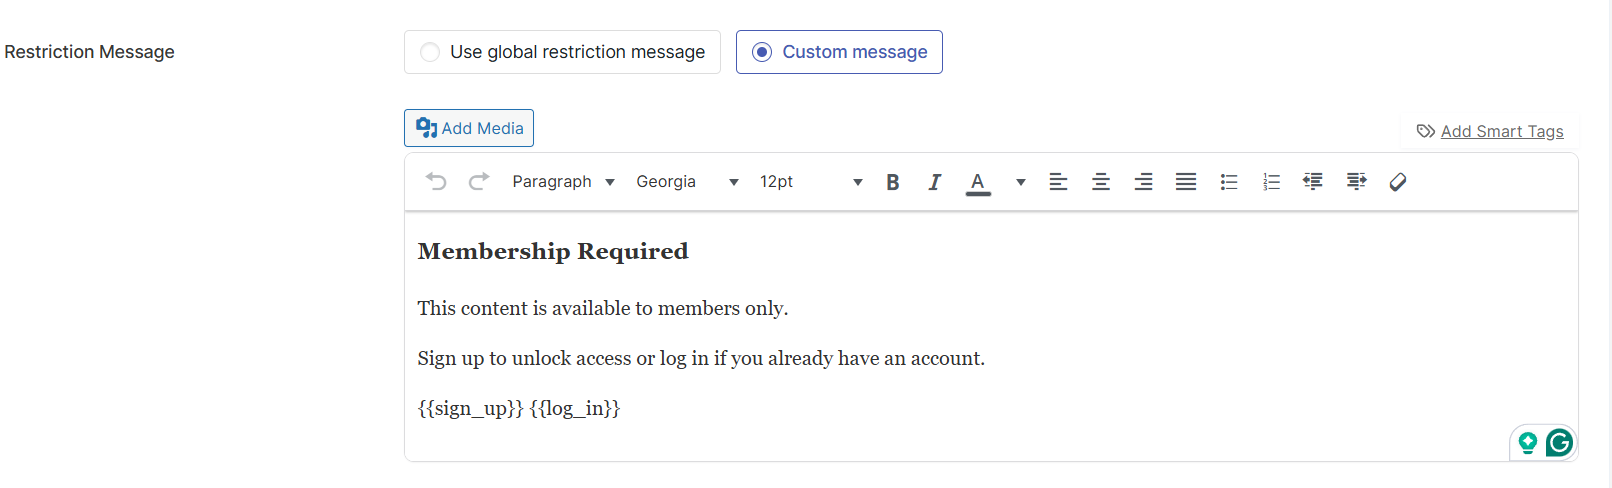
Use Custom Message when:
The rule’s context is unique (for example, “This course is only for Gold members.”)
You want a more targeted call to action
Different content segments require different explanations
Behavior:
If the Custom Message is selected and filled, it overrides the Global Message.
If the Custom Message is selected but left empty, the plugin falls back to the Global Message.
If both Global and Custom are empty, a built-in fallback message is shown so users are never left confused.
The message editor supports:
Smart tags (for example, Login button, Sign Up button)
Formatting (headings, lists, links)
Images and logos via the Add Media button
This lets you create branded, on-point restriction experiences.
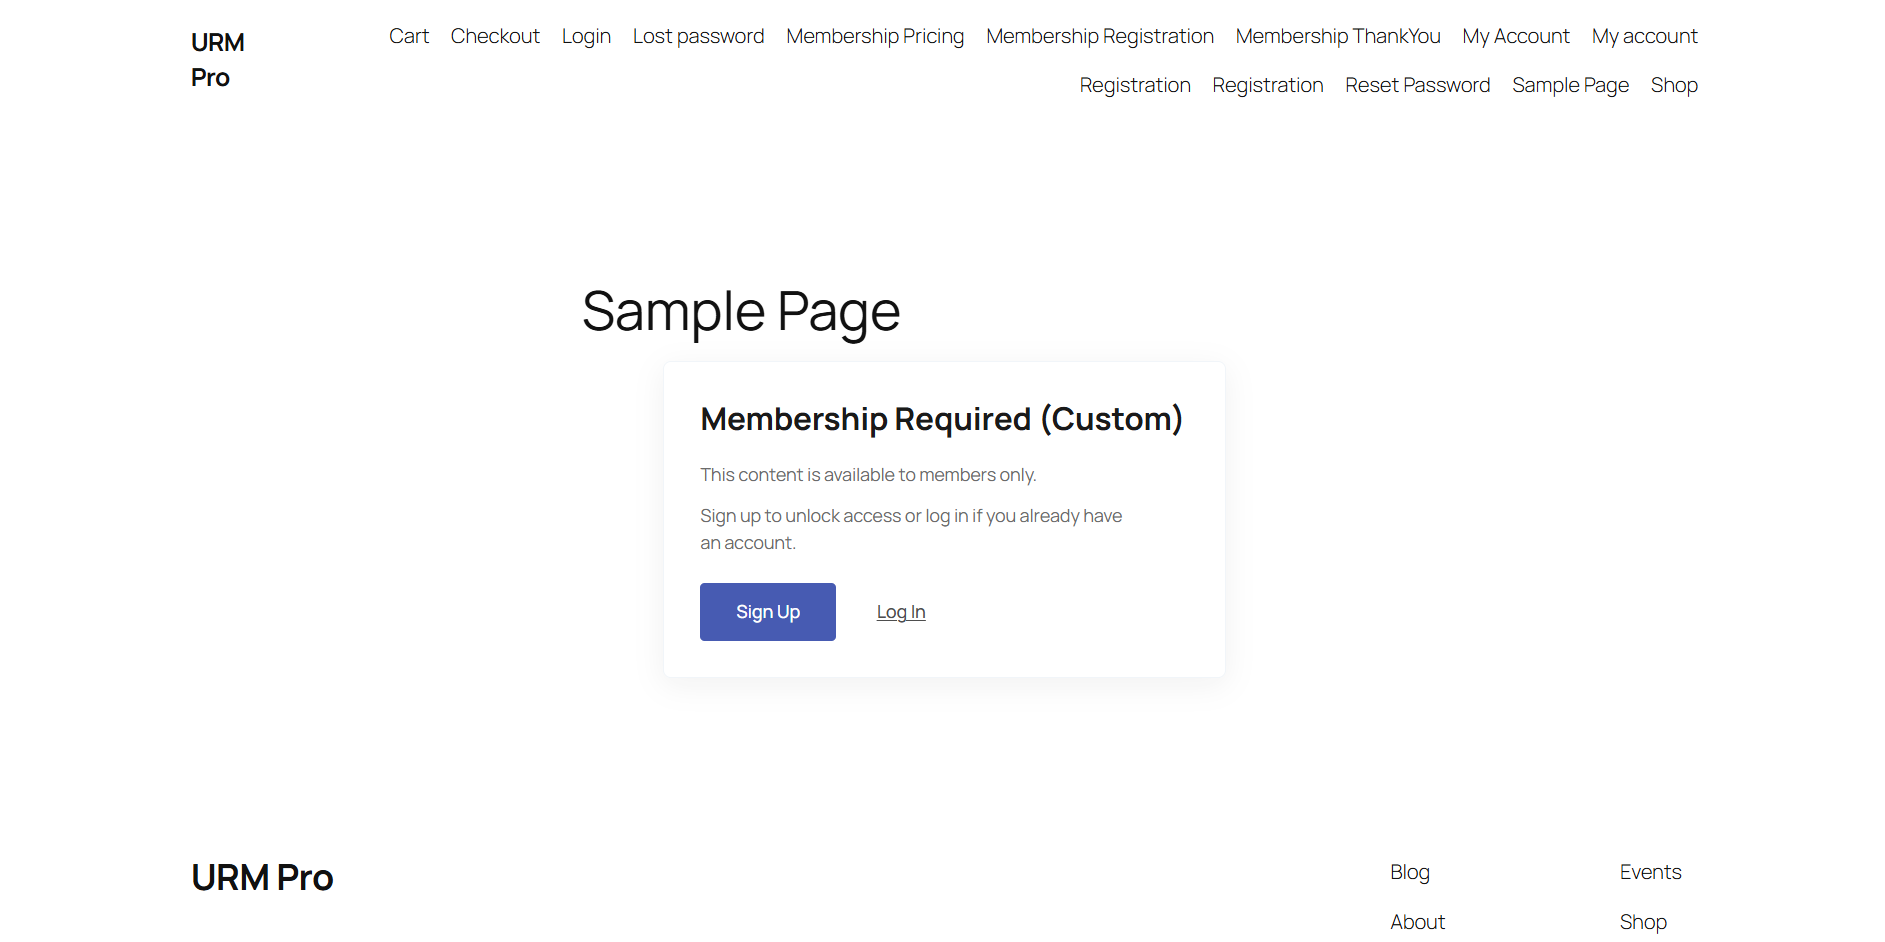
Frontend Display
Our message appears on the frontend as shown below:
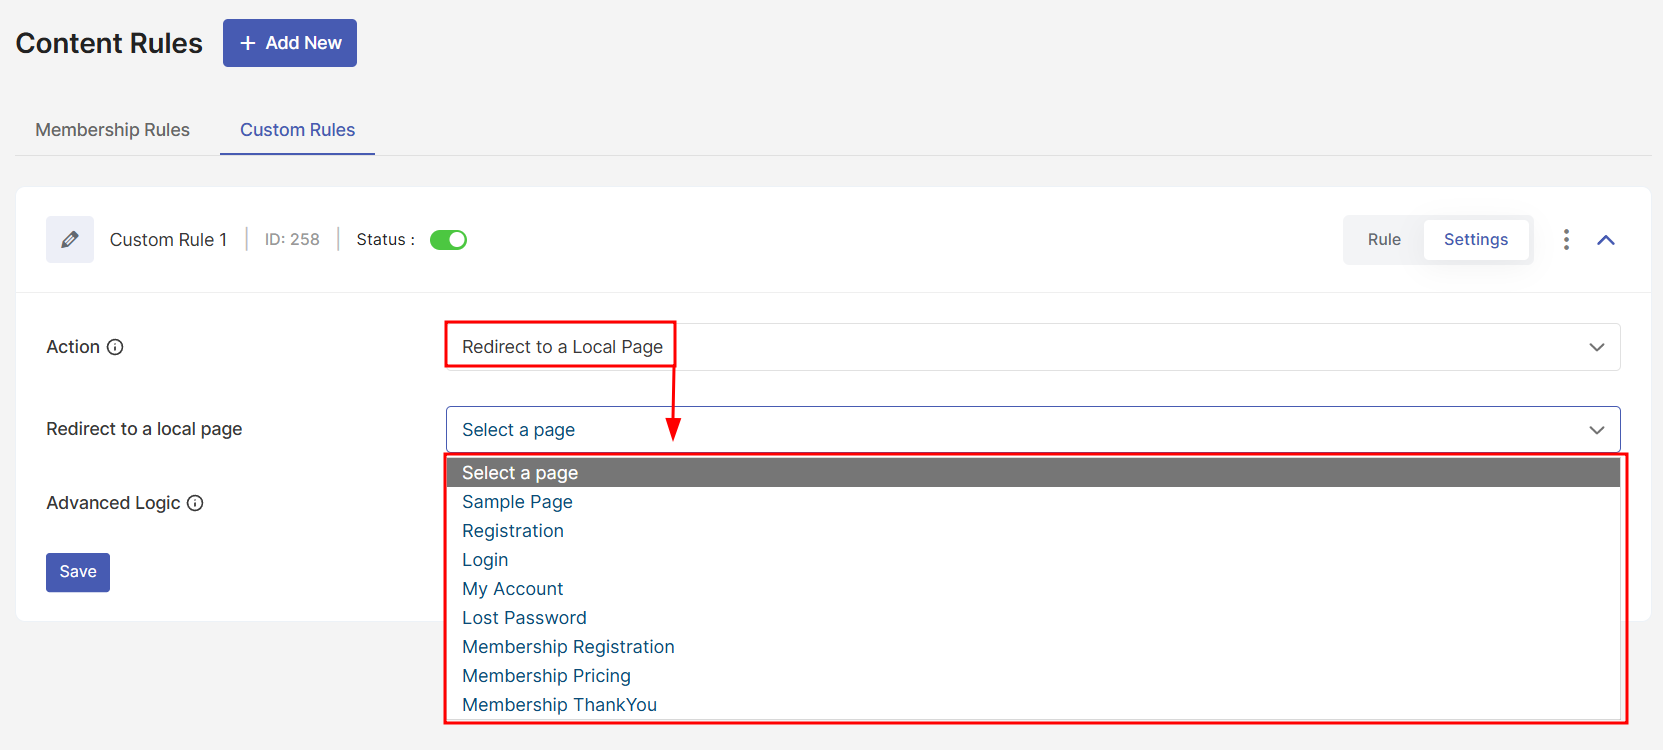
Redirect to Local Page
Instead of showing a message, you can redirect users to a specific page on your site when access is restricted.
Select a page from the dropdown
Common use cases:
Redirect non-members to a Pricing / Plans page
Redirect logged-out users to a Login page
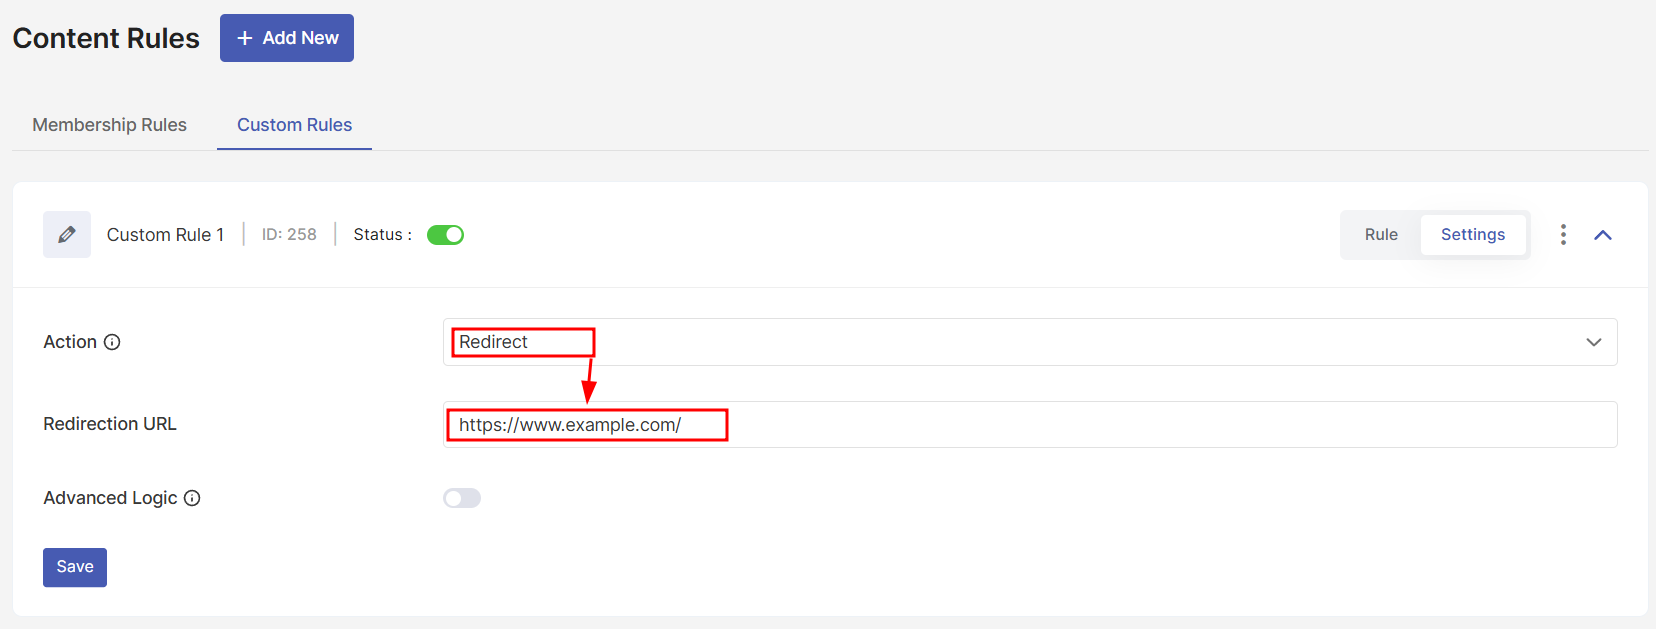
Redirect to Custom URL
Redirects the user to a fully custom URL, internal or external. Enter the full URL (including https://) under the Restriction URL.
Use this when:
Your funnel/checkout lives on a separate domain
You’re running a special landing or campaign page
You need a URL that isn’t listed as a normal page
Advanced Logic (Custom Rules Only)
Advanced Logic controls how multiple conditions are evaluated inside a rule.
Available for Custom Rules
Not available for basic Membership Rules
By default, Advanced Logic is disabled. In that case, all conditions use a simple AND logic:
The user must meet all conditions for the rule to apply.
Enabling Advanced Logic
Go to Custom Rule > Settings and enable the Advanced logic toggle.
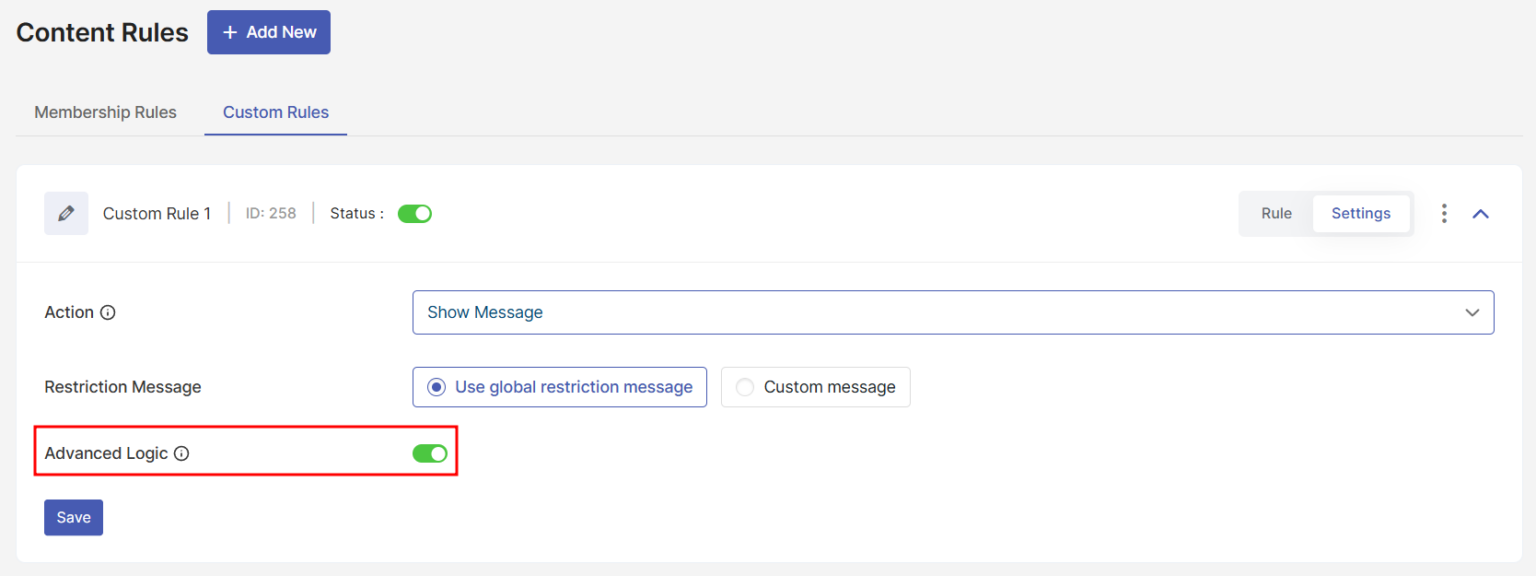
Using Advanced Logic
When you enable Advanced Logic in the Settings tab, you can:
Group conditions
Choose different logic gates for each group
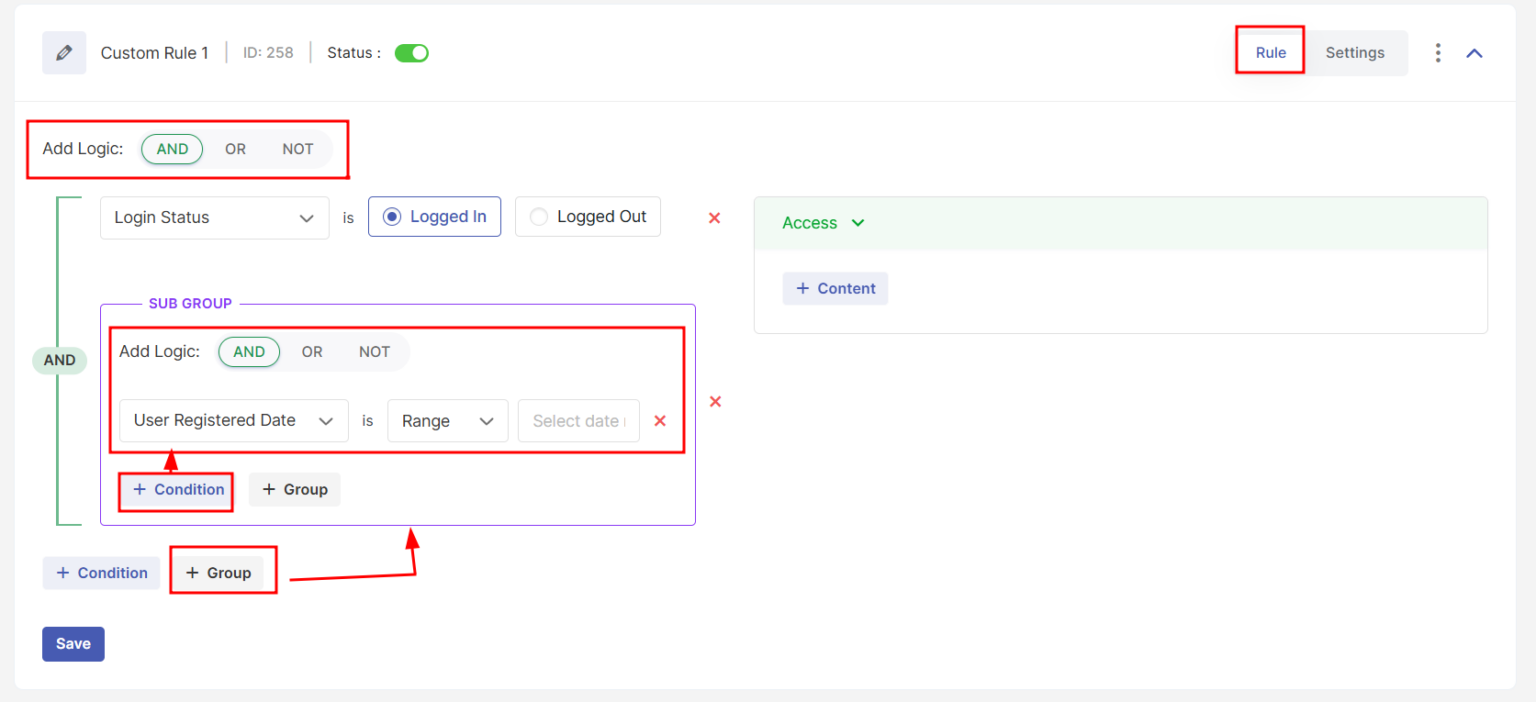
Supported logic gates:
AND – All conditions in the group must be true
OR – At least one condition in the group must be true
NOT – Used to exclude users that match certain conditions
Example scenarios
Logged in OR registered between specific dates
Grant access to a category but NOT to users with a certain role
Target users from a specific email domain AND with a completed payment
Notes & Best Practices
Use multiple, smaller rules instead of one huge, complex rule whenever possible.
Before turning Advanced Logic off, flatten your groups back to a simple AND structure to avoid confusion.
Remember: Membership Rules always use simple AND logic; Advanced Logic is only for Custom Rules.
Best Practices for Content Restriction
Use Membership Access for standard membership-based protection
Use Custom Rules when access should not depend on memberships
Create multiple focused rules instead of overcrowding one
Disable unused rules instead of deleting them
Keep logic readable to avoid conflicts
Content Restriction: Free vs PRO Summary
Capability | Free | PRO |
|---|---|---|
Membership-based content access | ✅ | ✅ |
Membership > Access section | ✅ | ✅ |
Content Rules menu | ❌ | ✅ |
Membership Rules overview | ❌ | ✅ |
Custom content rules | ❌ | ✅ |
Advanced logic (AND / OR / NOT) | ❌ | ✅ |
File download protection | ❌ | ✅ |